Amcrest ATC-801 Скачать руководство пользователя страница 10


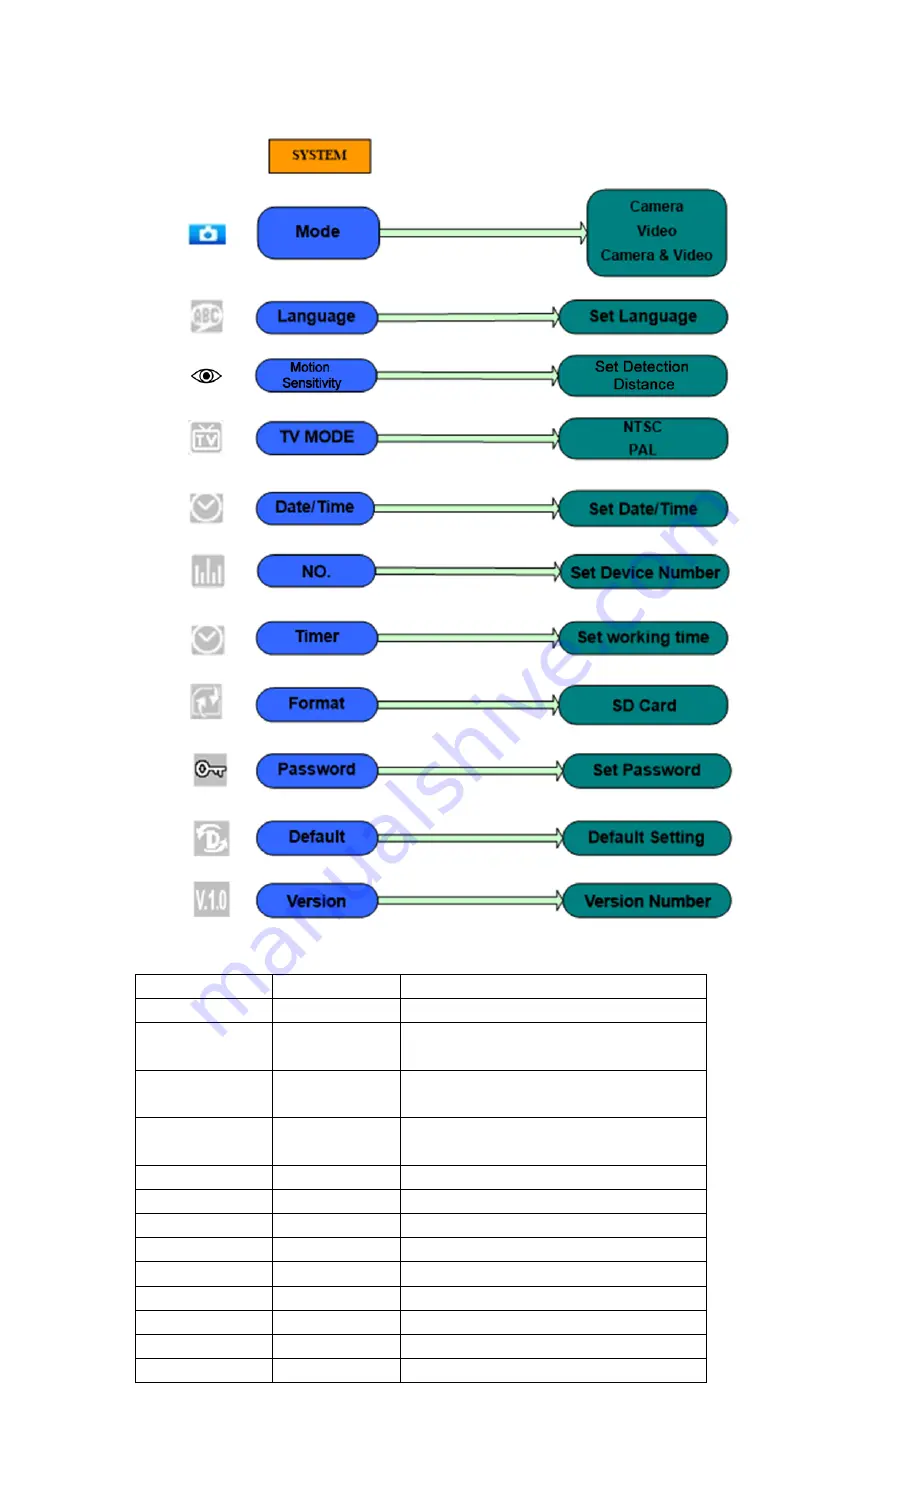
4.1.3 System Setting 


4.1.4 Default 

Default Settings are listed as below: 

Setting 

Default 

Options 

Mode 

Camera 

Camera, Video, Camera & Video 

Language 

English 

English, French, German, Spanish and 

Russian 

Motion Sensitivity 

High 

Low (7 meters), Medium (15 meters), High 

(20 meters) 

Resolution   

(Camera) 

8M 

8M,5M,3M 

Interval 

5 Seconds 

5-30 Seconds,1-30 Minute 

Multi 

Single 

Single,3,6,9 Pictures 

ISO 

Auto 

Auto,100,200,400 

Resolution(Video) 

720P 

720P,WVGA,QVGA 

Video Length 

10s 

10s,30s,60s,90s 

Date/Time 

Same Date/Time 

YY/MM/DD,MM/DD/YY,DD/MM/YY    Adjust 

NO. 

CAM 000 

6 Alphanumeric Characters 

Timer 

0:0:0 to 23:59:59 

Adjust 

Format 

SD Card 

SD Card 

Содержание ATC-801

Страница 1: ...Digital Game Trail Hunting Camera User Manual ATC 801 Version 1 1 3...

Страница 2: ...Images or Videos 5 3 5 Power Off 5 4 Advanced Operations 6 4 1 Settings Menu 6 4 1 1 Photo Settings 7 4 1 2 Video Setting 7 4 1 3 System Setting 8 4 1 4 Default 8 4 1 5 General Settings 9 4 1 6 Camera...

Страница 3: ...The camera has the following input output I O interfaces USB connector SD card slot TV output and external DC power connector Take a few moments to familiarize yourself with the camera s controls and...

Страница 4: ...formation Display When the camera is turned on the power switch is in the TEST position the shooting information will be displayed on the LCD 1 6 Supported Format Item Format Photo JPG Video AVI SD Ca...

Страница 5: ...not insert or take out the SD card when the power switch is in the ON position It is recommended to format the SD card with the camera when being used for the first time The camera will be in USB mod...

Страница 6: ...s at this time 3 2 Insert the SD card Insert a SD card into the card slot with contacts facing the front of the camera Please note that the SD card can only be inserted in one direction Make sure that...

Страница 7: ...nually capture photos or record video 3 4 3 View Images or Videos There are two ways to view the captured images or videos 1 View using the LCD screen on the camera 2 View using a TV monitor which con...

Страница 8: ...enu press MENU while in TEST mode called the settings menu in this chapter The settings menu will be shown on the camera s LCD or the external TV monitor Navigating the menus and settings The MENU key...

Страница 9: ...7 4 1 1 Photo Settings 4 1 2 Video Setting...

Страница 10: ...vity High Low 7 meters Medium 15 meters High 20 meters Resolution Camera 8M 8M 5M 3M Interval 5 Seconds 5 30 Seconds 1 30 Minute Multi Single Single 3 6 9 Pictures ISO Auto Auto 100 200 400 Resolution...

Страница 11: ...how a message Please Wait as below Press MENU return to the info display without saving the settings 4 1 8 Photo Size This parameter has three values 8MP 5MP and 3MP The default value is 5 mega pixels...

Страница 12: ...he ISO setting a Press MENU to display the settings menu b Press RIGHT or LEFT to select the Camera menu c Press DOWN and then OK to ISO d Press DOWN UP to select the desired ISO setting e Press OK to...

Страница 13: ...ord setting is set to On after switching on the camera the LCD screen on the camera will prompt to enter the password The default password setting is off It can be changed by the following steps a Pre...

Страница 14: ...tely saved in a pre named folder 100MEDIA File number increases as new photos or videos are taken The file name is similar to PTDC0001 JPG or PTDC0001 AVI Through the suffix you can distinguish whethe...

Страница 15: ...inutes Selectable Image Resolution 8MP 5MP 3MP Multiple Frame 1 3 6 9 Video Resolution 720P WVGA QVGA File Format JPEG AVI Date Time Imprint Yes Exposure Auto MMS EMAIL SMS Support No support Device N...

Отзывы: