background image

User information | +31 (0)53 4302 836 |  [email protected] | www.ambroise.nl

UTX.2018.01

4

• 

can open up far enough

DONNING AND DOFFING THE UTX

The UTX-SWING orthosis is put on while sitting. To achieve this, the orthosis must first be 
unlocked by hand. Straighten the knee hinge of the orthosis, make a dorsal flexion at the ankle 

hinge (bring the foot up) and bend the orthosis.

The orthosis is put on the leg while it’s in a 90 degree angle. In some cases, the foot is first 

placed on the foot support, so the foot and foot support can be inserted together in the 

shoe. In other cases, the foot support is first placed in the shoe. The strap below the knee is 
fastened first. The order to fasten the remaining three straps is up to your liking.
The UTX-ESF / STABIL orthosis is also put on while seated. To do so, the orthosis must first 

be unlocked by hand. Straighten the knee hinge of the orthosis, push the button at the top of 
the orthosis and bend the orthosis.

On our YouTube channel you can find a tutorial how the UTX can be donned and doffed.          

www.youtbube.com/AmbroiseHolland

It will require practice to become skillful in donning and doffing the orthosis. See the following 

instructional photo series: 

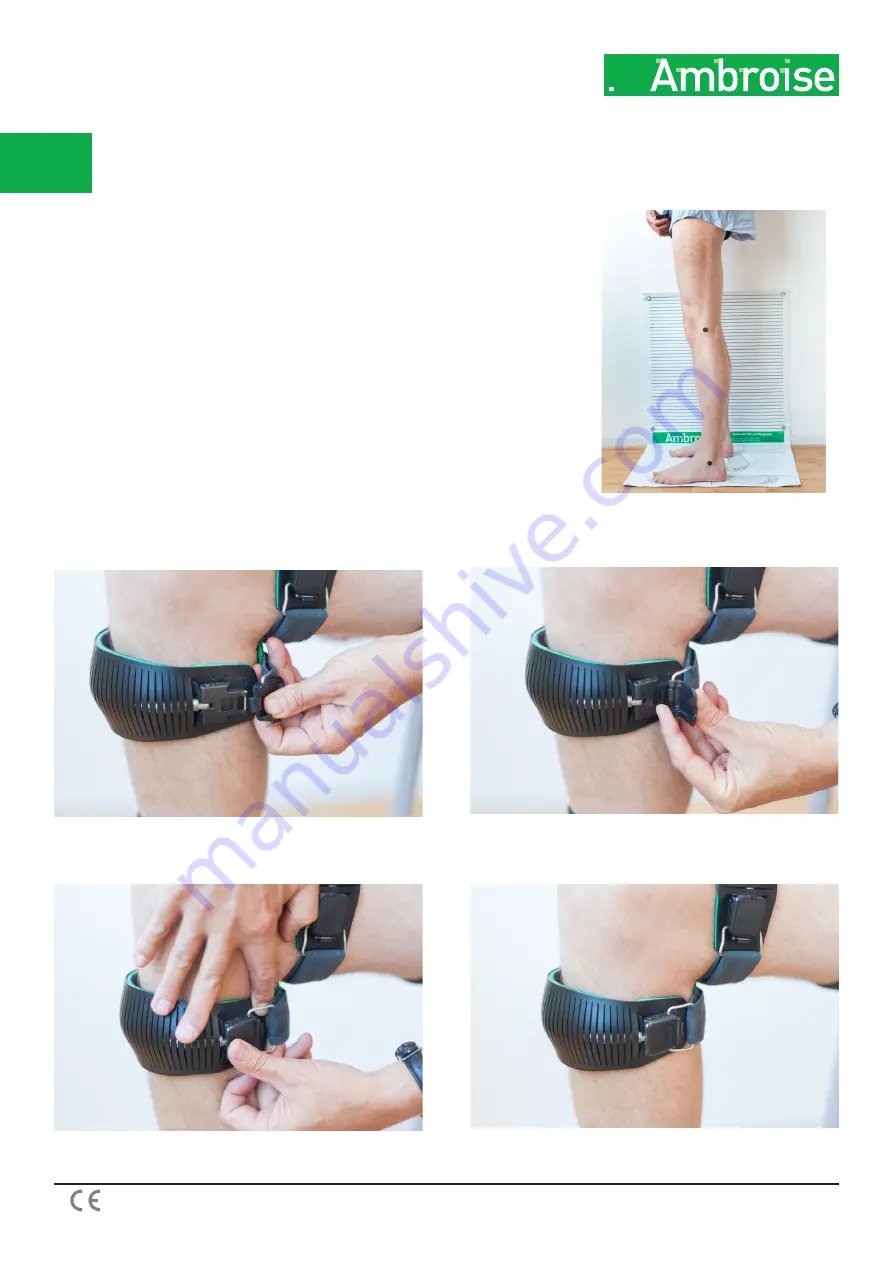
CLOSING THE CLIPS 

-


when brace is on the leg.

Figure 2: Photo measurement, casting the leg 

is no longer needed.

1. Hold the clip between thumb and index finger and bring it 
towards the connector. Beware of any skin entrapment.

2. Connect the clip with the connector with a twisting motion. 
Make sure the clip is well connected.

3. Close the clip with your thumb. Beware of skin entrapment.

4. When you hear the ‘click’ it means the clip is closed correctly.

Содержание UTX-ESC

Страница 1: ...ies Twekkeler Es 24 7547 SM Enschede The Netherlands 31 53 4302836 info ambroise nl www ambroise nl www youtube com AmbroiseHolland www facebook com AmbroiseHolland USER PRODUCT INFORMATION PROFESSIONAL I N N O VAT I O N M E E T S S T Y L E ...

Страница 2: ...TABIL 7 FREE 7 POST 7 UNILAT 7 FS 7 EZ 7 DZ 7 ESF 7 ESC 7 Itemnumbers Knee function Addition 8 Operation of the SWING 9 Operation of theSTABLE 9 Operation of the FREE 9 Operation of the POST 9 Operation of the FS 9 Operation of the EZ 9 Operation of the DZ 9 Operation of the ESF 9 Operation of the ESC 9 Focus points for handling the UTX SWING 9 Focus points for handling the UTX STABIL 12 Troublesh...

Страница 3: ...artial or complete paralysis of one or both legs and or a severe instability of the knee The UTX can stimulate the user to activate the remaining residual functions and to walk safely and dynamically again UTX ORTHOSIS USER INFORMATION Technique See Figure 2 next page The Ambroise software converts the photos to a production drawing with the exact leg contour and sizes Casting the leg is history a...

Страница 4: ... your liking The UTX ESF STABIL orthosis is also put on while seated To do so the orthosis must first be unlocked by hand Straighten the knee hinge of the orthosis push the button at the top of the orthosis and bend the orthosis On our YouTube channel you can find a tutorial how the UTX can be donned and doffed www youtbube com AmbroiseHolland It will require practice to become skillful in donning...

Страница 5: ...It is important that you are sure that the orthosis hinge is locked If this is not the case you can use your hand to push the knee even further back so that the hinge will get locked In rare cases it is advisable though to stretch the leg and lock the hinge before you get up SITTING DOWN WITH THE ORTHOSIS To be able to sit down with the UTX SWING orthosis the knee hinge must be unlocked Unlocking ...

Страница 6: ...actions as trafic or uneven surfaces It is also important to pay attention to the mental process An orthosis is intended as a medical device that you d rather do without Moreover it takes perseverance to learn to handle it In the beginning the benefits of the brace may not immediately outweigh the disadvantages This could mean that the user becomes demotivated This will be prevented by proper inst...

Страница 7: ...f the knee in the frontal plane UNILAT This is the standard version of the UTX using only a laterally placed orthosis Used if no additional stability is needed in the frontal plane Because this is the standard version the Figure 3 UTX POST term unilat is usually omitted FS The FS version delivers additional stability in case of a valgus or varus knee instability via an intelligent cable design In ...

Страница 8: ... end of the stance phase you need to simultaneously reach two conditions First a small dorsiflexion with the ankle minimum of 5 degrees should be made This is a normally occurring ankle motion during the stance phase when the foot remains on the floor and the leg moves forward This is what happens in the UTX the ankle hinge is attached to the ratchet in the knee hinge via a cable This ratchet can ...

Страница 9: ...E POST Pelotte carrier just below the knee positioned at the back posteriorly provides additional control in case of hyperextension A thus placed pelotte carrier immediately captures the force of the backwards bending knee OPERATION OF THE FS Cable provides stability to frame thereby generating control over valgus UTX lateral cable medial or varus UTX medial cable lateral OPERATION OF THE EZ Only ...

Страница 10: ...f around the knee an extension moment is present Releasing the flexion lock is safe in this situation If on the other hand the knee would be unlocked when it momentarily tends to flex is loaded with flexing moment of force an unsafe situation would occur leading to possible falling With the UTX SWING this is not possible because an extension is needed for release This compelling double condition d...

Страница 11: ...e hinge will automatically fall back into its lock The knee should be bent before the heel lifts off the floor The ankle hinge has a spring mechanism that allows plantar flexion only after a certain threshold This results in a uniform and controlled plantar flexion that will bring the foot in full contact with the ground at initial contact People with a foot drop can thus reduce the peak load on t...

Страница 12: ...s may lead to insufficient remaining dorsal flexion causing the knee hinge to not unlock see Figure 6 The user must practice taking bigger steps Reason 2 There is no or insufficient knee extension at the end of the stance phace Stretching the knee at the wrong moment Despite a present hyperextension there is no extension at the end of the stance phase possibly because the orthosis is aligned too m...

Страница 13: ...ar and tear on expensive and more difficult to replace parts Desired maintenance is also important for lasting high wearing comfort by replacing in a timely manner the parts that are in direct contact with the skin such as straps and pelottes When you notice the orthosis to not work smoothly it is strongly advised not to lubricate hinges with oil or other lubricants This seems to help initially bu...

Страница 14: ...hinge 3 Determine the right angle of the ankle stirrup More dorsal flexion means unlocking later more plantar flexion means unlocking sooner 4 Tighten the socket head screw Use a good non rounded Allen key When the Allen key is slipping use the included spare screw and find a better Allen key 5 Check the timing of unlocking if necessary adjust the hinge back to step 2 The following steps are requi...

Страница 15: ... leg is not internally or externally rotated Make sure the medial side of the foot hits the line while taking the sagital photo Take the frontal photo at knee height 2 meters from the wall Hold the camera vertically Portrait Make sure at least 3 of the 4 corner markers on each side of the grid are visible on the photo Take the sagittal photo at knee height 2 meters from the wall Hold the camera ve...

Страница 16: ...hell 2 Slide the outer shell on the tube matte side out 3 Remove the yellow strip and press the flaps of the inner shell trough the first groove of the outer shell 4 Shape to an S bend Press the flaps of the inner shell through the outer groove of the outer shell 5 Remove the other yellow strip so that the adhesive strip is exposed Press the adhesive strip well 6 You can find the size of the shell...

Страница 17: ...Ambroise Twekkeler Es 24 7547 SM Enschede the Netherlands 31 53 4302 836 info ambroise nl www ambroise nl www youtube com AmbroiseHolland www facebook com AmbroiseHolland ...

Страница 18: ...Twekkeler Es 24 7547 SM Enschede The Nederlands tel 31 53 4302836 info ambroise nl www ambroise nl www youtube com AmbroiseHolland www facebook com AmbroiseHolland ...

Отзывы: