background image

nScan 700gt User Guide


700gt_UG_1.0               ©2019 Ambir Technology


Page 

26

 of 

35


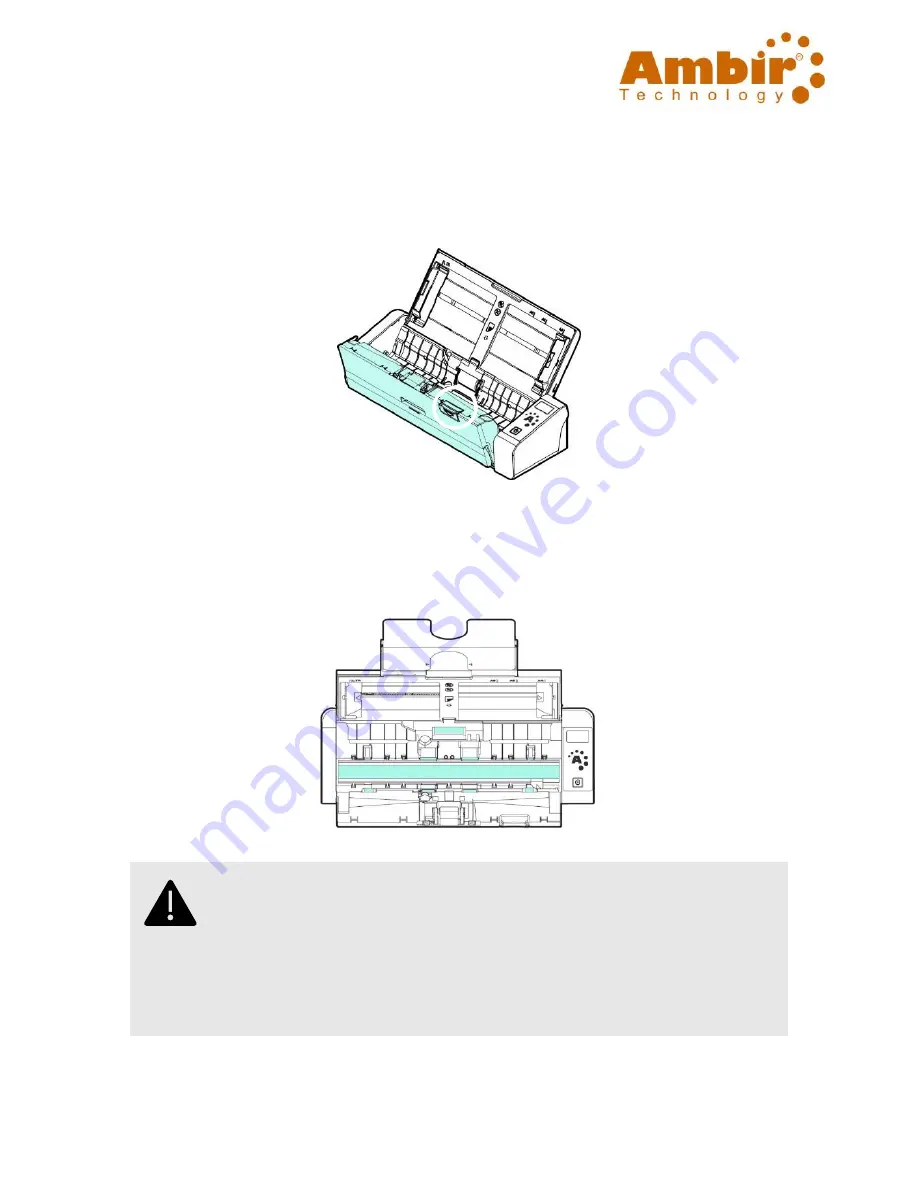
2.


Press the 

ADF Release button

 to open the 

feeder cover


3.


Wipe the 

separation pad, rollers and the glass

 with the cleaning 

cloth. 


N

OTE

:


Adding some isopropyl alcohol (95%) on the cleaning 
cloth is more efficient when cleaning the rollers. 


Do not use any solvents or corrosive liquid 

(i.e., alcohol, 

to clean any part of the scanner, otherwise the plastic 
material will be permanently damaged. 


Содержание nScan 700gt

Страница 1: ...nScan 700gt User Guide 700gt_UG_1 0 2019 Ambir Technology Page 1 of 35 nScan 700gt USER GUIDE...

Страница 2: ...the Computer 14 Loading Your Paper 15 Loading Your Document into the ADF Paper Tray 16 Loading Paper to the Document Feeder 17 Loading A Single Page Document into the Front Input Tray 19 Loading A Sin...

Страница 3: ...r device Using any other AC power adapter could cause fire electrical shock or injury Use only the AC power cord and USB cable that came with your device and avoid abrasions cuts fraying crimping and...

Страница 4: ...device and the AC power adapter and refer servicing to Ambir Support under the following conditions The AC power adapter or plug is damaged Liquid has entered the device or the AC power adapter Object...

Страница 5: ...res including Dual functionality scanning top load or single page Scan to Searchable PDF Word Excel and Cloud services Managed Profile Software Before you install and operate the new scanner please ta...

Страница 6: ...age 6 of 35 Package Items The following figure indicates the package contents Please check all the items against your checklist If you did not receive all the items please contact Ambir Technology Sca...

Страница 7: ...User Guide 700gt_UG_1 0 2019 Ambir Technology Page 7 of 35 Front View Item Name Description 1 LCD Display Displays the function button via the AmbirScan Button Manager software 2 Power Press to turn o...

Страница 8: ...n the plate to support the document when loading a long document 2 Document Guides These guides ensure documents are fed straight Raise the guides when loading a document and then align them to the ed...

Страница 9: ...700gt User Guide 700gt_UG_1 0 2019 Ambir Technology Page 9 of 35 Rear View ITEM NAME DESCRIPTION 1 Kensington Security Slot Attach to a lock to secure the scanner 2 Rear Slot Used to insert a rear fe...

Страница 10: ...Guide 700gt_UG_1 0 2019 Ambir Technology Page 10 of 35 Side View ITEM NAME DESCRIPTION 1 Power Jack Connect the AC adapter to the scanner 2 Micro USB port Used to plug the micro end of the USB cable...

Страница 11: ...or installation privileges please contact your local IT support Please visit www ambir com 700gt set for instructions on installing the scanner driver and software NOTE 1 To ensure your computer can...

Страница 12: ...nScan 700gt User Guide 700gt_UG_1 0 2019 Ambir Technology Page 12 of 35 Installing the Rear Feed Tray Attach the rear feed tray to the back slot of the scanner as indicated...

Страница 13: ...nner Insert the other end to an appropriate power outlet Turning on the Power Press the Power Switch button on the front panel The Power LED will flash When it is finished and ready to scan the LED in...

Страница 14: ...the rectangle end to the USB port at the rear side of your computer 2 The computer should detect a new USB device and prompt a New Hardware Found message 3 By following the on screen instructions cli...

Страница 15: ...ons Document s can range in size from 50 x 50 mm 2 x 2 in to 216 x 356 mm 8 5 x 14 in Document s can range in weight from 27 413 g m2 7 110 lb ID cards up to 1 25 mm 0 05 in thick Document s should be...

Страница 16: ...ccasional multi feeds or paper jams please fan your documents and align the top edges before feeding them into the scanner 1 Hold both ends of the documents and fan them a few times 2 Rotate the docum...

Страница 17: ...nScan 700gt User Guide 700gt_UG_1 0 2019 Ambir Technology Page 17 of 35 Loading Paper to the Document Feeder 1 Unfold the document feeder and its extension...

Страница 18: ...old your multi page document 3 Load the stack of documents facing down with the top of the pages pointing into the feeder 4 Verify the paper guides are aligned with the edges of the stack IMPORTANT To...

Страница 19: ...pen the cover of the front input tray 2 Load your singe page document to the front input tray with the top of the page pointing to the front input tray Load the one sided document with the text facing...

Страница 20: ...y Page 20 of 35 Loading A Single Page Document into the Rear Feed Tray Load your single page document FACE DOWN TOP EDGE FIRST into the rear feed tray Align the document to the paper size mark and gen...

Страница 21: ...scanner provides two eject paths front default and rear side You can switch between these paths by checking or not checking the eject paper opposite on the Setting tab via the TWAIN user interface sc...

Страница 22: ...Scan Profile Manager software 2 Click Settings tab in the left side menu 3 In Settings select Show TWAIN Interface 4 Click Scan in the left menu to return to the dashboard 5 Click the green Scan butto...

Страница 23: ...f documents with different sizes and weights be sure to follow these guidelines to avoid a skewed image or a paper jam 1 Align the documents TOP EDGE first in the sequence of paper size from largest t...

Страница 24: ...echnology Page 24 of 35 3 Align the edges of the documents by tapping the bottom of the stack against the table top 4 Center these pages in the document feeder and make sure that the edges of page of...

Страница 25: ...on Pad and Rollers If the scanned images contain streaks or scanned documents become dirty the scanning glass separation pad and roller inside the scanner are likely to be dirty Clean them periodicall...

Страница 26: ...r 3 Wipe the separation pad rollers and the glass with the cleaning cloth NOTE Adding some isopropyl alcohol 95 on the cleaning cloth is more efficient when cleaning the rollers Do not use any solvent...

Страница 27: ...ot feed correctly and paper jams may occur When document feed performance deteriorates replace the feed roller and separation pad NOTE It is recommended to replace the feed roller or separation pad wh...

Страница 28: ...nScan 700gt User Guide 700gt_UG_1 0 2019 Ambir Technology Page 28 of 35 2 Press the ADF Release button to open the feeder cover 3 Open the roller cover...

Страница 29: ...nScan 700gt User Guide 700gt_UG_1 0 2019 Ambir Technology Page 29 of 35 4 Slide the feed rollers to the left 5 Remove the feed rollers...

Страница 30: ...ogy Page 30 of 35 6 Attach the new feed rollers Insert the left end of the shaft to the notch and slide the feed roller to the right A snap in sound could be heard 7 Completely close the roller cover...

Страница 31: ...can 700gt User Guide 700gt_UG_1 0 2019 Ambir Technology Page 31 of 35 Replacing the Separation Pad To replace the Separation Pad complete the following steps 1 Open the feed tray 2 Open the feeder cov...

Страница 32: ...two arms of the separation pad with two fingers and attach the new separation pad to the scanner 5 Close the feeder cover Troubleshooting Clear a paper jam In the event of a paper jam follow the steps...

Страница 33: ...nScan 700gt User Guide 700gt_UG_1 0 2019 Ambir Technology Page 33 of 35...

Страница 34: ...an error drawing will be displayed Refer to the following table to clear the error conditions ERROR DRAWING MEANING CAUSE HOW TO RESTORE Paper jam 1 Document has become stuck in the feeder 2 Document...

Страница 35: ...port is available Monday Friday 8 am 5 pm CT excluding holidays Before contacting Ambir please prepare the following information Scanner serial number located on the bottom of the scanner The name and...

Отзывы: