background image

9

urt 

and 

of 

ase 

n.

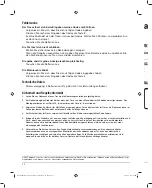
Mode d’emploi 


Français

Coffre électronique intelligent AmazonBasics

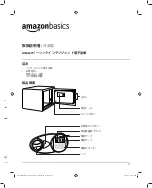
Contenu


Coffre électronique intelligent


Clé de secours


Boulons à expansion (jeu de 4)


Ce mode d'emploi

Présentation du produit

Verrous

Compartiment des batteries 

Bouton de réinitialisation

Capot du verrouillage de secours

Voyant de batteries faibles

Voyant d'avertissement

Voyant de confi rmation

Bouton de confi rmation (#)

Bouton

B00UG9HB1Q Security Safe Black_15-0299_MAN_V1_Full.indd   9

4/6/2015   12:13:27 PM

Содержание B00UG9HB1Q

Страница 1: ...Intelligent Electronic Safe B00UG9HB1Q B00UG9HB1Q Security Safe Black_15 0299_MAN_V1_Full indd 1 4 6 2015 12 13 24 PM ...

Страница 2: ...Ins Am Con Pro English 3 Français 9 Deutsch 15 日本語 21 中文 27 Italiano 33 Español 39 B00UG9HB1Q Security Safe Black_15 0299_MAN_V1_Full indd 2 4 6 2015 12 13 25 PM ...

Страница 3: ...tronic Safe Emergency key Expansion bolts 4 sets This instruction manual Product overview Bolts Battery Compartment Reset Button Emergency Lock Cover Low Battery Light Warning Light Confirm Light Confirming button Knob B00UG9HB1Q Security Safe Black_15 0299_MAN_V1_Full indd 3 4 6 2015 12 13 25 PM ...

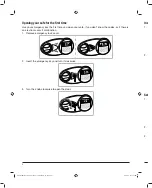
Страница 4: ... if you don t know the codes or if there is an electronic circuit malfunction 1 Remove emergency lock cover 2 Insert the emergency key and turn it clockwise 3 Turn the knob clockwise to open the door Ins 1 2 Set 1 2 3 B00UG9HB1Q Security Safe Black_15 0299_MAN_V1_Full indd 4 4 6 2015 12 13 25 PM ...

Страница 5: ...ng the user code 1 With the door open press the Reset button You will hear two beeps 2 Input the new code 3 8 digits on the keypad then press the button to confirm If the confirm light turns on the reset is accepted If the warning light flashes the code reset is not accepted and you need to try again 3 Before you close the door try the new code to make sure it works B00UG9HB1Q Security Safe Black_...

Страница 6: ... confirm light doesn t turn on your new code isn t set Repeat these steps Opening your safe after the first time 1 Input your user code 3 to 8 digits on the keypad Press to confirm 2 The confirm light turns on 3 Rotate the knob clockwise then open the door NOTE The preset user code is 159 Locking the safe Close the door then turn the knob counterclockwise to lock it Aut If an entr Sec Bolt 1 2 3 4 ...

Страница 7: ...to a wall make sure that your safe is resting on a supporting surface such as the floor or a shelf Do not bolt your safe to both the floor and wall 2 Set the safe in place then use a pencil to mark the mounting holes in the floor or wall 3 Move the safe away then use a 12mm bit to drill mounting holes that are 2 in 50mm deep 4 Align the safe over the holes then install the expansion bolts included...

Страница 8: ...f the emergency key and keep them in one secret place out of safe please do not put the emergency keys inside the safe otherwise you can not open the safe with emergency key if battery used up 4 For security of your property you will need to change the preset code 5 Do not place the product in an insecure and elevated place lest it may fall over and damage the product or hurt people Never spill li...

Страница 9: ...ulons à expansion jeu de 4 Ce mode d emploi Présentation du produit Verrous Compartiment des batteries Bouton de réinitialisation Capot du verrouillage de secours Voyant de batteries faibles Voyant d avertissement Voyant de confirmation Bouton de confirmation Bouton B00UG9HB1Q Security Safe Black_15 0299_MAN_V1_Full indd 9 4 6 2015 12 13 27 PM ...

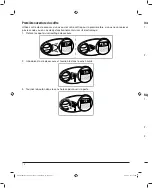
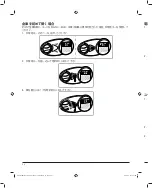
Страница 10: ... ne connaissez pas les codes ou en cas de dysfonctionnement du circuit électronique 1 Retirez le capot du verrouillage de secours 2 Introduisez la clé de secours et tournez la dans le sens horaire 3 Tournez le bouton dans le sens horaire pour ouvrir la porte B00UG9HB1Q Security Safe Black_15 0299_MAN_V1_Full indd 10 4 6 2015 12 13 28 PM ...

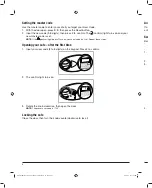
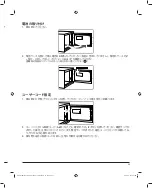
Страница 11: ... étant ouverte appuyez sur le bouton de réinitialisation Deux bips se font entendre 2 Entrez le nouveau code 3 8 chiffres sur le clavier numérique et appuyez sur le bouton pour confirmer La réinitialisation est acceptée quand le voyant de confirmation s allume Si le voyant d avertissement clignote la réinitialisation du code n est pas acceptée et vous devez réessayer 3 Testez le nouveau code pour ...

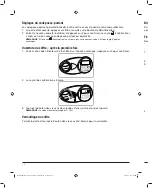
Страница 12: ...ré REMARQUE Si le voyant confirmation ne s allume pas votre nouveau code n est pas réglé Répétez ces étapes Ouverture du coffre après la première fois 1 Entrez votre code utilisateur 3 à 8 chiffres sur le pavé numérique Appuyez sur pour confirmer 2 Le voyant de confirmation s allume 3 Tournez le bouton dans le sens des aiguilles d une montre et ouvrez la porte REMARQUE Le code utilisateur préréglé...

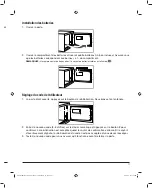
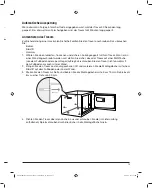
Страница 13: ...e boulonnage au mur assurez vous que le coffre repose sur une surface de support comme le plancher ou une étagère Ne boulonnez pas votre coffre à la fois au sol et au mur 2 Mettez le en place et marquez les trous de montage au sol ou au mur à l aide d un crayon 3 Éloignez le coffre et percez des trous de montage d une profondeur de 50 mm avec un foret de 12 mm 4 Alignez le coffre sur les trous et ...

Страница 14: ...de la clé de secours et conservez la dans un endroit secret à l écart du coffre ne placez pas de clés de secours dans le coffre vous ne pourriez pas ouvrir le coffre avec la clé en cas d épuisement des batteries 4 Pour la sécurité de vos biens changez le code préréglé 5 Ne placez pas le produit en un lieu non sûr et élevé d où il pourrait tomber s endommager ou blesser des personnes Ne déversez ja...

Страница 15: ...sor Schlüssel für Notfälle Spreizschrauben 4 Diese Bedienungsanleitung Überblick über das Produkt Bolzen Batteriefach Reset Taste Abdeckung des Notfallschlosses Batterie Niedrigstand Leuchtanzeige Warnleuchte Bestätigungsleuchte Bestätigungstaste Drehknopf B00UG9HB1Q Security Safe Black_15 0299_MAN_V1_Full indd 15 4 6 2015 12 13 28 PM ...

Страница 16: ... Störung im Elektronikschaltkreis vorliegt den Schlüssel für Notfälle 1 Entfernen Sie die Abdeckung des Notfallschlosses 2 Stecken Sie den Schlüssel für Notfälle in das Schloss und drehen Sie ihn nach rechts 3 Drehen Sie den Drehknopf nach rechts und öffnen Sie die Tür B00UG9HB1Q Security Safe Black_15 0299_MAN_V1_Full indd 16 4 6 2015 12 13 29 PM ...

Страница 17: ...utzercodes 1 Drücken Sie bei geöffneter Tür die Reset Taste Es ertönen zwei Pieptöne 2 Geben Sie auf dem Tastenfeld zunächst den neuen Code ein 3 bis 8 Ziffern und drücken Sie zur Bestätigung die Taste Wenn die Bestätigungsanzeige aufleuchtet gilt die Rücksetzung als akzeptiert Wenn die Warnleuchte blinkt wurde die Code Rücksetzung nicht akzeptiert und Sie müssen einen neuen Versuch unternehmen 3 ...

Страница 18: ...WEIS Wenn das Symbol Bestätigung nicht aufleuchtet wurde der neue Code nicht eingestellt Wiederholen Sie diese Schritte Öffnen des Tresors nach dem ersten Mal 1 Geben Sie auf dem Tastenfeld Ihren Benutzercode 3 bis 8 Ziffern ein Drücken Sie zur Bestätigung die Taste 2 Die Bestätigungsanzeige leuchtet auf 3 Drehen Sie den Drehknopf nach rechts und öffnen Sie die Tür HINWEIS Der voreingestellte Benu...

Страница 19: ...ellen Sie sicher dass der Tresor auf einer Stützfläche wie dem Fußboden oder einem Regal aufliegt Verschrauben Sie den Tresor nicht sowohl mit dem Fußboden als auch mit der Wand 2 Bringen Sie den Tresor an den vorgesehenen Ort und markieren Sie die Montagelöcher mit einem Bleistift auf dem Fußboden oder an der Wand 3 Stellen Sie den Tresor zur Seite und bohren Sie die Montagelöcher mit einem 12 mm...

Страница 20: ... Seite 19 Anmontieren des Tresors beschrieben 3 Verwahren Sie den Schlüssel für Notfälle an einem geheimen Ort und keinesfalls im Tresor da Sie diesen dann im Falle einer leeren Batterie nicht mit diesem Schlüssel öffnen können 4 Zur Sicherheit der im Tresor verwahrten Objekte sollten Sie den voreingestellten Code ändern 5 Bringen Sie das Produkt nicht an einen ungeschützten und höher liegenden Or...

Страница 21: ...go 取扱説明書 日本語 Amazonベーシックインテリジェント電子金庫 目次 インテリジェント電子金庫 非常用キー 拡張ボルト 4個 この取扱説明書 製品概要 ボルト 電池ケース リセッ トボタン 非常用ロックカバー 電池残量低下ランプ 警告ランプ 確認ランプ 確認ボタン ノブ B00UG9HB1Q Security Safe Black_15 0299_MAN_V1_Full indd 21 4 6 2015 12 13 30 PM ...

Страница 22: ...2 3 金庫を初めて開く場合 初めて金庫を開く コードを知らない あるいは電子回路に異常が発生した場合 非常用キーを使用して ください 1 非常用キーのカバーをはずしてください 2 非常用キーを差し込んで時計回りに回して下さい 3 扉を開くにはノブを時計回りに回して下さい B00UG9HB1Q Security Safe Black_15 0299_MAN_V1_Full indd 22 4 6 2015 12 13 30 PM ...

Страница 23: ...下ランプが点灯したら電池を取り替えてください ユーザーコード設定 1 扉を開いた状態でリセッ トボタンを押してください ビー という電子音が二回鳴ります 2 キーパッ ド上から新規コード 3 8桁 を入力し 確認のため ボタンを押してください 確認ランプが 点灯した場合 正常にリセッ トされています 警告ランプが点灯した場合 コードリセッ トが失敗してお り やりなおす必要があります 3 扉を閉じる前に新規コードを試し 正常に作動するか確かめてください て B00UG9HB1Q Security Safe Black_15 0299_MAN_V1_Full indd 23 4 6 2015 12 13 30 PM ...

Страница 24: ...ため を押してください 確認 ランプが点灯し あなたの新規 マスターコードが設定されます 注意 確認 ランプが点灯しない場合 あなたの新規コードは設定されていません 上記の手順を繰り返してください 金庫を開く 初めてではない場合 1 あなたのユーザーコード 3 8桁 をキーパッ ド上に入力してく ださい 確認のため を押してください 2 確認ランプが点灯します 3 ノブを時計回りに回し 扉を開いてください 注意 デフォルトのユーザーコードは 159 です 金庫の施錠 扉を閉め ノブを反時計回りに回して下さい B00UG9HB1Q Security Safe Black_15 0299_MAN_V1_Full indd 24 4 6 2015 12 13 30 PM ...

Страница 25: ...金庫を設置する場所として 周囲に何もなく 乾いた安全な場所を選びましょ う 壁に取り付ける場合 金庫が床や本棚などの支持面に触れている位置に取り付けましょ う 金庫を床と壁の両方に固定する ことを避けてください 2 金庫を取り付ける位置に置き 鉛筆を使って取り付け穴を床 または壁にマークしてください 3 金庫をどかし ドリルの12mmビッ トを使って取り付け穴を2インチ 50mm の深さに掘ってください 4 金庫を穴の位置に合わせ 拡張ボルト 製品に含まれています を穴から取り付ける面へ取り付けて ください 新規 い い B00UG9HB1Q Security Safe Black_15 0299_MAN_V1_Full indd 25 4 6 2015 12 13 30 PM ...

Страница 26: ...てはなりません 取り付け手順は25ページの 金庫の確保を参照してください 3 非常用キーを大事に 金庫以外の秘密の隠し場所に保管してください 金庫の中に非常用キーを入れないでください 電池が切れたときに金庫を開くことができなくなるからです 4 あなたの資産の安全のため デフォルトで設定されているコードを変更してください 5 製品を不安定な高所に置かないでください 落下し 製品自体に傷がついたり 怪我の元になります コントロール パネルの上に液体をかけないでください 内部の電子部品に感電を引き起こし 正常に作動しなくなる場合があります 6 本製品を自分で分解することは避けてください 後蓋の中を専門知識なく分解 または組み立てを行うなら 電子回路 を傷つき 正常に作動しなくなる可能性があります メンテナンスが必要な場合は 現地のサービスセンター または 現地の販売業者にご連絡ください 2015...

Страница 27: ...27 め の い ール す 回路 たは nc 䈪᱄Ҝ ѣᮽ Ӑ傢䙀 ك ᙓᲰ㜳 ᆆؓ䲟 㻻 Ԭ Ჰ㜳 ᆆؓ䲟 ᓊᙛ䫛ॏ 㟞㛶㷰䪿δ ε 䈪᱄Ҝ ӝ Ᾰ㿾 䰞ṉ ⴈ གྷփ 䫤 ᓊᙛ䬷Ⲻሷⴌ 䠅ք 䆜 䇚 䇚 䭤δ ε ᰁ䫤 B00UG9HB1Q Security Safe Black_15 0299_MAN_V1_Full indd 27 4 6 2015 12 13 31 PM ...

Страница 28: ...28 ᆿ㻻 䇴㖤 俌 ᢉᔶؓ䲟 ᛞ俌 ᢉᔶؓ䲟 ᰬθ ᛞу 䚉ᇼ ᡌ ᆆ 䐥 䳒ᰬθ䈭ֵ ᓊᙛ䫛ॏȾ сᓊᙛ䬷ⲺሷⴌȾ ᨈ ޛ ᓊᙛ䫛ॏθ亰ᰬ䪾ᰁ䖢Ⱦ 亰ᰬ䪾䖢ࣞᰁ䫤θᢉᔶ 䰞Ⱦ B00UG9HB1Q Security Safe Black_15 0299_MAN_V1_Full indd 28 4 6 2015 12 13 31 PM ...

Страница 29: ... ؓ ф ⴈ Ⲻ 䍕ᶷḽ䇦 ९䞃Ⱦ 注意 㤛 䠅քⲺ Ӥ䎭 θ䈭ᴪᦘ Ⱦ 䇴㖤 ᡭᇼ 䰞ᢉᔶⲺ сθ ুགྷփ 䫤Ⱦᛞሼ ࡦଊଊњ༦Ⱦ 䈭 䭤ⴎр䗉 ޛ Ⲻᇼ δ փᮦᆍεθ ু 䭤ࣖԛ 䇚Ⱦ㤛 䇚 Ӥ䎭θ䘏ж 䠃䇴ቧᐨ㻡 Ⱦ㤛䆜 䰠Ӥθࡏᇼ 䠃䇴ᵠ㻡 θᛞ䴶㾷߃ ቓ䈋Ⱦ ᛞީ䰣 䰞ҁࢃθ䈭䈋с ᇼ θ ؓެ Ⱦ B00UG9HB1Q Security Safe Black_15 0299_MAN_V1_Full indd 29 4 6 2015 12 13 31 PM ...

Страница 30: ...Ⱦ 䗉 ޛ Ⲻᇼ δ փᮦᆍεθ ু 䭤ࣖԛ 䇚Ⱦ δ 䇚ε Ӥ䎭θᛞ 䇴Ⲻѱᇼ ᐨ䇴㖤ླȾ 注意 㤛 δ 䇚ε ᵠӤ䎭θᛞⲺ ᇼ ቧᵠ䇴㖤ླȾ䈭䠃གྷр䘦 僚Ⱦ 俌 ᔶ ҁ ᢉᔶؓ䲟 䭤ⴎр䗉 ޛ ᛞⲺ ᡭᇼ δ փᮦᆍεȾ ু 䭤䘑㺂 䇚Ⱦ 䇚 Ӥ䎭Ⱦ 亰ᰬ䪾䖢ࣞᰁ䫤θ ᢉᔶ 䰞Ⱦ 注意 人䇴Ⲻ ᡭᇼ ᱥć ĈȾ 䬷рؓ䲟 ީ䰣 䰞θ 䘼ᰬ䪾䖢ࣞᰁ䫤θሼؓ䲟 䬷рȾ B00UG9HB1Q Security Safe Black_15 0299_MAN_V1_Full indd 30 4 6 2015 12 13 32 PM ...

Страница 31: ...ぁᓜȾᛞ䴶㾷φ 䫱ᆊᵰ 䫻ㅊ 䭚ᆆ 䈭ѰᛞⲺؓ䲟 䘿 жѠ䳊㔓Ƚᒨ ъ 䶖Ⲻփ㖤Ⱦ㤛㾷 р㻻㷰ṉθ䈭 ؓᛞⲺؓ䲟 㩳 ж Ѡ 㺞䶘рδྸ൦ᶵᡌᨷᷬεȾу㾷ੂᰬ 㷰ṉሼᛞⲺؓ䲟 രᇐ ൦ᶵૂ рȾ ླؓ䲟 Ⲻփ㖤θ 䫻ㅊ ൦ᶵᡌ рḽ䇦 ᆿ㻻ᆊȾ 〱䎦ؓ䲟 θ ֵ Ⲻ䫱ཪ䫱 㤧ሮδ ε Ⲻᆿ㻻ᆊȾ ሼؓ䲟 ᆊрሯ喆θ ᨈ ޛ 㟞㛶㷰ṉδ䳅ӝ ᨆ ב εθサ䗽ᆿ㻻ᆊθ䘑 ࡦޛ ᆿ㻻㺞䶘 Ⱦ ѱᇼ B00UG9HB1Q Security Safe Black_15 0299_MAN_V1_Full indd 31 4 6 2015 12 13 32 PM ...

Страница 32: ...൦ᶵрθᆿ㻻䗽ぁ䈭 䰻ㅢ 31 享 രᇐؓ䲟 Ⱦ 䈭 ᣚᓊᙛ䫛ॏθሼެᆎ ؓ䲟 ҁཌⲺ ᇼ൦ᯯθ䈭у㾷ሼᓊᙛ䫛ॏ ؓ䲟 θੜࡏθ㤛 㙍ታθᛞቧᰖ ᓊᙛ䫛ॏᢉᔶؓ䲟 Ⱦ ѰҼؓ䳒ᛞⲺ䍘 ᆿ ޞ θᛞ䴶㾷ᴪ 人䇴ᇼ Ⱦ 䈭у㾷ሼ ӝ у രъ儎 Ⲻ൦ᯯθԛ ެރ 㘱 و ᒬᦕඅӝ ᡌ ԌӰȾ वሼ ࡦ 䶘ᶵрθੜࡏਥ 㜳Րሲ㠪 䜞 ᆆ䴬䜞Ԭਇ ᒬֵެᰖ ਇᥛᓊᴿࣕ㜳Ⱦ व㠠㺂ቓ䈋 䀙 ӝ Ⱦᵠ㔅 ሲ䘑㺂 䀙ૂу ൦䠃 㻻䞃 ⴌ 䜞ൽਥ㜳ᦕඅ ᆆ 䐥ᒬᖧଃެᙝ㜳Ⱦ ྸ䴶㔪ᣚθ䈭㚊㔒ᖉ൦Ⲻᵃࣗѣᗹᡌᖉ൦Ⲻ㔅䬶 Ⱦ 2015 Amazon com Inc ᡌެ䱺ኔ ޢ ਮ ᵹᡶᴿȾؓ ᡶᴿᵹ ȾӐ傢䙀δAmazonεૂӐ傢䙀 ك ᙓδAmazonBasicsε ᗳḽᱥ Amazon com Inc ᡌެ䱺ኔ ޢ ਮⲺ ḽȾ Ma Cas Con Des B00UG9HB1Q Security Saf...

Страница 33: ...za Bulloni a espansione set di 4 Il presente manuale d istruzioni Descrizione del prodotto Chiavistelli Vano batteria Pulsante di ripristino Coperchio serratura di emergenza Spia di bassa carica della batteria Spia di avviso Spia di conferma Pulsante di conferma Manopola B00UG9HB1Q Security Safe Black_15 0299_MAN_V1_Full indd 33 4 6 2015 12 13 32 PM ...

Страница 34: ...forte se non si conoscono le combinazioni o se c è un guasto al circuito elettronico 1 Rimuovere il coperchio della serratura di emergenza 2 Inserire la chiave di emergenza e girarla in senso orario 3 Girare la manopola in senso orario per aprire lo sportello B00UG9HB1Q Security Safe Black_15 0299_MAN_V1_Full indd 34 4 6 2015 12 13 33 PM ...

Страница 35: ...ortello aperto premere il pulsante di ripristino Viene emesso due volte un segnale acustico 2 Digitare la nuova combinazione 3 8 cifre sul tastierino quindi premere il pulsante per confermarla Se la spia di conferma si accende il ripristino è stato eseguito Se la spia di avviso lampeggia il ripristino della combinazione non è stato eseguito e occorre riprovare 3 Prima di chiudere lo sportello prov...

Страница 36: ...BENE Se la spia di conferma non si accende la nuova combinazione non è stata impostata Rieseguire le operazioni ai due punti precedenti Apertura della cassaforte dopo la prima volta 1 Digitare la combinazione dell utente da 3 a 8 cifre sul tastierino Premere per confermare 2 La spia di conferma si accende 3 Girare la manopola in senso orario quindi aprire lo sportello NOTA BENE La combinazione del...

Страница 37: ...ccertarsi che la cassaforte poggi su una superficie salda come il pavimento o una mensola Non bullonare la cassaforte sia al pavimento che a una parete 2 Collocare la cassaforte nel punto prescelto quindi contrassegnare con una matita i punti per i fori di fissaggio al pavimento o a una parete 3 Mettere da parte la cassaforte e praticare con il trapano usando una punta da 12 mm fori di 50 mm di pr...

Страница 38: ... pavimento per le istruzioni vedere la sezione Fissaggio della cassaforte a pagina 37 3 Custodire la chiave di emergenza in un luogo segreto fuori della cassaforte se la si lascia nella cassaforte sarà impossibile usarla per aprire la cassaforte nel caso in cui le pile si scarichino 4 Ai fini della massima sicurezza modificare la combinazione preimpostata 5 Non collocare la cassaforte in un punto el...

Страница 39: ...os expansibles juego de 4 Este manual de instrucciones Sinopsis del producto Pernos Compartimento de las pilas Botón de restablecimiento Tapa de la cerradura de emergencia Luz de pilas bajas Luz de advertencia Luz de confirmación Botón de confirmación Mando in dere à ore Inc B00UG9HB1Q Security Safe Black_15 0299_MAN_V1_Full indd 39 4 6 2015 12 13 33 PM ...

Страница 40: ...s o si el circuito electrónico falla 1 Retire la tapa de la cerradura de emergencia 2 Introduzca la llave de emergencia y gírela en el sentido de las agujas del reloj 3 Gire el mando en el sentido de las agujas del reloj para abrir la puerta Cóm 1 2 Cóm 1 2 3 B00UG9HB1Q Security Safe Black_15 0299_MAN_V1_Full indd 40 4 6 2015 12 13 34 PM ...

Страница 41: ... Con la puerta abierta pulse el botón de restablecimiento Escuchará dos pitidos 2 Introduzca el nuevo código 3 a 8 dígitos en el teclado numérico y luego pulse el botón para confirmar Si la luz de confirmación se enciende el código se ha restablecido Si la luz de advertencia parpadea el código no se ha restablecido y tendrá que intentarlo de nuevo 3 Antes de cerrar la puerta pruebe el nuevo código...

Страница 42: ...o código no está configurado Repita estos pasos Cómo abrir la caja fuerte después de la primera vez 1 Introduzca el código de usuario 3 a 8 dígitos en el teclado numérico Pulse el botón para confirmar 2 La luz de confirmación se enciende 3 Gire el mando en el sentido de las agujas del reloj y luego abra la puerta NOTA El código de usuario predefinido es 159 Cómo cerrar la caja fuerte Cierre la pue...

Страница 43: ...se de que la caja fuerte descanse sobre una superficie de apoyo como el suelo o un estante No atornille la caja fuerte al suelo y a la pared a la vez 2 Coloque la caja fuerte en su lugar y marque con el lápiz los orificios de montaje en el suelo o en la pared 3 Retire la caja fuerte y utilizando la taladradora y una broca de 12 mm taladre orificios de montaje de 50 mm de profundidad 4 Alinee la ca...

Страница 44: ...so de montaje consulte la página 43 Cómo proteger la caja fuerte 3 Tenga cuidado con las llaves de emergencia y guárdelas en un lugar secreto fuera de la caja fuerte no ponga las llaves de emergencia dentro de la caja fuerte ya que no podrá utilizarlas para abrir la caja si las pilas se agotan 4 Para la seguridad de sus bienes tendrá que cambiar el código prefijado 5 No coloque el producto en un lu...

Страница 45: ...45 las n nas B00UG9HB1Q Security Safe Black_15 0299_MAN_V1_Full indd 45 4 6 2015 12 13 34 PM ...

Страница 46: ...46 B00UG9HB1Q Security Safe Black_15 0299_MAN_V1_Full indd 46 4 6 2015 12 13 34 PM ...

Страница 47: ...47 B00UG9HB1Q Security Safe Black_15 0299_MAN_V1_Full indd 47 4 6 2015 12 13 34 PM ...

Страница 48: ...V1 15 0299 Amazon com AmazonBasics Made in China B00UG9HB1Q Security Safe Black_15 0299_MAN_V1_Full indd 48 4 6 2015 12 13 34 PM ...
Отзывы:

Похожие инструкции для B00UG9HB1Q