Step 1
You will need to assemble the M6 x 45 bolts (item A) with the
M6.5 x 9 spring washers (item C) and the M6.5 x 19 flat
washers (item B)
A M6 X 45 BOLT
4
PCES
B M6.5 X 19 FLAT
WASHER
4
PCES
C M6.5 X 9
SPRING
WASHER
4
PCES
D ALLEN KEY
1 PCE
YOU WILL NEED
4
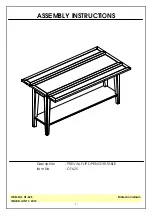
Step 2
Attach a support bar (Part 3) to the Dresser as shown using 2
of the assembled sets from Step 1, using allen key (item D).
Step 3
Repeat for other support bar.
5
Содержание SIGNATURE 64529
Страница 9: ...8 9 Assembly is complete...