Amantii TRV SLIM Скачать руководство пользователя страница 9

Screws and fending bars

Side glass panels

After screws and fending bars are removed, 

now you can take off the side glass panels.

Содержание TRV SLIM

Страница 1: ...Repair Guide TRV SLIM TRV XT XL...

Страница 2: ...Content How to replace the LED light How to replace the flicker motor How to replace the heating element How to replace the PCB board How to replace the signal receiver How to replace the canopy light...

Страница 3: ...Replacing the LED light Unscrew one screw on both sides and then to remove the front glass Step 1 Unscrew the screw Replace ember bed LED light...

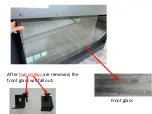
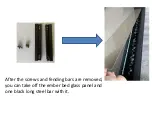
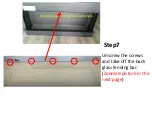
Страница 4: ...After two screws are removed the front glass will fall out Front glass...

Страница 5: ...Step 2 Unscrew two screws on both sides and then to take off two bars and the ember bed glass panel Zoomed view...

Страница 6: ...After the screws and fending bars are removed you can take off the ember bed glass panel and one black long steel bar with it...

Страница 7: ...Step 3 After the ember bed glass panel is removed now you can replace the LED light for ember bed effect Replace flame light see STEP 4...

Страница 8: ...ed view Zoomed view Unscrew 2 screws on the left and right hand side of the fireplace where the arrows marked to take off the fending bars After the bars have been taken out you can remove two side gl...

Страница 9: ...Screws and fending bars Side glass panels After screws and fending bars are removed now you can take off the side glass panels...

Страница 10: ...The front glass fending bar is located here Step 5 Unscrew the screws on the left and right sides from the front glass fending bar to take it off the fireplace...

Страница 11: ...The top light is located here Unscrew 3 screws then unplug to take off the canopy light from the fireplace Step 6...

Страница 12: ...The back glass fending bar locates here Unscrew the screws and take off the back glass fending bar Zoomed picture in the next page Step7...

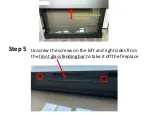
Страница 13: ...Fending bar Screws that fix the fending bar...

Страница 14: ...Back glass Fending bar Step 8 After fending bar is removed now you can take off the back glass panel You come to here...

Страница 15: ...Step 9 Unscrew 2 screws each on left and right side to take off the flame stencil And you can see the LED strips for flame Replace those don t work...

Страница 16: ...Replacing the flicker motor Please follow steps 1 to 2 in Replacing the LED light to arrive here Motor for the ember bed is located here...

Страница 17: ...d effect is beneath the ember bed glass panel Step 1 Unscrew the screw and then disconnect the flicker rod from the motor Replacing the flicker motor for ember bed effect Unscrew the screws to take of...

Страница 18: ...Please follow steps 1 to 9 from Replacing the LED light Unscrew 2 screws on left and right side to take off the flame stencil And you can see the flame motor...

Страница 19: ...The flicker motor for flame effect is behind the flame stencil Step 1 Unscrew the screw and then disconnect the flicker rod from the motor Unscrew the screws to take off the motor from the fireplace...

Страница 20: ...Replacing the heating element Please follow Step 1 in replacing LED light you come to here The heating element is located here...

Страница 21: ...Unscrew the screws on the left and right sides from the front glass fending bar to take it off the fireplace Step 1...

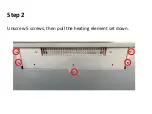
Страница 22: ...Step 2 Unscrew 5 screws then pull the heating element set down...

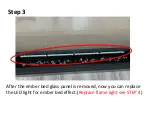
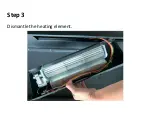
Страница 23: ...Step 3 Dismantle the heating element...

Страница 24: ...Unscrew 4 screws and you can separate the heater from the heating element set...

Страница 25: ...Step 4 Unplug and you can replace the heater...

Страница 26: ...Replacing the PCB board Please follow step 1 and 2 in Replacing the LED light to arrive here The PCB board is located here...

Страница 27: ...Step 1 Unscrew 4 screws then pull the control board down and the PCB board is fixed on it...

Страница 28: ...Step 2 Unplug unscrew the 5 screws circled in red and replace the PCB board...

Страница 29: ...Replacing the signal receiver Please follow steps 1 thru 8 in Replacing the LED light to arrive here The signal receiver is located here...

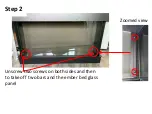
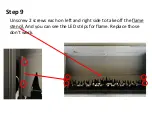
Страница 30: ...Step 1 Unscrew 2 screws...

Страница 31: ...Step 2 Please follow step 1 in Replacing the PCB board Unplug and signal receiver from the PCB board and replace a new receiver...

Страница 32: ...Replacing the canopy light Unscrew one screw on both sides and then to remove the front glass Step 1 Unscrew the screw...

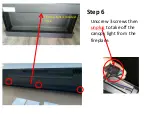
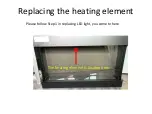
Страница 33: ...Zoomed view The top light is located here Unscrew 3 screws then unplug to replace the top light Step 2...

Отзывы: