Amantii TRD-26 Скачать руководство пользователя страница 12


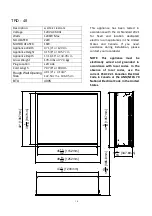
INSTALLATION- BUILT-IN


NOTE: Due to the many different m

you consult your local builder befor

Preparation


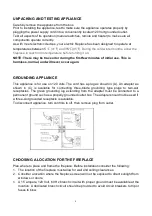
1.  Select a location that is not pro

from combustible materials suc

2.  Mark the desired location on th

place. 

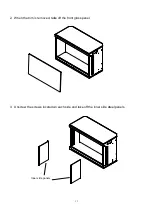
3.  Prepare a wall with a framed o

1/4” (6mm) around the edge of

with local and national codes an

Prior to installing, test the appliance

plugging the power supply cord into


INSTALLATION 

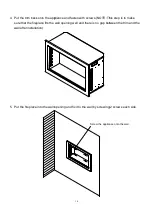
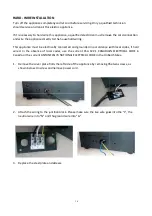
1.  Unscrew 4 screws and take off t

down automatically when the tri


12 


rent materials used to build walls, it is highly re

 before you install this appliance on a wall.


ot prone to moisture and is located at least 0.9

ls such as curtains, drapes, furniture, bedding,

 on the floor and store the appliance in a safe, 

med opening to accommodate the size of your

dge of the appliance. Any new wiring must be

des and other applicable regulations. 

liance to make sure the appliance is fully oper

rd into a 120 Volt grounded outlet.


e off the trim. (NOTE: Keep hold of the front gl

the trim is removed.) 

recommended that 

st 0.91m or 3 feet away 

dding, paper, etc. 

 safe, dry and dust free 

f your unit. Leave at least 

ust be done in compliance 

 operational by 

ront glass as it may fall 
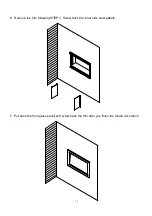
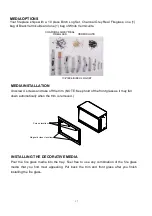
Screws locations

Magnetic stones locations


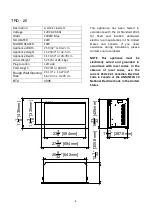
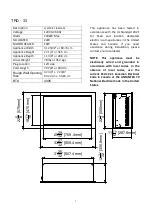
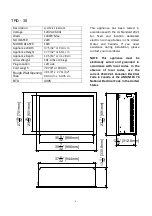
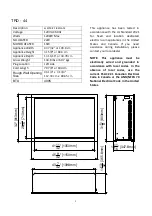
The rough wall opening size of the

 of the fireplace:

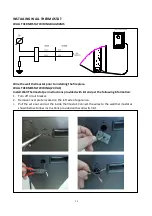
 Fireplace removal should be a simple process. The reason for removal of a fireplace

may vary and include changing the PCB, heater and fan.

NOTE:

Take note of the air intake vent located at the bottom and behind the front trim.


W(“)


D(

TRD-26 

26 1/4 

TRD-30 

30 3/8 

TRD-33 

32 3/4 

TRD-38 

38 1/8 

TRD-44                  44 1/4       14 3/4
TRD-48                  48 1/4       14 3/4


D(“)


H(“)


12 3/8   16 27/32


12 3/8   19 7/32 

12 3/8   22 3/8  
13 3/8   27 11/32


  31 3/4 
  41 3/4 

Содержание TRD-26

Страница 1: ...FUTURE REFERENCE SAFETY INFORMATION WARNING For your safety always comply with all warnings and safety instructions contained in this manual to prevent personal injury or property damage Do not store...

Страница 2: ...Amantii product Table of Contents IMPORTANT INSTRUCTIONS 3 UNPACKING AND TESTING APPLIANCE 4 GROUNDING APPLIANCE 4 CHOOSING FIREPLACE LOCATION 4 5 6 7 8 9 10 INSTALLATION BUILT IN 11 INSTALLATION OUT...

Страница 3: ...ners or the like Arrange the cord away from traffic area and where it will not be tripped over 7 Do not modify this fireplace Use it as described in the manual Any other use not recommended by the man...

Страница 4: ...ng type plugs to two slot receptacles The green grounding lug extending from the adapter must be connected to a permanent ground such as a properly grounded outlet box The adapter should not be used i...

Страница 5: ...Canadian Electrical Code in Canada or the ANSI NFPA 70 National Electrical Code in the United States Description ELECTRIC FIREPLACE Voltage 120V AC 60Hz MOTOR HEATER 19W Appliance Width 25 9 32 or 64...

Страница 6: ...anadian Electrical Code in Canada or the ANSI NFPA 70 National Electrical Code in the United States TRD 30 Description ELECTRIC FIREPLACE Voltage 120V AC 60Hz Watts 1200W Max MOTOR HEATER 19W Applianc...

Страница 7: ...anadian Electrical Code in Canada or the ANSI NFPA 70 National Electrical Code in the United States TRD 33 Description ELECTRIC FIREPLACE Voltage 120V AC 60Hz Watts 1200W Max MOTOR HEATER 19W Applianc...

Страница 8: ...anadian Electrical Code in Canada or the ANSI NFPA 70 National Electrical Code in the United States TRD 38 Description ELECTRIC FIREPLACE Voltage 120V AC 60Hz Watts 1200W Max MOTOR HEATER 19W Applianc...

Страница 9: ...Canadian Electrical Code in Canada or the ANSI NFPA 70 National Electrical Code in the United States TRD 44 Description ELECTRIC FIREPLACE Voltage 120V AC 60Hz Watts 1200W Max MOTOR HEATER 19W Applian...

Страница 10: ...Canadian Electrical Code in Canada or the ANSI NFPA 70 National Electrical Code in the United States TRD 48 Description ELECTRIC FIREPLACE Voltage 120V AC 60Hz Watts 1200W Max NO HEATER 22W MOTOR HEA...

Страница 11: ...ning the listed mantel and combustibles clearances a rain protection overhang factor of 1 2 shall be constructed to the front and to each side of the installed appliance See illustration below All wir...

Страница 12: ...te the size of your dge of the appliance Any new wiring must be des and other applicable regulations liance to make sure the appliance is fully oper rd into a 120 Volt grounded outlet e off the trim N...

Страница 13: ...2 When the trim is removed take 13 take off the front glass panel Inner side panels 3 Unscrew the screws located on ed on each side and take off the inner side stee e steel panels...

Страница 14: ...lation 5 Put the fireplace into the wall op 14 appliance and fasten with screws NOTE This the wall opening well and there is no gap betw all opening and fix it to the wall by screwing 2 This step is t...

Страница 15: ...6 Remove the trim following STEP 7 Put back the front glass panel a 15 STEP 1 Screw back the inner side steel pane el and screw back the trim after you finish th l panels ish the media decoration...

Страница 16: ...ate and scre ely and let cool before servicing Only a qualified lectric appliance is appliance a qualified electrician must remove ire the appliance directly to the household wiring ally connected and...

Страница 17: ...EDIA Pour the fire glass media into the tray Feel free to use any combination of the fire glass media that you find most appealing Put back the trim and front glass after you finish installing the fir...

Страница 18: ...mes to set ambient temperatures at 18 22 72 23 73 24 75 25 ON or OFF When setting the temperature th for 5 seconds to switch between Celsius and F with a safety cut off which will operate if the ir ve...

Страница 19: ...used on the fireplace BLUE Each click adjusts the intensity of the blue flame Use alone or in addition to yellow and or orange YELLOW Each click adjusts the intensity of the yellow flame Use alone or...

Страница 20: ...24 VAC Install Wall Thermostat per instructions provided with kit and per the following information 1 Turn off circuit breaker 2 Remove cover plate located on the left side of appliance 3 Pull the wi...

Страница 21: ...10702248 BACK GLASS 6 BOX 7 301506 REMOTE RECEIVER 8 601094H CIRCUIT BOARD 9 602130B BLOWER AND HEATER ASSEMBLY 10 10101225 FLAME MOTOR 11 3085504E 3087504E 3089504E FLICKER ASSEMBLY 12 601136B 60113...

Страница 22: ...301506 REMOTE RECEIVER 8 601095D CIRCUIT BOARD 9 602130B BLOWER AND HEATER ASSEMBLY 10 10101225 FLAME MOTOR 11 3218507 3219507 3220507 FLICKER ASSEMBLY 12 601136B 601136B 601136B LED STRIP 3 2 2 12 6...

Страница 23: ...23 EXPLODED VIEW 3 1 2 4 4 5 6 8 9 11 10 12 7...

Страница 24: ...fuse has blown Replace the fuse Appliance will not come on when switch is flipped to ON Appliance is not plugged into an electrical outlet Check plug and plug in Appliance has overheated and safety de...

Страница 25: ...25 SERVICE HISTORY This heater must be serviced annually depending on usage Date Dealer Name Service technician Name Service Performed Special Concerns NOTES...

Страница 26: ...of purchase of the cover is required for any warranty claims Defects Defects must be brought to the attention of the selling dealer Please have your proof of purchase catalogue model and serial number...

Отзывы: