


Содержание BI-DEEP-XT
Страница 1: ...Fix your Fireplace BI DEEP XT...
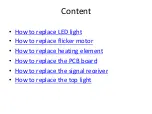
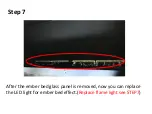
Страница 3: ...Replace LED light Remove the trim Step 1 Replace ember bed LED light...
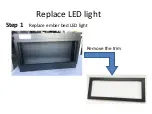
Страница 4: ...Step 2 Unscrew the screw in the middle and then to get out the front panel Unscrew the screw...
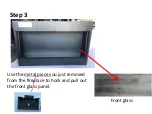
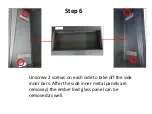
Страница 6: ...Step 4 Unscrew one screw on both sides Zoomed view...
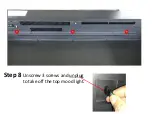
Страница 10: ...Unscrew 3 screws and unplug to take off the top mood light Step 8...
Страница 11: ...Unscrew 5 screws to remove the top fending bar for the flame effect glass panel Step 9...
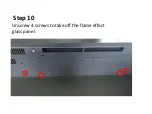
Страница 12: ...Unscrew 4 screws to take off the flame effect glass panel Step 10...
Страница 13: ...Now you can replace flame Effect LED light bars Step 11...
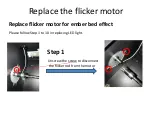
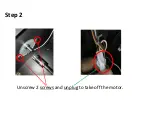
Страница 15: ...Unscrew 2 screws and unplug to take off the motor Step 2...
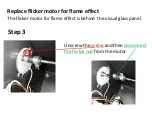
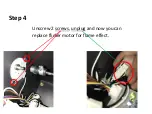
Страница 17: ...Unscrew 2 screws unplug and now you can replace flicker motor for flame effect Step 4...
Страница 19: ...Step 1 Unscrew the screws to take off the holding metal bar for flame effect glass panel...
Страница 20: ...Step 2 Unscrew 10 screws to remove the heating set from the unit...
Страница 21: ...Step 3 After the screws are removed you can pull out the heating set from the unit...
Страница 22: ...Step 4 Unplug and you can replace the heater...
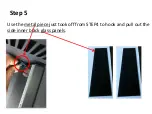
Страница 23: ...Step 5 Unplug to replace the heating element please note to keep the parts...
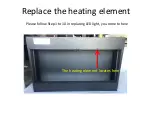
Страница 24: ...Replace PCB board Please follow Step 1 to 4 in replacing LED light you come to here The PCB board locates here...
Страница 25: ...Step 1 Unscrew 2 screws on left side to take off the side inner panel...
Страница 26: ...Step 2 Unscrew 4 screws to pull out the PCB board set...
Страница 27: ...Step 3 Turn around the PCB board set and unscrew the 5 screws to take off the PCB board from the set...
Страница 29: ...Step 1 Unscrew 2 screws to disconnect the signal receiver from the unit...
Страница 30: ...Step 2 Please follow Step 1 to 3 in replacing PCB board you come to here...
Страница 31: ...Step 3 Please follow Step 1 to 3 in replacing PCB board you come to here...
Страница 32: ...Step 4 Unplug to take off signal receiver from unit...
Страница 34: ...Replace top light Remove the trim Step 1...
Страница 35: ...Step 2 Unscrew the screw in the middle and then to get out the front panel Unscrew the screw...
Страница 37: ...Unscrew 3 screws and unplug to take off the top mood light Step 4...