Amantii 40-TRV-XL-XT Скачать руководство пользователя страница 28


28


                                                      FIG.4   

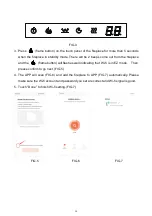
3.  Press            (flame button) on the touch panel of the fireplace for more than 5 seconds 

when the fireplace in standby mode. There will be 2 beeps come out from the fireplace 

and the           (flame button) will flash as well indicating that Wi-fi is in EZ mode.    Then 

please confirm to go next. (FIG.5) 

4.  The  APP  will  scan  (FIG.6)  and  add  the  fireplace  to  APP  (FIG.7)  automatically.  Please 

make sure the Wi-fi account and password you set are correct and Wi-fi signal is good. 

5.  Touch “Done” to finish Wi-fi setting.(FIG.7) 


                      FIG.5                                            FIG.6                                              FIG.7 


Содержание 40-TRV-XL-XT

Страница 1: ...N WARNING For your safety always comply with all warnings and safety instructions contained in this manual to prevent personal injury or property damage Do not store or use gasoline or other flammable...

Страница 2: ...IONS 11 SAFETY DRILL SCREW AREA 12 OUTDOOR INSTALLATION 12 INSTALLATION 13 HARDWIRE INSTALLATION 19 MEDIA OPTIONS 22 DECORATIVE MEDIA INSTALLATION 22 OPERATION 23 MANUAL OPERATION 23 REMOTE CONTROL OP...

Страница 3: ...ea and where it will not be tripped over 7 Do not modify this fireplace Use it as described in the manual Any other use not recommended by the manufacture may cause fire shock or injury to persons 8 D...

Страница 4: ...y energy and if not installed and used in accordance with the instructions may cause harmful interference to radio communications However there is no guarantee that interference will not occur in a pa...

Страница 5: ...a plug as shown in A An adapter as shown in C is available for connecting three blade grounding type plugs to two slot receptacles The green grounding lug extending from the adapter must be connected...

Страница 6: ...m 33 837 2mm 395 8 1007mm 133 4 348mm 61 4 160mm 14 1 4 363mm 55 8 144mm This appliance has been tested in accordance with the UL Standard 2021 for fixed and location dedicated electric room appliance...

Страница 7: ...33 837 2mm 495 8 1261mm 133 4 348mm 61 4 160mm 14 1 4 363mm 55 8 144mm This appliance has been tested in accordance with the UL Standard 2021 for fixed and location dedicated electric room appliances...

Страница 8: ...5 8 1515mm 631 4 1605 6mm 133 4 348mm 61 4 160mm 14 1 4 363mm 55 8 144mm This appliance has been tested in accordance with the UL Standard 2021 for fixed and location dedicated electric room appliance...

Страница 9: ...4 1910 4mm 715 8 1819 8mm 133 4 348mm 61 4 160mm 15 1 2 393mm 55 8 144mm This appliance has been tested in accordance with the UL Standard 2021 for fixed and location dedicated electric room appliance...

Страница 10: ...4 2316 8mm 875 8 2226 2mm 133 4 348mm 61 4 160mm 15 1 2 393mm 55 8 144mm This appliance has been tested in accordance with the UL Standard 2021 for fixed and location dedicated electric room applianc...

Страница 11: ...Gage Fuse 120 V 14 GA 15 AMP 240 V 14 GA 20 AMP Table 1 Consult with professional electrician and adhere to all code requirements for installations in bathrooms FOR BATHROOM USE If this unit is insta...

Страница 12: ...in outdoor areas protected from direct water impingement In addition to maintaining the listed mantel and combustibles clearances a rain protection overhang factor of 1 2 shall be constructed to the f...

Страница 13: ...34 72 TRV XL XT TV T190072 01 75 3 4 14 1 4 34 88 TRV XL XT TV T190088 01 93 3 4 14 1 4 34 W D H 13 INSTALLATION The TRV XL XT models are designed to be built in and allow for the finishing material d...

Страница 14: ...and the wall studs To fix the bottom of the fireplace and the wall studs with the framing plates that you ve removed from left and right side of the fireplace at STEP 4 Plug in and check if the firepl...

Страница 15: ...from front and right side take off the fending panel on the right 2 Unscrew 7screws on the right side that fix the fending bar and panel and then take off the fending bar and panel 3 After the fendin...

Страница 16: ...To fix the bottom of the fireplace and the wall studs with the framing plates that you ve removed from left and right side of the fireplace at STEP 4 Plug in and check if the fireplace works 7 After c...

Страница 17: ...rew 7 screws on the left side that fix the fending bar and panel and then take off the fending bar and panel 3 After the fending panel is removed screw back the bar 4 Remove the framing plates from th...

Страница 18: ...and the wall studs with the framing plates that you ve removed from left and right side of the fireplace at STEP 4 Plug in and check if the fireplace works 7 After checking that the fireplace operates...

Страница 19: ...ure the live wire goes into the L the neutral wire into N and the ground wire into G Return the cover plate to the left side and screw the two screws back in to fasten the Turn off the appliance compl...

Страница 20: ...NG ERRORS CAN CAUSE IMPROPER AND DANGEROUS APPLIANCE OPERATION L1 BLACK POWER L2 ORANGE POWER G GREEN GROUND N WHITE COMMON N1 BLUE COMMON N2 BLUE COMMON 2 2 WIRING See Power Supply Specifications on...

Страница 21: ...ORS CAN CAUSE IMPROPER AND DANGEROUS APPLIANCE OPERATION L1 BLACK POWER L2 ORANGE POWER G GREEN GROUND N WHITE COMMON N1 BLUE COMMON N2 BLUE COMMON 3 2 WIRING See Power Supply Specifications on Page 1...

Страница 22: ...wobracketswhich arefendingthefrontglasspanel Screwsandbrackets 2 Afterthebracketsareremoved thefrontglasspanel willfalldownautomatically 4 Installing the fire glass media Pour the fire glass media int...

Страница 23: ...ff time 30min 1h 2h 3h 4h 5h 6h 7h 8h t0 The indicator light turns off automatically leaving it not operated within 10 seconds The timing turns off when is pressed 5 Press to turn on and off the heate...

Страница 24: ...o confirm day of the week and then enter hour setting Press or to set the hour press to confirm the hour and then enter minute setting Press or to set the minute and press to confirm the minute and fi...

Страница 25: ...LCD screen of the remote control shows 6 6 6 Press or or to change the brightness of each color flame 7 Day Timer Function Press once 7 days from Monday to Sunday will display on the LCD screen of the...

Страница 26: ...da will disappears NOTE If the 7 day timing and the general timing are set at the same time the system will respond to an earlier shutdown time Press Refer button to check the settings of 7 day timer...

Страница 27: ...one download and install 2 Scan the QR code below with your mobile phone WIFI SETTING AND FIREPLACE OPERATION 1 Create an account and log in 2 When you log in touch FIG 1 to enter in FIG 2 Touch other...

Страница 28: ...om the fireplace and the flame button will flash as well indicating that Wi fi is in EZ mode Then please confirm to go next FIG 5 4 The APP will scan FIG 6 and add the fireplace to APP FIG 7 automatic...

Страница 29: ...29 6 Now you are in the interface like FIG 7 You can operate the fireplace via Wi fi FIG 7...

Страница 30: ...44 Qty 12 601144 Qty 8 8 Flicker Assembly 2 3151505B 3123505B 3124505B 3125505B 3235505 9 Flame Motor 2 1010501 1010501 1010501 1010501 1010501 10 Touch Panel 1 10124003 10124003 10124003 10124003 101...

Страница 31: ...EXPLODED VIEW 31...

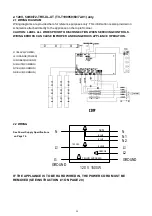
Страница 32: ...Wiring Diagram 32...

Страница 33: ...gged into an electrical outlet Check plug and plug in Appliance has overheated and safety device has caused the thermal switch to disconnect Turn off the main switch allow appliance to cool for 10 min...

Страница 34: ...SERVICE HISTORY This heater must be serviced annually depending on usage Date Dealer Name Service technician Name Service Performed Special Concerns NOTES 34...

Страница 35: ...35...

Отзывы: