background image

3

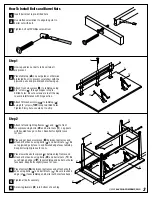
How To Install Bolts and Barrel Nuts

Insert barrel nut in pre-drilled hole.

Use slotted screwdriver to align long slot in 

barrel nut with bolt. 

Tighten bolt with Phillips screwdriver.

1
2

3

Step 2

Attach left and right leg frames (

C

)


and


(

D

) to front 

crosspiece using bolts (

2

) and barrel nuts (

1

). Leg posts 

with beveled tops go in front. Keep bolts slightly loose  

for now.

Place upper back crosspiece (

E

) between leg frames and 

attach at both ends using bolts (

2

) and barrel nuts (

1

). Be 

sure plywood pads face in and finished edge faces tabletop. 

Keep bolts slightly loose for now. 

Place lower back crosspiece (

F

) between leg frames and 

attach at both ends using bolts (

2

) and barrel nuts (

1

). Be 

sure finished edge (of 

F

) faces tabletop and barrel nut holes 

face back. Keep bolts slightly loose for now.

Place footrest (

G

) between leg frames and attach at both 

ends using bolts (

2

) and barrel nuts (

1

). Be sure rounded 

edge (of 

G

) faces tabletop and barrel nut holes face back. 

Tighten all bolts securely.

Screw leg levelers (

3

) into bottom of each leg.

1

2

3

4

5
6

Step 1

Unwrap and lay out parts to be certain all  

are present.

Place tabletop (

A

) on a carpeted or otherwise 

protected floor (to prevent scratches) with the 

plywood pads and pre-drilled holes facing up. 

Attach front crosspiece (

B

) to tabletop using 

3/4" screws (

9

) through hinges into pre-

drilled holes. Be sure screws are in all the way 

to avoid interference with hinge action.

Attach tilt mechanisms (

12

) to tabletop (

A

using 3/4" screws (

10

) into pre-drilled holes. 

Tighten firmly but use care not to strip.

1

2

3

4

9

A

B

12

10

2

3

2

1

1

C

D

G

F

E

©2009 ALVIN & COMPANY, INC.

Содержание Vanguard VAN48

Страница 1: ...Vanguard Table Assembly Instructions VAN48 www alvinco com 2010 ALVIN COMPANY INC Bloomfield CT 06002 ...

Страница 2: ...wer Slide 14 12pcs Wood Hole Plugs 15 4pcs Screws for Pencil Ledge 3 4 Thank you for purchasing this Alvin table Need assistance with assembly Call customer service at 1 800 444 2584 Visit us on line at www alvinco com 1 Power tools for assembly are not recommended Great care must be taken to avoid over tightening screws so that holes are not stripped accidentally 2 Wood products can be easily scr...

Страница 3: ...dge of F faces tabletop and barrel nut holes face back Keep bolts slightly loose for now Place footrest G between leg frames and attach at both ends using bolts 2 and barrel nuts 1 Be sure rounded edge of G faces tabletop and barrel nut holes face back Tighten all bolts securely Screw leg levelers 3 into bottom of each leg 1 2 3 4 5 6 Step 1 Unwrap and lay out parts to be certain all are present P...

Страница 4: ...wer supports I to front and back crosspieces using 1 bolts 7 and nuts 6 through pre drilled holes Tighten all drawer support bolts securely 1 2 3 4 4 1 2 Attach tilt mechanisms 12 to back crosspiece using 3 4 screws 10 into pre drilled holes Tighten firmly but use care not to strip Carefully return table to the upright position This may require two people HINT Grasp entire assembly by the tabletop...

Страница 5: ...screws 11 into pre drilled holes 1 Step 5 Attach drawer knob and bolt set 4 to drawer face K through pre drilled hole in center Tighten firmly Attach drawer face to drawer J using 1 bolts 8 into threaded inserts Slide drawer dividers M into desired slots in drawer Slide drawer into opening in front of base frame 1 2 3 4 5 8 4 K J M 11 13 2009 Alvin Company Inc ...

Страница 6: ... The ratcheted tilt mechanisms allow the tabletop to be set to a variety of comfortable working angles Simply lift the tabletop from the back edge until it clicks into the desired position To return the top to the flat position raise the back edge as high as it will go releasing the ratchet mechanism allowing the top to be lowered gently Pencil Ledge Pencil ledge has two functions depending on whi...

Отзывы: