background image

••

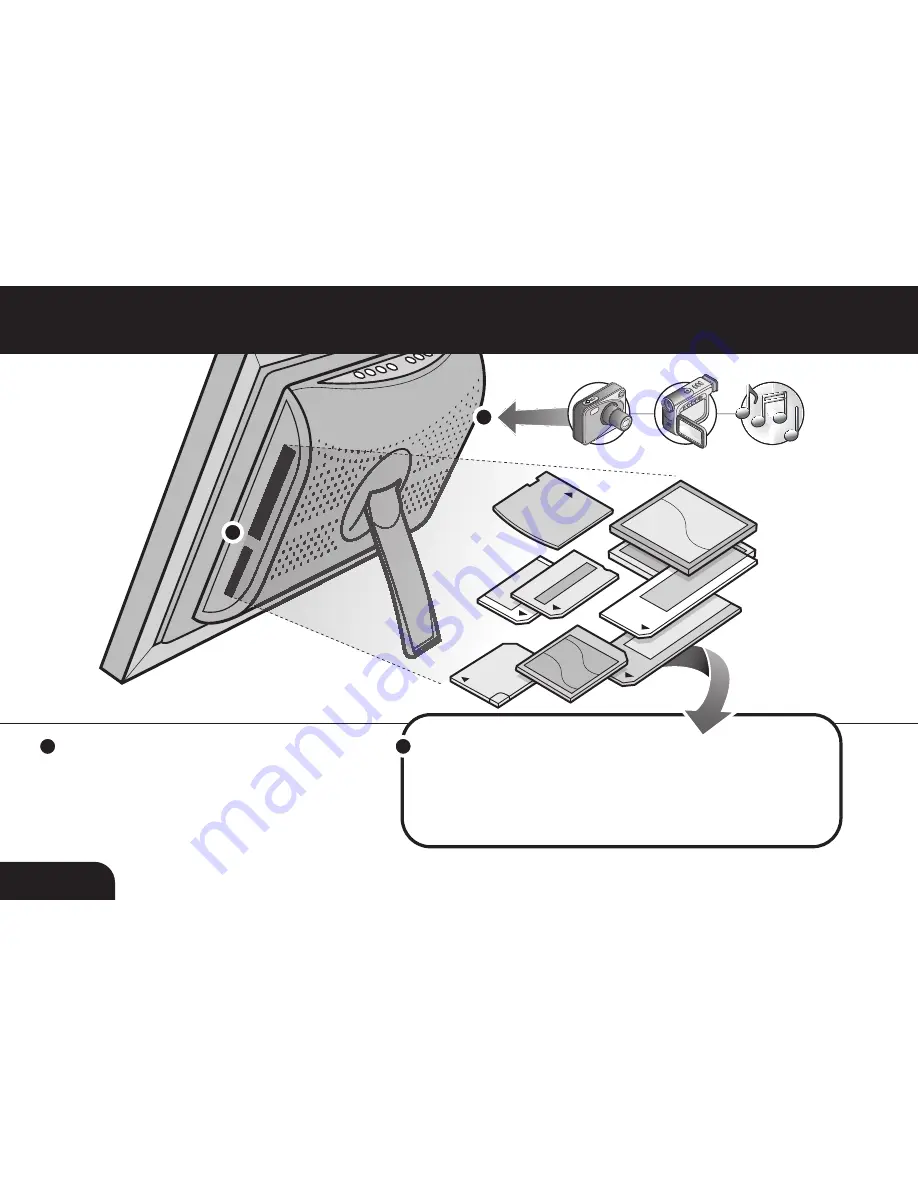
CF/MD

SD/MMC/MS/XD

A

B

A

B

Application

Insert any of the following memory cards:

Compact Flash (CF) Type I, II, Ultra, and Extreme; 

Secure Digital (SD); MMC; RS-MMC; Memory 

Stick (MS); Memory Stick Pro; Memory Stick Duo; 

Memory Stick Pro Duo; XD and Micro Drive (MD)

Connect any mp3 device, digital 

camera or digital camcorder

through the unit’s USB ports

- OR -

08

Содержание ADMPF107

Страница 1: ...7 Digital Photo Frame model ADMPF107 Instructional Manual mnl M10040...

Страница 2: ...Adjust Speed of Slideshow Adjust Order of Pictures in Slideshow Listen to Music Song Display Turn On Off Background Music During Slideshow Adjust Music Play Options View Videos Copy File Between Memo...

Страница 3: ...n In addition to making sure only quality materials are used for manufacturing Aluratek is also dedicated to provide the best customer satisfaction and support The goal of Aluratek is to embody Simple...

Страница 4: ...easily transfer your favorite pictures music or videos to the on board memory with hi speed USB 2 0 Can be displayed either on a table top with the included stand or mounted on a wall Ease of operati...

Страница 5: ...igital Photo Frame Remote Control Power Adapter Instructional Manual Warranty Registration Card Features cont USB Host Device Functions Any MP3 or USB mass storage device can be inserted into the USB...

Страница 6: ...oto Frame Highlights 7 viewing area Quality wood frame Built in speakers Menu selection buttons Headphone jack Power adapter port USB port connection CF MD MS SD MMC XD Card reader slots Remote contro...

Страница 7: ...4 Rotate Rotate pictures 90 degrees 5 Up Down Left Right Arrows Use arrow keys to navigate your way throught various menus 6 Return Returns to the previous menu 7 Enter 8 Stop 9 Volume Volume 10 Play...

Страница 8: ...memory cards Compact Flash CF Type I II Ultra and Extreme Secure Digital SD MMC RS MMC Memory Stick MS Memory Stick Pro Memory Stick Duo Memory Stick Pro Duo XD and Micro Drive MD Connect any mp3 dev...

Страница 9: ...2 Remove the plastic insulator from the battery on the remote control Step 3 Plug in the power adapter and then press the power button on the remote control or the power button on the photo frame to t...

Страница 10: ...SB port Once connected you will notice the digital photo frame will appear as an external drive on your computers device manager Simply drag and drop the photo music and or video les you would like to...

Страница 11: ...les Photo Music Combo Movie and Text you want to display play as it appears on the OSD by pressing Enter on the included remote control You will then see SD MMC MS CF XD NAND and USB appear on the OS...

Страница 12: ...gle up or down to select your desired picture then press Enter again to view The default mode is in slideshow you can disable it by pressing Enter twice to pause the particular picture You may manuall...

Страница 13: ...the remote to start a slideshow with pictures music stored in the onboard memory Picture Display Once an image is chosen press Enter again on the remote control for more options Pause Play Stop Rotat...

Страница 14: ...es options on the OSD pic 1 2 Scroll to Setup and press the Enter button on the remote control 3 Use the or key to select Picture Set then press Enter or 4 Use the or key to select Slideshow Model the...

Страница 15: ...categories options on the OSD pic 1 2 Scroll to Setup and press the Enter button on the remote control 3 Use the or key to select Picture Set then press Enter or 4 Use the or key to select Picture Pl...

Страница 16: ...ter and then select the desired media type 2 A list of the MP3 les stored on your media will appear on the OSD Use the or key on the remote control to select the desired song then press Enter 3 The ne...

Страница 17: ...17 Operations cont Song Display Once an song is chosen press Enter again on the remote control for more options Play Time Stop Play Mode Rwd Song Track Info Pause Prev Speci cations Fwd Next...

Страница 18: ...Press BGM on the remote to turn on off background music during slideshow Adjust Music Play Options 1 During music playback press the key on the remote control to the play mode selection below 2 Press...

Страница 19: ...tton then press Enter and select the desired media type and press Enter 2 You will see a list of Video les that are stored on your media Use the or buttons on the remote control to select which le you...

Страница 20: ...you want to copy the le to and press Enter 5 Press OSD button and select from to the list to copy the le 6 Press Enter once the le transfer is completed Set The Power on Menu Preference 1 Exit comple...

Страница 21: ...ther assistance please contact Aluratek support department prior to returning this device E mail support aluratek com Web www aluratek com support Local Irvine CA 949 419 6504 Toll free 1 866 580 1978...

Страница 22: ...energy and if not installed and used in accordance with the instruction may cause harmful interference to radio communications However there is no guarantee that interference will not occur in a part...

Страница 23: ...ne other than Aluratek D Products sold AS IS or WITH FAULTS IN NO EVENT SHALL ALURATEK S LIABILITY EXCEED THE PRICE PAID FOR THE PRODUCT FROM DIRECT INDIRECT SPECIAL INCIDENTAL OR CONSEQUENTIAL DAMAGE...

Страница 24: ...Aluratek Inc 12A Mauchly Irvine CA 92618 sales aluratek com 949 419 6504 of ce 949 419 6477 fax aluratek com...

Отзывы: