background image

T R O U B L E S H O O T I N G

47

CombiTouch ERROR CODES

Error 
Code

Error Call Out in Display

Description of Error

Possible Cause

E34

Steam Generator Drain 
Pump Fault

Water level in steam 
generator does not drop 
during cleaning program

—  Scale build up inside the steam generator 

drain pump.

—  Scale build up inside the steam generator affecting 

water level probes.

—  Generator drain pump is faulty.
—  Connection issue at drain pump.
—  No output to pump from relay board.

E36

Steam Temperature High

Oven cavity temperature is 
too high when operating in 
a steam mode or cleaning 
program

—  Water supply is shut off.
—  Low water pressure.
— Wiring or connection issue.
—  Water injection pipe obstructed.
—  Water fl ow control valve plugged or defective.
—  Dual solenoid valve Y-1 obstructed or defective.
—  No output to solenoid valve form relay board.

E51

No Water In Boiler

Water inside steam generator 

does not reach low water 

level

—  Water supply is shut off.
—  Low water pressure.
—  Generator drain cap missing or loose.
—  Generator drain pump is not sealing.
—  Generator drain pump elbow leaking.
—  Faulty or scaled water level probe.
—  Faulty or plugged dual solenoid valve assembly.
—  Wiring or connection issue.
—  No output to dual solenoid from relay board.

E53

Fan Motor High
Temperature

Fan motor too hot

—  Exhaust hood is not operating properly.

—  Check LED fl ashes on the Motor Control.

—  

See Motor Control Error Code list

.

—  Connection Issue on Hall Effect sensor.

— Fan wheel is not operating.

— Hall sensor does not detect motor rotation.

E54

Fan Motor 2 High
Temperature

20•20 lower fan motor too hot

—  Exhaust hood is not operating properly.

—  Check LED fl ashes on the Motor Control.

—  

See Motor Control Error Code list

.

—  Connection Issue on Hall Effect sensor.

— Fan wheel is not operating.

— Hall sensor does not detect motor rotation.

E55

Vent Not Open

Browning valve does not open

—  Alignment issue between motor cam and vent 

motor safety switch (micro switch).

—  Fault vent valve (motor).
—  Fault vent valve safety switch (micro switch).
—  Wiring or connection problem.

(Continued on next page)

Содержание CombiTouch 7.14es

Страница 1: ...3800 800 558 8744 USA CANADA FAX 262 251 7067 800 329 8744 U S A ONLY www alto shaam com MN 29249 04 12 p r i n t e d i n u s a Combitherm Combination Oven Steamer CombiTouch series CombiOven and CombiSmoker step by step cooking guide and Operation manual 7 14es CombiTouch 7 14esG CombiTouch ...

Страница 2: ...pe Programming 24 Bakery Recipes 25 Convenience Product Recipes 26 27 Fish Seafood Recipes 28 Meat Recipes 29 30 Miscellaneous Recipes 31 Poultry Recipes 32 Vegetable Recipes 33 34 HACCP ACCESS 35 CLEANING MAINTENANCE Cleaning Menus 36 Grease Collection Hook Up 37 Preventive Maintenance 38 Food Trolley Cleaning 38 Protecting Stainless Steel Surfaces 39 Cleaning Agents 39 Cleaning Materials 39 Dail...

Страница 3: ...t on breads and pastry items Multi shelf timers Track cooking time of either 7 or 10 different food items depending on oven size in the same oven with multi shelf timers Time is tracked in minutes and seconds On board diagnostics The CombiTouch system includes on board diagnostic functionality with results displayed right on the touch screen Reduced energy setting CombiTouch features an interactiv...

Страница 4: ...creen when the oven is next powered up see illustration 3 at left Return to Recipe Menu Press the red arrow if the CombiTouch screen does not need to be calibrated Begin Calibration Process Press the green check mark if the CombiTouch screen does need to be calibrated The screen will switch to a grey background see illustration 4 at left A crosshairs icon will appear The operator should touch the ...

Страница 5: ...ble to qualified service technicians 1 Download Recipes Copy all recipes from USB memory stick to oven This will replace and overwrite existing recipes 2 Upload Recipes Copy all recipes from oven to USB memory stick 3 Add All Recipes Copy all recipes from USB memory stick to the oven This will add the recipes to the beginning of the existing recipe list 4 Delete Photos on Oven Delete specific phot...

Страница 6: ...ious Screen Return to previous screen when finished adjusting settings 7 Forward to Next Screen Advance to next screen to review additional settings 8 Sound Alarm Settings Change alarm sounds and volume 9 Touchscreen Brightness Adjust brightness of Touchscreen 10 Lock Unlock Recipes Password protect preprogrammed recipes 11 Set Change Date Time Set or change oven time and date settings 12 HACCP Da...

Страница 7: ...heat 13 reduced Power mode 17 go to Previous Screen 11 cool down 16 fan speed 22 Multi shelf timer 20 find recipe 18 grease collection optional 19 add recipe 12 start stop icon 14 gold n brown mode 5 Convection mode 6 retherm mode 4 combination mode 15 smoking mode optional 23 Delta T only visible in certain modes 2 Power OFF key ...

Страница 8: ...rature of the product 10 Preheat Mode Preheats the oven cavity to a temperature set by user 11 Cool Down Mode Lowers temperature of the oven cavity at an accelerated pace to temperature set by user 12 Start Stop Initiates all cooking mode functions and programmed procedures stored in memory Stops an activated cooking mode or programmed procedure currently in progress auxiliary function Icons 13 Re...

Страница 9: ...onvection 350 F 175 C 160 F 70 C 30 minutes Retherm 275 F 135 C 160 F 70 C 5 minutes 1 Press Oven Power switch ON The Recipe Menu screen will load 2 Press the red arrow key to access the Main Menu screen 3 Press the Settings key 4 Press Fahrenheit or Celsius key Choose temperature format you prefer 5 Press the red arrow key to access the Main Menu screen 6 Press Oven Power switch OFF changE the te...

Страница 10: ...ated throughout this guide important safety precautions CAUTION METAL PARTS OF THIS EQUIPMENT BECOME EXTREMELY HOT WHEN IN OPERATION TO AVOID BURNS ALWAYS USE HAND PROTECTION WHEN OPERATING THIS APPLIANCE DANGER AT NO TIME SHOULD THE INTERIOR OR EXTERIOR BE STEAM CLEANED HOSED DOWN OR FLOODED WITH WATER OR LIQUID SOLUTION OF ANY KIND DO NOT USE WATER JET TO CLEAN SEVERE DAMAGE OR ELECTRICAL HAZARD...

Страница 11: ...en check mark key to confirm change Or to set Continuous Operation mode press the icon and touch the green check mark key to confirm TO COOK BY product core TEMPERATURE touch the probe icon The previously set core temperature or oven control default setting will appear highlighted within the oven display Touch the displayed core temperature The internal product core temperature will appear at the ...

Страница 12: ...same time but attention must be paid to the different cooking times required for each food product High Temp STEAM High temperature steaming is suitable for hearty root type vegetables such as potatoes turnips carrots and cabbage High temperature steaming provides a cooking time which is approximately 10 percent shorter than the regular steam mode temperature of 212 F 100 C Set the steam cooking t...

Страница 13: ...rrows to adjust time When finished touch the green check mark key to confirm change Or to set Continuous Operation mode press the icon and touch the green check mark key to confirm TO COOK BY product core TEMPERATURE touch the probe icon The previously set core temperature or oven control default setting will appear highlighted within the oven display Touch the displayed core temperature The inter...

Страница 14: ...ional cooking methods Cooking time will be reduced approximately 40 percent when cooking at the same temperature used for convection oven cooking and up to 50 to 60 percent less time when cooking at the same temperature used for a conventional oven Food browning in the Combitherm begins at a cooking temperature of approximately 250 F 120 C A higher cooking temperature results in heavier browning b...

Страница 15: ... the icon and touch the green check mark key to confirm TO COOK BY product core TEMPERATURE touch the probe icon The previously set core temperature or oven control default setting will appear highlighted within the oven display Touch the displayed core temperature The internal product core temperature will appear at the top of the temperature selection window Type in desired internal product core...

Страница 16: ...ction mode works best with foods containing little moisture or for very moist food which require a dryer finished product For baking preheat the Combitherm at a temperature of 325 F to 375 F 163 C to 191 C Once preheated reset the temperature as required A higher cooking temperature results in heavier browning but also results in greater product weight loss To achieve additional browning use the M...

Страница 17: ...RE touch the probe icon The previously set core temperature or oven control default setting will appear highlighted within the oven display Touch the displayed core temperature The internal product core temperature will appear at the top of the temperature selection window Type in desired internal product core temperature or use up and down arrows to adjust temperature When finished touch the gree...

Страница 18: ...ours BANQUET RETHERMALIZATION Banquet rethermalization is designed for high volume full or partial load multiple plate reheating Plates are assembled in advance covered and refrigerated or loaded on the roll in cart and refrigerated Preheat the Combitherm oven at 275 F 135 C for uncovered plates or 300 F 150 C for covered plates Remove plates or the roll in cart from refrigeration load in the oven...

Страница 19: ...ll appear at the top of the temperature selection window Type in desired internal product core temperature or use up and down arrows to adjust temperature When finished touch the green check mark key to confirm change PRESS THE green START arrow icon TO BEGIN COOKING The actual internal product temperature will appear next to the icon during operation To change the set value for core temperature p...

Страница 20: ...erature and time will appear in the display touch the probe icon The previously set core temperature or default setting will appear highlighted within the oven display Touch the displayed core temperature The internal product core temperature will appear at the top of the temperature selection window Type in desired internal product core temperature or use up and down arrows to adjust temperature ...

Страница 21: ...tandard operating condition of this feature Select desired cooking mode Adjust temperature and time settings Press the gold n brown icon Choose the desired Gold n Brown level Level 1 provides least amount of browning level 6 the most After a level has been selected the previous screen will be displayed and the Gold n Brown icon will be highlighted PRESS THE green START arrow icon TO BEGIN COOKING ...

Страница 22: ...he multi shelf timer allows the operator to program alarm times for the oven shelves This can be one common time for all shelves or individual times SET COOKING MODE TEMPERATURE AND TIME The time set by the user will be the default time for the shelf timers Press the multi shelf timer icon Adjust time settings for each shelf and press green check mark key to confirm change Press the green START ar...

Страница 23: ...uct to remain in the oven for a period of one hour If you would like assistance you are invited to contact an Alto Shaam corporate chef for recommendations NOTE Always keep the oven door closed whenever operating the smoking function The CombiTouch CombiSmoker can be operated without using the smoking function After using the oven as a smoker however it is necessary to clean the oven in order to p...

Страница 24: ...and down arrows to adjust temperature then touch the green check mark key to confirm TO COOK BY TIME touch the displayed time The cooking time will appear at the top the time selection window Type in desired time period or use up and down arrows to adjust time When finished touch the green check mark key to confirm change Or to set Continuous Operation mode press the icon and touch the green check...

Страница 25: ...om any screen Navigate to desired recipe icon using green next and previous screen arrows Press icon for desired recipe Cooking steps will start immediately See 25 34 for a list of all preprogrammed recipes stored recipes Previous next screen previous screen recipe range displayed on screen edit recipes recipe menu recipe mode Main menu cooking mode menu stored recipes confirm changes Program edit...

Страница 26: ...s the first recipe in the list 11 Touch the newly saved recipe icon Cooking steps in recipe will immediately start Edit a recipe To edit an existing default or user programmed recipe 1 Select recipe settings mode from the Recipe Menu The touch screen background will turn red to indicate that the user is in EDIT MODE 2 Press the icon of the recipe to be edited Selected recipe will be highlighted 3 ...

Страница 27: ...ish Pastry Combination 350 F 177 C 15 minutes 100 Dinner Rolls Combination 350 F 177 C 10 minutes 100 French Bread Combination 350 F 177 C 20 minutes 100 Fruit Bread Combination 300 F 149 C 50 minutes 100 Fruit Pie Combination 340 F 171 C 30 minutes 100 Muffins Convection 325 F 163 C 15 minutes 50 Par baked Bread frozen Combination 340 F 171 C 15 minutes 100 Par baked Rolls Combination 350 F 177 C...

Страница 28: ...7 C 145 minutes 100 Frozen Entrée Macaroni Cheese Combination 350 F 177 C 140 minutes 100 Frozen Entrée Meat Lasagna Combination 350 F 177 C 150 minutes 100 Frozen Entrée Ratatouille Combination 350 F 177 C 35 minutes 100 Frozen Entrée Stuffed Peppers Combination 350 F 177 C 150 minutes 100 Hamburger Patties Frozen Combination 350 F 177 C 12 minutes 100 4 Hamburger Patties Thawed Combination 350 F...

Страница 29: ...ecipes continued Icon Recipe Oven Mode Temp Time Fan Speed Smoker Browning Level Precooked Chicken Pieces Refrigerated Convection 325 F 163 C 20 minutes 100 1 Spring Rolls Combination 375 F 191 C 15 minutes 100 Tater Tots Combination 375 F 191 C 10 minutes 100 3 ...

Страница 30: ...d Fish Fillets Combination 460 F 238 C 4 minutes 100 Lobster Whole Steam 195 F 91 C 13 minutes 50 Salmon Cold Smoked 1 Convection 34 F 1 C 15 minutes 50 On 2 Convection 34 F 1 C 30 minutes 50 Off Salmon Filets Low Steam 145 F 63 C 7 minutes 50 Salmon Steaks Steam 145 F 63 C 8 minutes 100 Shrimp Smoked Convection 34 F 1 C 10 minutes 50 On Shrimp Steamed Low Steam 160 F 71 C 12 minutes 50 ...

Страница 31: ...elta T 130 F 54 C Probe 125 F 52 C 100 1 Beef Rounds by Time Combination 250 F 121 C 130 minutes 100 Beef Short Ribs Combination 275 F 135 C 90 minutes 100 Beef Short Ribs Smoked 1 Combination 275 F 135 C 30 minutes 50 On 2 Combination 275 F 135 C 60 minutes 100 Beef Tenderloin Combination 250 F 121 C Probe 125 F 52 C 100 2 Beef Tri tips Combination 250 F 121 C Probe 125 F 52 C 100 3 Breakfast Sau...

Страница 32: ...C 45 minutes 100 Pork Back Ribs Smoked 1 Combination 250 F 121 C 60 minutes 100 On 2 Steam 160 F 71 C Continuous 50 Pork Loin Roast by Core Temp Combination 300 F 149 C Probe 150 F 66 C 100 2 Pork Ribs Reheat Combination 400 F 204 C 7 minutes 100 Pork Shoulder Smoked 1 Combination 225 F 107 C 90 minutes 100 On 2 Combination 225 F 107 C Probe 185 F 85 C Rack of Lamb by Core Temp Delta T 130 F 54 C ...

Страница 33: ... at 18 minutes Steam 212 F 100 C 25 minutes 100 Eggs Scrambled in pan Steam 212 F 100 C 15 minutes 100 Eggs Sous Vide Steam 148 F 64 C 45 minutes 50 French Fries Full Load 1 Convection 400 F 204 C 1 minute 100 4 2 Combination 400 F 204 C 9 minutes 100 2 Pasta Steam 212 F 100 C 20 minutes 100 Pate en Croute by Core Temp 1 Convection 350 F 177 C 10 minutes 100 2 Combination 350 F 177 C Probe 135 F 5...

Страница 34: ... 79 C 50 Chicken baked Thawed Pieces Combination 375 F 191 C Probe 170 F 77 C 100 2 Duck Pieces Raw Combination 375 F 191 C 25 minutes 100 4 Duck Whole by Core Temp 1 Combination 250 F 121 C 15 minutes 100 2 Combination 300 F 149 C 10 minutes 100 3 Combination 400 F 204 C Probe 175 F 79 C 100 3 Galantine by Core Temp Low Temp Steam 160 F 71 C Probe 135 F 79 C 50 Grilled Chicken Breasts Combination...

Страница 35: ...0 C 6 minutes 100 Broccoli Frozen Steam 212 F 100 C 3 minutes 100 Brussel Sprouts Frozen Steam 212 F 100 C 6 minutes 100 Cabbage Fresh Steam 212 F 100 C 10 minutes 100 Carrots Fresh Steam 225 F 107 C 10 minutes 100 Carrots Frozen Steam 212 F 100 C 6 minutes 100 Cauliflower Fresh Steam 212 F 100 C 5 minutes 100 Cauliflower Frozen Steam 212 F 100 C 4 minutes 100 Corn Kernels Frozen Steam 212 F 100 C...

Страница 36: ...00 C 100 Green Beans Frozen Steam 212 F 100 C 100 Parsnips Fresh Steam 230 F 110 C 100 Peas Frozen Steam 212 F 100 C 100 Potatoes Red or Salad Steam 212 F 100 C 100 Squash Fresh Steam 212 F 100 C 100 Turnips Fresh Steam 230 F 110 C 100 Zucchini Fresh Steam 212 F 100 C Time 8 minutes 5 minutes 10 minutes 4 minutes 30 minutes 3 minutes 10 minutes 3 minutes 100 ...

Страница 37: ...and held devices 1 To download the data collected remove the cap of a USB port located on the left side of the oven and insert the USB flash drive If the flash drive is not recognized by the Combitherm a question mark will appear on screen Try again with another flash drive device or call Alto Shaam Service 2 Press to download information 3 Wait for the icon to change from loading to complete 4 Pr...

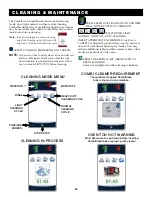
Страница 38: ... Press Green water on icon to confirm that water supply is turned on Select rinse light normal or heavy duty cleaning INsert appropriate number of CombiClean tablets as directed by touchscreen or spray interior of oven with combitherm liquid spray cleaner User may add one additional tablet in either normal or heavy duty modes for particularly dirty ovens PRESS THE green START arrow icon TO BEGIN C...

Страница 39: ...from the back of the unit Screw on to collection container until snug Turn ball valve handle to the ON position Automatic Grease Collection System is electronically activated during the chicken cooking process PATENT PENDING It is designed to save labor and provide greater employee safety by eliminating the need to handle hot grease in shallow pans On Off Ball Valve Grease Collection Hose 5014542 ...

Страница 40: ...unds found in fat particularly chicken fat will weaken the composition of the gasket unless cleaned on a daily basis Wipe with a hot soapy cloth TO ADDITIONALLY PROTECT GASKET LIFE ALLOW OVEN DOOR TO REMAIN SLIGHTLY OPEN AT THE END OF THE PRODUCTION DAY An open door will relieve the pressure on the door gasket ROUTINELY CLEAN DOOR HINGES Open oven door to relieve tension Clean all parts of the hin...

Страница 41: ...ing water as quickly as possible after rinsing CLEANING AGENTS Use non abrasive cleaning products designed for use on stainless steel surfaces Cleaning agents must be chloride free compounds and must not contain quaternary salts Never use hydrochloric acid muriatic acid on stainless steel surfaces Always use the proper cleaning agent at the manufacturer s recommended strength Contact your local cl...

Страница 42: ...probe with a disposable alcohol pad prior to inserting into a new food product DAILY OVEN CLEANING To be performed at the end of the production day or between production shifts DAILY STEAM GENERATOR FLUSH Electric boiler equipped models only See next page for instructions The steam generator must be flushed once a day when operating the oven on a regular basis This procedure will prevent lime depo...

Страница 43: ...d respiratory tract irritation keep out of reach of children precautions Do not take internally Avoid contact with eyes and skin Use rubber gloves when using this product Wash hands thoroughly after handling Avoid mixing with strong concentrated acids first aid Skin Flush with water Remove contaminated clothing and do not re wear until washed If irritation persists see a physician Eyes Flush with ...

Страница 44: ...uard Cover Plate toward the back of the oven to gain access to the Steam Exit Port Using a funnel with a flexible hose inserted into the Steam Exit Port slowly pour solution in to the Steam Generator until full Continue with the next steps that are used for all models ON ALL models Press the on off power key to the ON position Select cleaning mode from any screen NOTE If oven is too hot an oven wi...

Страница 45: ...ven in the event of an error code PRESS THE START icon TO ACKNOWLEDGE THE ERROR The icons that begin to flash represent operational modes that are still usable SELECT ONE OF THE available COOKING MODES SET THE OVEN CONTROLS AS IF OPERATING UNDER NORMAL CIRCUMSTANCES Depending on the error code involved oven function such as temperature range may be limited PRESS THE START icon TO BEGIN COOKING PRE...

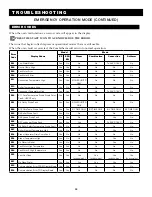
Страница 46: ...ACCP only Yes Yes No No No No E21 N6 Cavity Probe Fault Yes Yes BOILER UNITS ONLY No No No E22 B10 Core Temp Probe Fault Yes Yes BY TIME ONLY BY TIME ONLY BY TIME ONLY BY TIME ONLY E23 B4 Boiler Probe Fault Yes No No No No No E24 B5 Bypass Probe Fault Yes Yes No No Yes No E25 B3 Condenser Probe Fault Yes Yes Yes No To 356 F 180 C No E26 N8 Boiler Safety Temperature Probe Fault Yes No No No No No E...

Страница 47: ...aulty or plugged dual solenoid valve assembly Wiring or connection issue No output to dual solenoid from relay board Relay board high voltage is not operating E02 Control Temperature High Relay board surface temperature too high Wiring or connection issue Cooling fan on Relay board assembly is not operating Cooling Fan on display board is not operating Main Cooling fan is not operating Cooling Fan...

Страница 48: ...fective B11 Single Point Core Temperature probe receptacle wires disconnected E21 N6 Cavity Probe Fault Cavity temperature probe defect or disconnected N6 Oven Cavity Temperature probe defective N6 Oven Cavity Temperature connection problem E22 B10 Core Temperature Probe Multipoint Fault Multipoint core temperature probe defect or disconnected B10 Multipoint Core Temperature probe defective B10 Mu...

Страница 49: ...ply is shut off Low water pressure Generator drain cap missing or loose Generator drain pump is not sealing Generator drain pump elbow leaking Faulty or scaled water level probe Faulty or plugged dual solenoid valve assembly Wiring or connection issue No output to dual solenoid from relay board E53 Fan Motor High Temperature Fan motor too hot Exhaust hood is not operating properly Check LED flashe...

Страница 50: ...s mentioned below Ribbon cable defective Relay board low voltage connector defective Display board connector defective E98 RB is in Cesius and DB is in Fahrenheit Conflict of unit configuration in the setup menu Relay board and Data board do not match use setup menu to change format E99 RB is in Fahrenheit and DB is in Cesius Conflict of unit configuration in the setup menu Relay board and Data bo...

Страница 51: ...g sequence with 4 flashes per period Blocked motor detected by current peak monitoring from 900 rpm rotating field overcurrent Led flashing sequence with 5 flashes per period intermediate circuit current exceeds 4 0a Short circuit Led flashing sequence with 6 flashes per period Release of interrupt at intermediate circuit current larger than 53a power on Led flashing sequence with 7 flashes per period eff...

Отзывы: