


5
Features
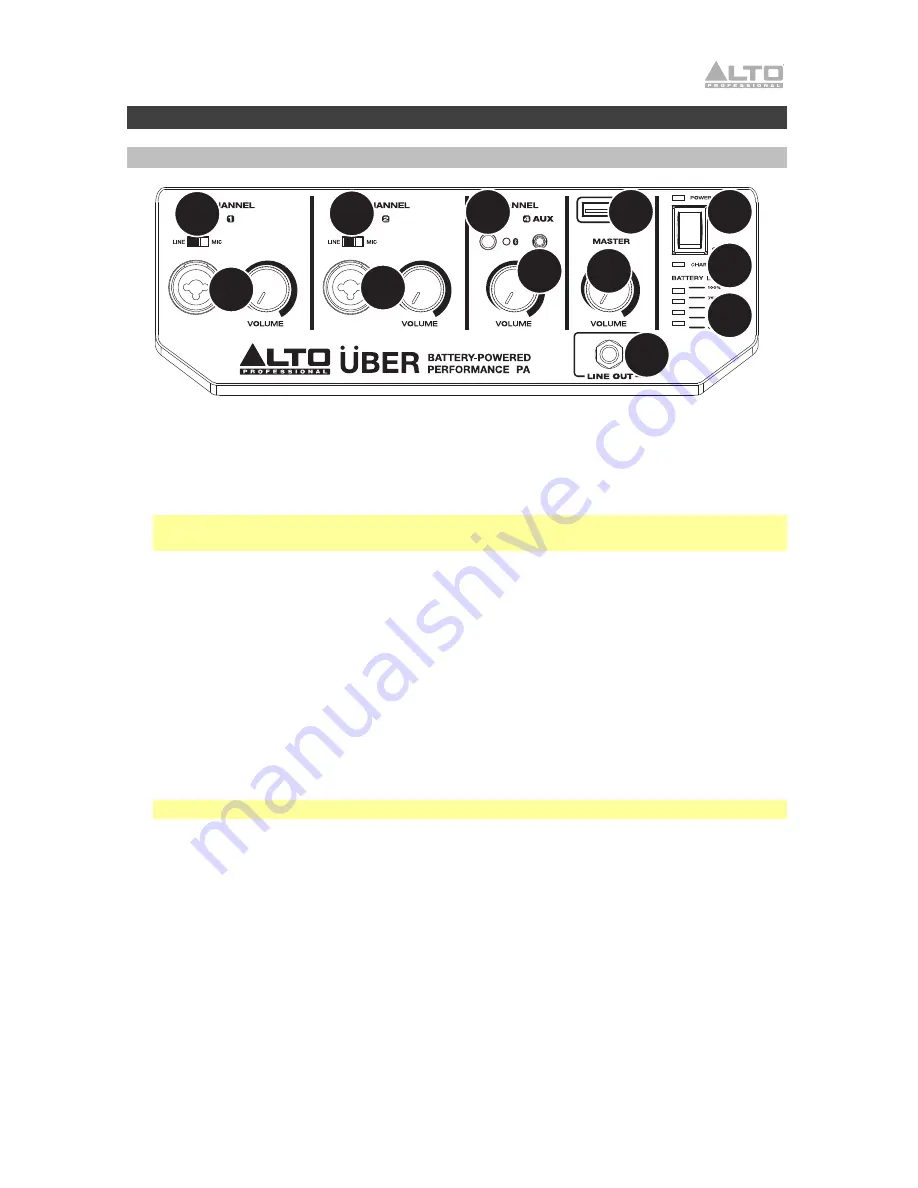
Front Panel
1
2
5
3
4
6
7
8
9
1
2
10
1.
Combo Inputs with Volume Control:
Use a standard 1/4" (6.35 mm) TRS or XLR cable
(
not included
) to connect your sound source to each input. Use the
Volume
knob to adjust
the level of each one.
2.
Line/Mic Switch:
Use this switch to set the
Input
to accept either a Line-level or Mic-level
sound source.
Note:
When using an instrument with passive pickups, set the switch to the
Mic
setting.
When using an instrument with active pickups, set the switch to the
Line
setting.
3.
Bluetooth
®
:
The
Bluetooth LED
will be lit when a device is paired to Uber. This LED will
not be lit when Uber is first powered on (unless it was previously paired with a device).
Press the
Bluetooth button
to disconnect a paired Bluetooth device.
4.
Auxiliary Input with Volume Control:
This stereo 1/8” (3.5 mm) input can be used to
connect a CD player, MP3 player, or other audio source. The
Volume
control adjusts
auxiliary input and Bluetooth volume.
5.
Master Volume Control:
This adjusts the loudspeaker's main mix volume, which includes
Instrument/Microphone Inputs, Auxiliary Input, and the audio of a paired Bluetooth device.
6.
Line Out:
Use a standard 1/4" (6.35 mm) TRS cable (
not included
) to connect this output
to the input of another loudspeaker. The Line Out is post-Master Volume Control.
7.
USB Charging Port:
Connect your device’s charge cable here to charge it. USB charging
only functions when the unit’s power is turned on.
Note
: To charge smartphones and tablets faster, put the device’s screen to sleep.
8.
Power Switch:
Use this switch to power the loudspeaker on or off. Make sure all
Volume
knobs are set to "zero" before powering it on. When the loudspeaker is powered on, the
Power LED
above it will be lit.
9.
Charge Indicator:
This LED will illuminate when Uber is connected to AC power to
indicate it is charging. Once charging is complete, the LED will go off.
10.
Battery Level Indicator:
While the unit is powered on, these four lights indicate the power
left in the battery. Battery life varies based on volume and usage.
11.
Power Cable Input
(rear panel)
:
Insert the included power cable here to charge the unit.
Please note that when the power cable is connected, the battery will still charge while the
unit is in use.
12.
NFC
(Near-Field Communication) (top panel)
:
Touch and briefly hold your supported and
enabled device to the NFC logo to pair the device. See
Pairing a Bluetooth Device Using
NFC
for more information.
Содержание Uber
Страница 40: ...altoprofessional com Manual Version 1 1...


