


Chapter 2: Getting Started with the Stratix V Hard IP for PCI Express
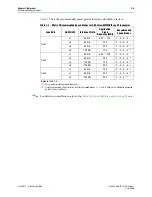
2–3
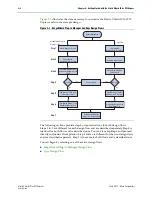
MegaWizard Plug-In Manager Design Flow
June 2012
Altera Corporation
Stratix V Hard IP for PCI Express
MegaWizard Plug-In Manager Design Flow
This section guides you through the steps necessary to customize the Stratix V Hard
IP for PCI Express and setup the example testbench, starting with the creation of a
Quartus II project. It includes the following steps:
■
■
Customizing the Endpoint in the MegaWizard Plug-In Manager Design Flow
■
Understanding the Files Generated
■
Generating the Simulation Model Using Qsys
■
Compiling the Design in the MegaWizard Plug-In Manager Design Flow
■
Creating a Quartus II Project
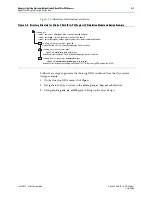
Follow these steps to copy the example design files and create a Quartus II project.
1. Choose
Programs > Altera > Quartus II
<version>
(Windows Start menu) to run
the Quartus II software.
2. On the Quartus II File menu, click
New,
then
New Quartus II Project
, then
OK
.
3. Click
Next
in the
New Project Wizard:
Introduction
(The introduction does not
display if you previously turned it off.)
4. On the
Directory, Name, Top-Level Entity
page, enter the following information:
a. The working directory for your project. This design example uses
<working_dir>
/example_design
b. The name of the project. This design example uses
pcie_de_gen1_x8_ast128
1
The Quartus II software specifies a top-level design entity that has the same
name as the project automatically. Do not change this name.
5. Click
Yes
, if prompted, to create a new directory.
6. Click
Next
to display the
Add Files
page.
7. Click
Next
to display the
Family & Device Settings
page.
8. On the
Device
page, choose the following target device family and options:
a. In the
Family
list, select
Stratix V (GS/GT/GX)
.
b. In the
Devices
list, select
Stratix V GX PCIe
.
c. In the
Available devices
list, select
5SGXEA7K2F40C2
.
9. Click
Next
to close this page and display the
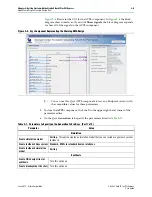
EDA Tool Settings
page.
10. From the
Simulation
list, select
ModelSim
®
. From the
Format
list, select the HDL
language you intend to use for simulation.
11. Click
Next
to display the
Summary
page.
12. Check the
Summary
page to ensure that you have entered all the information
correctly.