background image

15


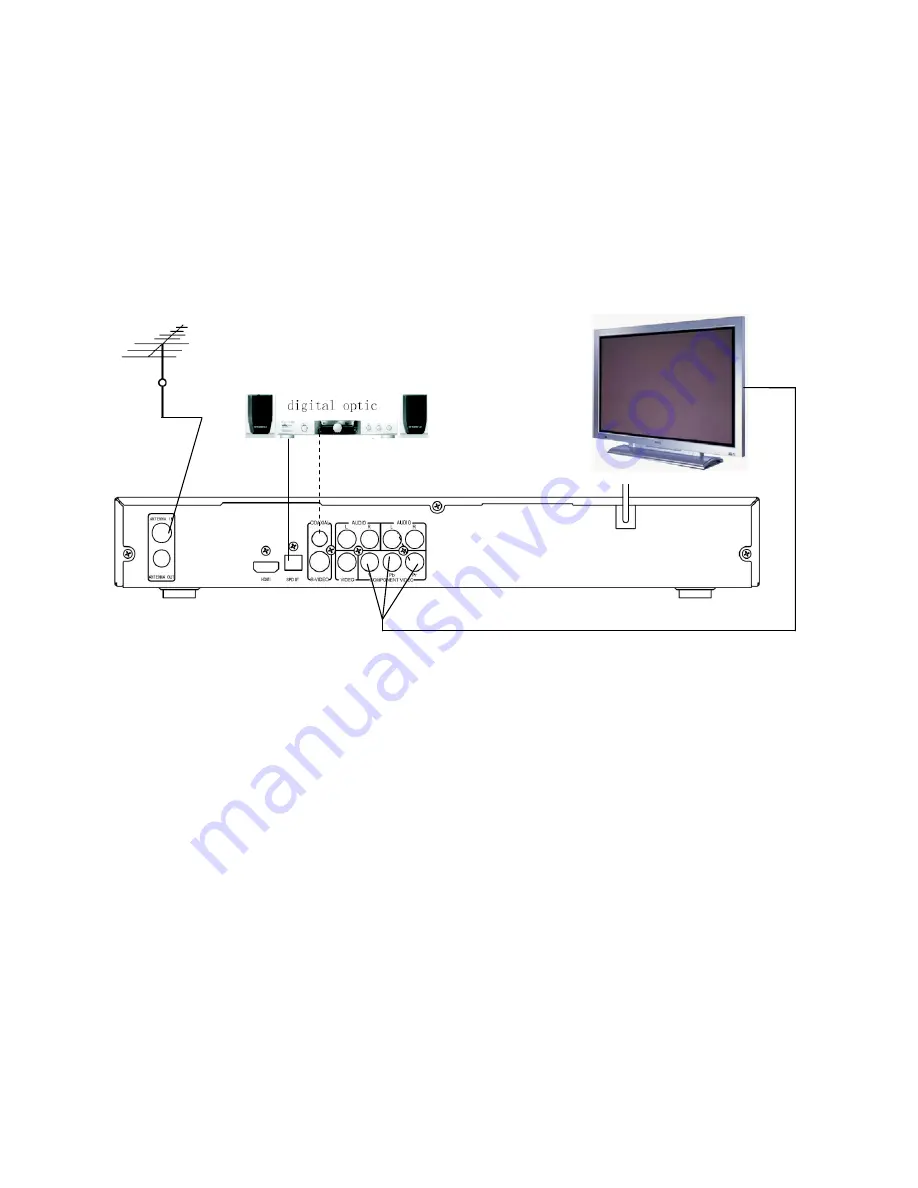
4. SET UP- Amplifier 

For  this


Set  Up,  use  your  preferred  video  connection,  the  example  below 

shows video connection via YPbPr (component), you can use other methods 
from  the  previous  examples.  You  will  also  need  an  Optical  cable  for  the 
audio set up. 


4.1 Prepare your equipment


Make  sure  that  your  television  monitor  has  a  component  input;  it  may  be 
labeled  “YPbPr”,  COMPONENT  VIDEO.  In  any  case  it  will  be 
characterized by the red, green and blue connectors and grouped together. 
Ensure that the power leads to both the TV monitor and the Set Top Box are 
unplugged before you commence the set up procedure. 

4.2 Connecting Video and Audio 

Video 
Follow the instructions for one of the previous video set up examples to suit 
your system.   
Audio 
a) Connect the optical cable to the SPDIF/COAXIAL connector on the rear 
of the set top box. 
b) Connect the other end of the optical cable to the Amplifier. 

Содержание PVR 6690

Страница 1: ...TWIN TUNER HIGH DEFINITION DIGITAL RECORDER PVR 6690 500 GB...

Страница 2: ...ECTION 11 1 SET UP YPbPr 11 2 SET UP HDMI 12 3 SET UP CVBS 13 4 SET UP Amplifier 15 POWER ON 16 SCANNING CHANNELS 17 SETTINGS INSTALLATION SET UP 18 SOFTWARE UPGRADE 20 PVR FUNCTIONALLITY 22 FILE PLAY...

Страница 3: ...ing storms or when unused for long periods of time 14 Refer all servicing to qualified service personnel Servicing is required when the device has been damaged in any way such as power supply cord or...

Страница 4: ...close the lid 10 OK Operation confirmation 11 MENU Menu entry 12 EXIT Exit operation REAR PANEL 1 Terminal ANTENNA IN connection with antenna signal 2 Terminal ANTENNA OUT Antenna signal loop through...

Страница 5: ...cause corrosion or fluid leakage Please observe the following instructions for the safe use of batteries 1 Be aware of polarities of batteries 2 Never leave dead batteries in the remote control 3 Remo...

Страница 6: ...guide Please allow time for information to load RECALL recalls the previous channel AUDIO displays the Audio sub menu OK Operation confirmation VOL Volume adjustment CH Channel changing LIST TV or rad...

Страница 7: ...o output format between 16 9 4 3 pan scan and 4 3 letter box CC closed caption on off C Play Access currently recording programs Chase Play P List lists recorded programs from hard drive T Rec Access...

Страница 8: ...n the lid 2 Load the batteries and attend whether the terminal and terminal of battery are corresponding to the polarity indicated on the remote controller 3 Close the lid POINT the control toward the...

Страница 9: ...g i e ABC news or Manual timer press the T Rec on the remote and access the recording list and follows instructions on bottom of page to book event for recording using time i e 7 00 a m 9 00 a m 2 Rec...

Страница 10: ...ing from the beginning 8 USB Recording An external hard drive max 320Gb can be connected to the PVR for recording programs directly onto The file format is FAT32 and the PVR can be used to format the...

Страница 11: ...f the RCA leads that came with this Set Top Box or an optical cable for the audio connection All of video output modes are active simultaneously 1 1 Prepare your equipment Make sure that your TV has Y...

Страница 12: ...nna Connect the antenna lead to the ANTENNA IN connection on the rear of the Set Top Box 1 4 Connect the power a Plug the connector of the power line of the receiver into the socket b Connect the powe...

Страница 13: ...nect the antenna lead to the ANTENNA IN connection on the rear of the Set Top Box 2 4 Connect the power a Plug the connector of the power line of the receiver into the socket b Connect the power to yo...

Страница 14: ...the red and white connectors of the RCA lead to the corresponding colored audio output connectors on the rear of the Set Top Box b Connect the other end of the cable to the corresponding colored conne...

Страница 15: ...be labeled YPbPr COMPONENT VIDEO In any case it will be characterized by the red green and blue connectors and grouped together Ensure that the power leads to both the TV monitor and the Set Top Box a...

Страница 16: ...er line of the receiver into the socket b Connect the power to your monitor and turn it on you are now ready to get started c Connect the power to your monitor and amplifier and turn them on you are n...

Страница 17: ...rt press OK to commence scanning Image of scanning process right side Manual highlight Search Mode press the key LEFT RIGHT to switch type between Auto and Manual Highlight Frequency KHz press the dig...

Страница 18: ...e UP DOWN key to highlight the Settings press OK then input code 0000 to enter TV display aspect can be set up here also available on Hot Key 16 9 4 3 Three modes are available 16 9 4 3 full and 4 3 l...

Страница 19: ...ighlight the instruction SystemSetting press OK to enter Information Plate Time to set the duration of the information bar on the screen when switching channels Transparency of the menu after highligh...

Страница 20: ...vice and insert into front USB port of PVR Select software upgrade function from the menu and press ok to enter During the updating process the system of receiver will go under the order of Checking U...

Страница 21: ...ill be lost and the unit will need a rescan STORED PROGRAMS ON THE HARD DRIVE WILL NOT BE ERASED The factory reset function can also be used to unlock the PVR If you are finding that the PVR is not fu...

Страница 22: ...This setting can be changed by accessing the PVR menu and is under the RECORD SETTINGS option The info bar on the right shows recording remaining time and record status 2 Timer record Here you can pr...

Страница 23: ...re the coloured buttons on the remote is used to book recordings If you want to record to record program once press the RED button on the remote control If you want the same program recorded as a seri...

Страница 24: ...mode You can select either of the 2 programs to play from the beginning 6 Recorded list Access your recorded program by pressing the P LIST button on your remote Here the program will start playing in...

Страница 25: ...exit and the PVR will prompt you select yes no to save edited file 8 Timer Record Shows list of recordings that have been scheduled Can be active via a hot key on remote T Rec 9 Record Settings Here...

Страница 26: ...own This includes FFW REW Skip backward Skip forward and seek play During playback of a file the yellow button is used to skip backwards and the blue button is used to skip forward These buttons are o...

Страница 27: ...The PVR will ask you to select hard drive source Once you have accessed the external hard drive you can select to play your MP3 music 3 Hard drive Format It is advisable to occasionally format your i...

Страница 28: ...GB or copy files into external hard drive from the internal hard drive 5 Below are 2 information screens you need to be aware of if you have an external hard drive inserted TV RADIO CHANNEL Press the...

Страница 29: ...AUDIO key to display a dialog box Audio CTL Here you can select to mix stereo audio to mono so you can connect your audio output to one RCA connnector MULTI AUDIO While watching a program you can sel...

Страница 30: ...Audio Sampling Frequency Audio Freq response Audio Output Level Audio Output Terminal Power supply voltage Power consumption Temperature Weight 75 ohm MPEG II H 264 MP HL PAL CVBS YPbPr HDMI S VIDEO...

Страница 31: ...is defaced or altered than the warranty will be rendered invalid 4 Cost of transportation both ways to and from the authorized service centre being met by the owner if it is necessary to return the pr...

Страница 32: ...32 support uec com au...

Отзывы: