Alpine NVD-A111
SMART MAP PRO Скачать руководство пользователя страница 23

15

Manual backup

The navigation system will automatically back up (save) your new settings (for example, address
book settings etc.) when the ignition switch is turned off and turned on again. If the battery leads
should be disconnected from the vehicle's battery, be sure to manually back up your new settings
before disconnecting the battery leads as described below.
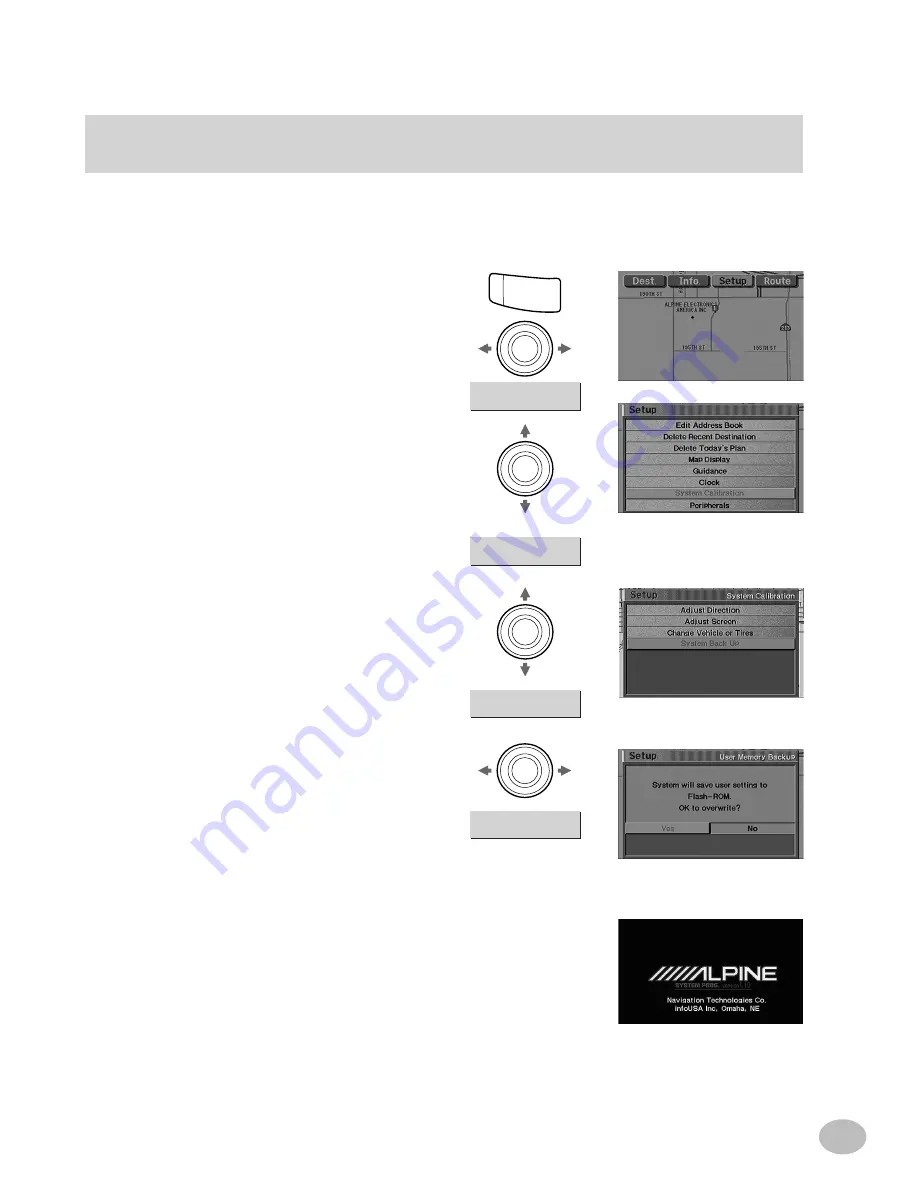
Press the 

MENU 

button to display the

main menu bar. Select 

Setup

 and press

ENTER

. The Setup Menu appears.

Select 

System Calibration

 and press

ENTER

.

The 

User Memory Backup 

screen

appears. If you would like to save your
settings to Flash ROM, select "

Yes

" and

press 

ENTER

.

Highlight 

System Back Up

 and press

ENTER

.

1

2

3

M E N U

Set  up

System  Backup

ENTER

ENTER

ENTER

System  Calibration

ENTER

Yes

Continued next page

The navigation system begins the
backup process and the display darkens.
Once the backup process is complete,
the opening screen will appear.

4

Содержание NVD-A111 SMART MAP PRO

Страница 1: ...000 ALPINE ELECTRONICS GmbH Kreuzerkamp 7 11 40878 Ratingen Germany Tel 02102 45 50 ALPINE ITALIA S p A Via C Colombo 8 20090 Trezzano Sul Naviglio MI Italy Tel 02 48 47 81 ALPINE ELECTRONICS FRANCE S...

Страница 2: ...ii...

Страница 3: ...i...

Страница 4: ...due to misspelling omission of letters or any other cosmetic discrepancy in layout found in Disk and or Database The right to use the Disk and Database shall expire either when the user destroys this...

Страница 5: ...oduction Because of changes in streets and neighbourhoods there may be situations where the navigation system is not able to route you to your desired destination In these cases use your own judgment...

Страница 6: ...e instructions in this manual This manual uses various pictorial displays to show you how to use this product safely and to alert you to potential dangers resulting from improper connections and opera...

Страница 7: ...judgement Any route suggestions by this system should never supersede any local traffic regulations or your personal judgement or knowledge of safe driving practice KEEP SMALL OBJECTS SUCH AS BATTERIE...

Страница 8: ...vi...

Страница 9: ...etup Editing Menu Address Book editing 41 Address Book editing Name Editing 42 Address Book editing Phone Number Editing 43 Address Book editing Special Settings 44 45 Recent Route editing 46 Today s...

Страница 10: ...9 categories an address an intersection a point of interest POI a recent destination your personal address book a special feature called Today s Plan a location selected directly from the map display...

Страница 11: ...tant change GPS Clock This time will automatically adjust according to GPS time This time can also be displayed directly on the map along with your estimated time of arrival ETA or estimated drive tim...

Страница 12: ...isplayed on the road Destination The destination point is represented by a checkered flag Address Book Up to 99 personal locations and phone numbers can be stored in the system s memory Popular Points...

Страница 13: ...cal characters CANC button Cancels current display screen and switches back to previous screen with menus MP RG button Toggles between Detailed Map Display and Basic Guide Display during guidance Swit...

Страница 14: ...imately 10 minutes to calculate the vehicle s current position During this period the vehicle position icon may not move even if the vehicle is being driven Once the ENTER button on the remote control...

Страница 15: ...cation is incorrect drive the car several miles in an area with an open view to the sky This will correctly synchronize the navigation system Press the MENU button on the remote control The main menu...

Страница 16: ...thod to find the point of interest and press ENTER In this example City Name Input is being selected Note If you select Sorted by distance a list of destinations will appear sorted by the distance fro...

Страница 17: ...ct SW or the South West area The current area being searched is shown as WEST The Input City Name screen will appear and will show South West as the area selected Proceed to step 10 b c d e f The sele...

Страница 18: ...LIST at the top of the character pallet and press ENTER The Select City screen appears Use the joystick to enter a city name and scroll down to select that city Press ENTER when finished LOS ANGELES C...

Страница 19: ...directions and voice prompts If the system determines that you are currently on the route to the destination it will automatically announce the next maneuver once you approach the next turn 14 15 Once...

Страница 20: ...you press the DISP ON OFF button again the display turns back on 3 Switching the display on off a If the DVD ROM is not inserted in the navigation system Please insert DVD ROM is displayed For details...

Страница 21: ...to next maneuver Compass Icon Indicates North and heading mode on the current map N North North Up icon Heading Up icon The arrowhead shows the direction of north Detailed Map Display Vehicle s curre...

Страница 22: ...ves you further information to the voice guidance Sometimes the enlarged crossroad map is displayed even when you are going to go straight Zoomed Intersection Map Display This shows the remaining dist...

Страница 23: ...ed below Press the MENU button to display the main menu bar Select Setup and press ENTER The Setup Menu appears Select System Calibration and press ENTER The User Memory Backup screen appears If you w...

Страница 24: ...screen appears After you have read this important information press the ENTER button The map screen will appear and all of your information will be successfully stored in backup memory 5 ENTER Manual...

Страница 25: ...ne of the following methods used to find an address and press ENTER Select City Unknown if you want to search for the street name and don t know the city name Select City Name Input if you want to sea...

Страница 26: ...by inputting just the start of its name and selecting LIST a If you want to display the list of candidate city names select LIST and press ENTER If the number of candidates narrows down to less than...

Страница 27: ...A range of valid street numbers will be shown just below the input window 8 9 7 2 DONE The Select Street Name screen appears Use the joystick to enter a street name and scroll down to select that str...

Страница 28: ...an address and press ENTER Select City Unknown if you want to search for the street name and don t know the city name Select City Name Input if you want to search for the city name first For this exam...

Страница 29: ...the top of the character pallet and press ENTER Note If Street Name Input is selected first and the intersection exists in multiple cities you will need to select the city name in which the desired i...

Страница 30: ...d press ENTER The system will start to calculate the route Note If you wish to add this entry to Today s Plan select Add to Today s Plan see page 35 To store this destination in your personal address...

Страница 31: ...tion by menu appears Select Point of Interest and press ENTER Select Name from the Find Point of Interest by menu and press ENTER Name 1 Dest Point of Interest 2 3 MENU ENTER ENTER ENTER ENTER ENTER C...

Страница 32: ...The system starts calculating a route to the destination Note If you wish to add this entry to Today s Plan select Add to Today s Plan see page 35 To store this destination in your personal address bo...

Страница 33: ...screen Select Dest from the menu bar then press ENTER to display the Find Destination by menu Select Point of Interest and press ENTER This will display the Find Point of Interest by menu Select Categ...

Страница 34: ...to enter a city name and scroll down to select that city Press ENTER when finished The Input City Name screen is displayed Use the joystick to select the first character of the city name and press EN...

Страница 35: ...ss Book see page 34 The navigation system starts calculating a route to the destination OK to Proceed The Select Point of Interest Name screen appears To select a place scroll through the list highlig...

Страница 36: ...r and press ENTER Enter the phone number including the area code Entering a Point of Interest by Phone Number Dest Phone Number 1 2 The phone number can be input using the numeric keypad on the remote...

Страница 37: ...ct select OK to Proceed and press ENTER The system starts calculating a route to the destination Note If you wish to add this entry to Today s Plan select Add to Today s Plan see page 35 To store this...

Страница 38: ...ons is displayed Select the desired destination and press ENTER The address of the selected destination appears in the Confirm Destination screen If it is correct select OK to Proceed and press ENTER...

Страница 39: ...n by menu appears Select Address Book and press ENTER Your personal entries are listed in alphabetical order Scroll through the list to select the destination and press ENTER The name and address of t...

Страница 40: ...n You do not need know the names of either the streets or POI Press ENTER OK to Proceed To move greater distances on the Detailed Map Display quickly use the Zoom keys on the remote control to zoom ou...

Страница 41: ...menu appears Select Origin of the Route and press ENTER Entering a destination by Origin of the Route Dest Origin of the Route 1 The Confirm Destination screen appears Select OK to Proceed and press E...

Страница 42: ...ination is selected and entered the system allows you to save the address Select Option Menu and press ENTER The Option Menu screen is displayed Select Save in Address Book and press ENTER Saving a de...

Страница 43: ...a destination is selected and entered by any method the Confirm Destination screen is displayed Select Add to Today s Plan and press ENTER The Today s plan list is displayed with the added destinatio...

Страница 44: ...will appear Use the joystick to select the destination you would like to visit first and press ENTER Today s Plan will calculate the most efficient travel order for multiple destinations Up to 8 desti...

Страница 45: ...teps 2 to 3 above OK to Proceed If you would prefer to determine the order of the destinations yourself you may select Manual from the Today s Plan screen in the Route Options for Today s Plan calcula...

Страница 46: ...tion Menu and press ENTER 1 The Option Menu screen is displayed Select Set as Waypoint and press ENTER 2 Waypoint Number setting menu is displayed These points should be set as Waypoint 1 Waypoint 2 W...

Страница 47: ...d by moving the cursor or searching from its address etc the system displays the Confirm Destination screen Select Option Menu and press ENTER 1 Option Menu The Option Menu screen is displayed Select...

Страница 48: ...ed and press ENTER The system starts calculating a route to the destination Note If you wish to add this entry to Today s Plan select Add to Today s Plan see page 35 To store this destination in your...

Страница 49: ...isplayed See below Select yes to execute the deletion c Name You can give a name to a registered point AGo to Page 42 Name Editing d Telephone number Telephone number information can be added to an Ad...

Страница 50: ...ENTER 4 The Input Name for Address Book screen appears Select CLR Clear and press ENTER The current entry will be erased 5 CLR Use joystick to change the address book entry In this example E MONLACO...

Страница 51: ...ress ENTER In this example ALPINE ELECTRONICS is chosen 3 Select Tel and press ENTER 4 The Input Phone Number screen appears Use joystick to add or edit the phone number valid for only 0 or 10 digits...

Страница 52: ...to Beep Directional For details on how to set the direction see Page 68 Direction adjustment You can set the system to beep not only upon approach to a point but also from a specific direction of tra...

Страница 53: ...45 The special use setting list is displayed Press ENTER 6 The memory editing list is displayed 7 ENTER...

Страница 54: ...ENTER The Delete Recent Destination screen appears with a list of up to 20 most recent routes 1 2 Select the address to be deleted and press ENTER In this example KNOTT S BERRY FARM is selected The C...

Страница 55: ...lect the address to be deleted and press ENTER In this example WORLD TRADE CENTER is selected The Confirm Deletion screen appears Select OK to Delete and press ENTER A confirmation window will appear...

Страница 56: ...press ENTER The Arrange Route menu appears Select Edit Route and press ENTER 1 Route editing Route The Arrange Current Route screen is displayed When you select Delete and press ENTER the entire curre...

Страница 57: ...ted The map for the area around the waypoint is displayed The specified waypoint is deleted if you select Delete here then YES in the confirmation screen Drop by When point of departure is specified T...

Страница 58: ...aypoint you want to go first among the waypoints currently set and press ENTER The selected waypoint moves to the right side In this example Waypoint 3 is changed to Waypoint 1 Change other waypoints...

Страница 59: ...location of the present vehicle position icon on the map screen if it is deviated from the real present location of your vehicle The Option Menu screen is displayed Select Set as Current Position and...

Страница 60: ...e and press ENTER The Arrange Route menu appears Select Display Entire Route and press ENTER 1 Route The entire route is displayed on a map with a large enough view that you can see the entire route 2...

Страница 61: ...calculating the route You may select from either Manual or Automatic Use the joystick to toggle between the two selections A When set to Manual the system will recalculate a new route when the DETOUR...

Страница 62: ...A When set to Quickest the system will calculate the most efficient way to arrive at your destination B The Max Fwy Maximize Freeways option calculates a route that makes most efficient use of freeway...

Страница 63: ...Plan List The user will be prompted for the next destination and may select them in any order from Today s Plan List Press the MP RG button The system returns to the Detailed Map display 3 Route Optio...

Страница 64: ...w upcoming turns and street names Recalling the Street List during guidance Street List The Street List is displayed To preview a specific point select a street name maneuver and press ENTER 2 When th...

Страница 65: ...You have 3 choices of display modes A DAY mode maintains a bright tone screen even while your headlights are on B NIGHT mode maintains a dark tone screen even when your headlights are off C AUTO mode...

Страница 66: ...ale settings Press the MENU button to display the main menu bar Select Setup and press ENTER The Setup menu appears Select Map Display and press ENTER Highlight P O I Icons and press ENTER Three modes...

Страница 67: ...Select ON from the P O I Icons menu and press ENTER Press the MP RG button The system returns to the Detailed Map display 5 6 7 ON ENTER MP RG ENTER ENTER ENTER To remove the point of interest icons f...

Страница 68: ...n of the next turn on the map Either North Up or Heading Up can be selected Use the joystick to toggle between the two and press ENTER A When set to North Up the map display will always show the map w...

Страница 69: ...Normal mode the system will emit tones and voice instructions when approaching upcoming maneuvers Voice instructions are announced 1 2 mile before each maneuver on surface streets and one mile before...

Страница 70: ...RG button The system returns to the Detailed Map display Guidance Press the MENU button to display the main menu bar Select Setup from the main menu and press ENTER The Setup menu appears Select Guid...

Страница 71: ...ENTER to end the setting procedure B When set to SFC Surface Road the system will display the Set Assumed Surface Road Speed screen Tilt the joystick to the right or left to increase or decrease the...

Страница 72: ...t your Alpine dealer for further information 4 Setting audio interrupt Press the MENU button to display the main menu bar Select Setup and press ENTER The Setup menu appears Select Guidance and press...

Страница 73: ...ss the MENU button to display the main menu bar Select Setup from the main menu and press ENTER The Setup menu appears Select Clock from the Setup menu and press ENTER From the Clock Set Up screen sel...

Страница 74: ...hange whether Daylight Savings is currently being observed or not select Daylight Savings Time and press ENTER Select ON or OFF depending upon which is currently being observed Press ENTER to save Day...

Страница 75: ...pend on the vehicle manufacturer and the tire size when you buy a new vehicle or replace your tires the vehicle s speed pulses are compared with the distance measured with GPS waves and the distance c...

Страница 76: ...ehicle you can correct the direction of the icon with the following method The direction correction screen is displayed Tilt the joystick toward the left and right to correct the direction Direction a...

Страница 77: ...the display position to match the TV monitor you connect to the system The screen position adjustment screen is displayed 1 2 Screen position adjustment Highlight Adjust Screen and press ENTER 3 Setup...

Страница 78: ...ripheral screen appears in the display and it shows the connection state of the Navigation Interface Mobile Mayday and cellular phone If connections for each item are correctly and securely made the d...

Страница 79: ...ction The vehicle position icon will automatically move along the desired route showing a simulation of how the navigation system functions If waypoints have been set the simulation only shows a route...

Страница 80: ...ving are displayed green and those from which you are not receiving are displayed red Yellow indicates that your position is being calculated a The direction gives the heading of your vehicle a The sp...

Страница 81: ...d To reset the trip Meter Distance Driven Time Elapsed press ENTER A Distance Drive refers to the total distance traveled after the trip meter is reset B Time Elapsed refers to the total time traveled...

Страница 82: ...D ROM s version Make note of this information and refer to it whenever you communicate with Alpine Tech Support or your Alpine authorized dealer The DVD ROM s information is displayed Press ENTER on t...

Страница 83: ...se CenterSM when connected to an Alpine Mobile Mayday System The navigation system will notify you of a pending message by displaying an icon on the screen and sounding a tone Use the following proced...

Страница 84: ...an you may select to change the first destination The system will start recalculating the travel order for Today s Plan Once the system is finished recalculating the Confirm Destination screen appears...

Страница 85: ...t 1 hour Lower the temperature in the vehicle below 122 F 50 C by driving with the windows open or air conditioner on Replace with a fuse of the prescribed rating Symptom The vehicle s position is err...

Страница 86: ...that no waypoint is set The message goes out soon Message Please insert DVD ROM map data disk DVD ROM unreadable Please check DVD ROM DVD ROM being checked Menu inoperable while driving Cautiously bri...

Страница 87: ...79...

Отзывы: