background image

50

-EN

Ai-NET

NORM

EQ/DIV

+

,
-

.

~

)

(

/

:

$

&

<

;

#

8

9

%

1

4

5

6

7

"

!

3

2

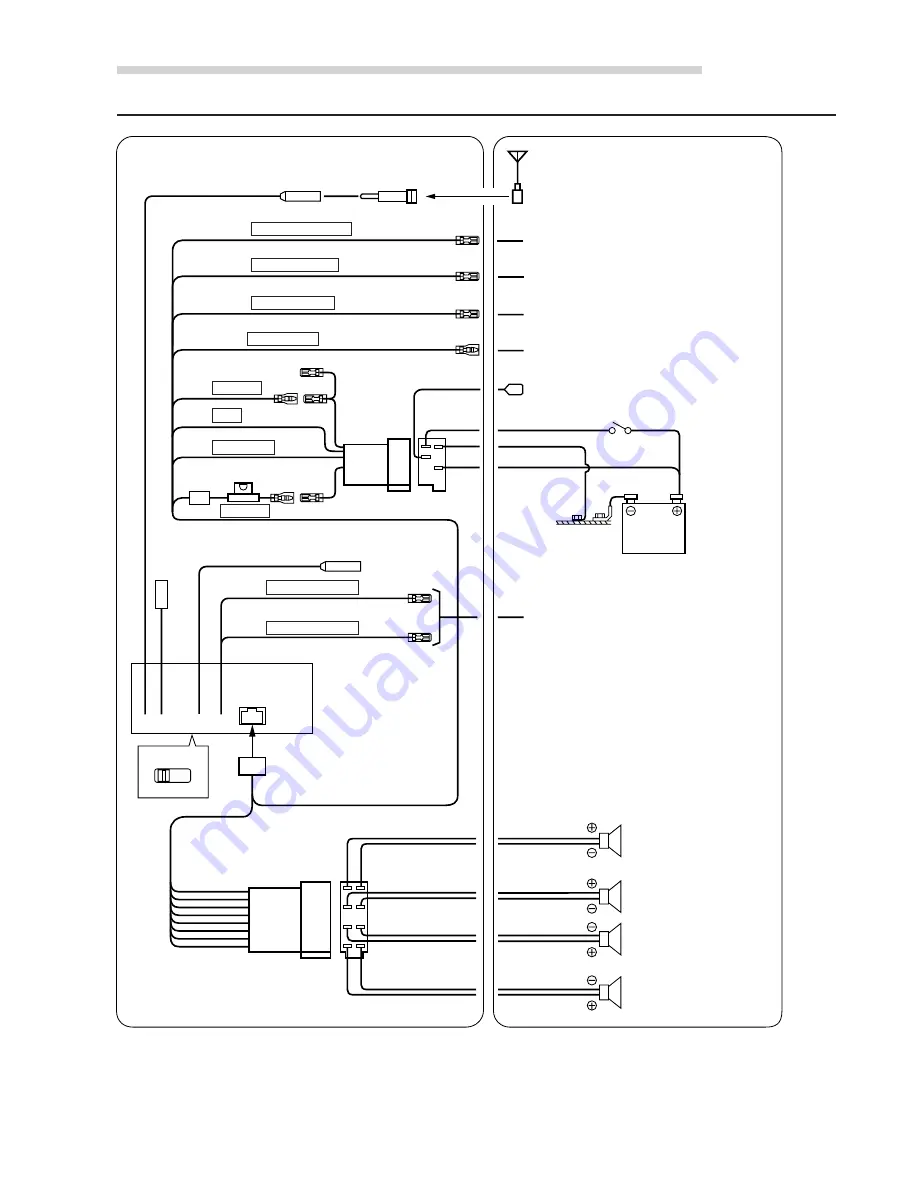
Installation and Connections

Basic Connections

Antenna

ISO Antenna Plug

To remote input lead

To amplifier or equalizer

To power antenna

To vehicle phone

To the parking brake signal lead

Ignitin key

Battery

Front Right

Rear Right

Rear Left

Front Left

Speakers

(Yellow)

(White/Brown)

(Blue/White)

(Blue)

(Pink/Black)

(Yellow/Blue)

(Red)

(Black)

(White/Brown)

REMOTE OUT AUX2

REMOTE OUT AUX1

PARKING BRAKE

BATTERY

POWER ANT

IGNITION

GND

REMOTE TURN-ON

AUDIO INTERRUPT IN

To the instrument cluster illumination
lead

(Orange)

ILLUMINATION

(Grey)

(Grey/Black)

(Violet/Black)

(Violet)

(Green)

(Green/Black)

(White/Black)

(White)

Содержание CVA-1003R

Страница 1: ...13 Vitoria Alava Apdo 133 Spain Tel 34 45 283588 ALPINE ELECTRONICS OF AUSTRALIA PTY LTD 6 8 Fiveways Boulevarde Keysborough Victoria 3173 Australia Tel 03 9769 0000 ALPINE ELECTRONICS GmbH Kreuzerkamp 7 11 40878 Ratingen Germany Tel 02102 45 50 ALPINE ITALIA S p A Via C Colombo 8 20090 Trezzano Sul Naviglio MI Italy Tel 02 48 47 81 Designed by ALPINE Japan Printed in Japan Y 68P41262Y61 O Mobile ...

Страница 2: ... compatible Ai NET et équipé d un convertisseur N A standard d une sortie optique numérique d une mémoire d une capacité de 150 titres et de la fonction CD TEXT Le modèle CHA 1214 Ai NET peut contenir 12 disques Le modèle CHM S620 M Bus est un changeur 6 disques super compact Los cambiadores Alpine de CD le ofrecen más Más selecciones musicales más versatilidad y más ventajas Un cambiador Alpine d...

Страница 3: ...RNING WARNING 3 CAUTION 3 PRECAUTIONS 3 Basic Operation Detaching the Front Panel 6 Attaching the Front Panel 6 Initial System Start Up 6 Turning Power On and Off 7 Raising the Monitor 7 Lowering the Monitor 8 Selecting the Monitor s Opening Position 8 Adjusting the Monitor Viewing Angle 8 Adjusting Volume Balance Between Left and Right Fader Between Front and Rear 9 Turning Loudness On and Off 9 ...

Страница 4: ...n or Off 36 Setting the Clock Display 36 Displaying Time 37 Setting Time 37 Selecting Rear Monitor 37 Setting the External Input 38 Switching NTSC PAL Setting 38 Adjusting Source Signal Levels 39 Switching the Tuner Mode 39 Subwoofer Control On and Off 39 Interrupt Feature MIX LEVEL 40 Setting the External Expansion Box 40 Switching Disc Mode 41 Switching Display Modes 41 Recalling Stored Settings...

Страница 5: ...ERTION SLOTS OR GAPS Doing so may result in personal injury or damage to the product KEEP SMALL OBJECTS SUCH AS BATTERIES OUT OF THE REACH OF CHILDREN Swallowing them may result in serious injury If swallowed consult a physician immediately USE ONLY IN CARS WITH A 12 VOLT NEGATIVE GROUND Check with your dealer if you are not sure Failure to do so may result in fire etc CAUTION This symbol means im...

Страница 6: ...hile the car is moving The car must be parked and the parking brake must be engaged for the procedure described in the Owner s Manual to be valid The warning CAN T OPERATE WHILE DRIVING will be displayed if any attempts are made to perform these operations while driving This operation is the same as when selecting sources using the remote control Optional When the car is parked the selection is ma...

Страница 7: ... functions of this unit with the monitor display open or closed For operations with the monitor display closed refer to page 43 THE MONITOR DISPLAY IS OPEN THE MONITOR DISPLAY IS CLOSED displayed in the sub display displayed in the monitor display ...

Страница 8: ...the main unit Compatibility with Factory Steering Wheel Radio Controls If your vehicle has steering wheel controls for the radio an optional steering wheel control interface may be available to connect your Alpine radio For details contact your Alpine dealer Controllable with Remote Control This unit can be controlled with an optional Alpine remote control For details consult your Alpine dealer Po...

Страница 9: ...T Single Pole Single Throw switch sold separately can be added to simplify this procedure Then you can simply place it in the OFF position when you leave the vehicle Turn the SPST switch back ON before using the CVA 1003R For connecting the SPST switch refer to Connection Diagram of SPST Switch on page 49 Some operation of the unit cannot be performed while the vehicle is in motion In this case be...

Страница 10: ...7 7 8 8 8 8 8 buttons to adjust the monitor s angle so the screen will be in the best viewing position Each press of the buttons produces a beep and changes the screen angle between 40 and 105 degrees When you press and hold the 7 7 7 7 7 or 8 8 8 8 8 ANGLE button for at least 2 seconds the monitor s angle keeps moving until you release the button NOTES If the monitor touches an obstacle while the...

Страница 11: ...his compensates for the ear s decreased sensitivity to bass and treble sound 1 Press and hold the LOUD button for at least 2 seconds to activate or deactivate the loudness mode The display shows LOUD when the loudness mode is activated NOTE When connecting an external audio processor to the unit you cannot use this function VOL BAL FAD Audio Mute Function Activating this function will instantly lo...

Страница 12: ...urrent Time Frequency of the current station Selected Source The current setting status Preset button number for the stored station Automatic Seek Tuning 1 Press the SOURCE button until a radio band and frequency appears in the display 2 Press the BAND button repeatedly until the desired radio band is displayed Each press changes the band FM1 FM2 FM3 MW LW 3 Press the TUNE button to illuminate the...

Страница 13: ...ation in a preset memory which already has a station the current station will be cleared and replaced with the new station Automatic Memory of Station Presets 1 Press the SOURCE button to select the radio mode 2 Press the BAND button repeatedly until the desired radio band is displayed 3 Press and hold the A ME button for at least 2 seconds The frequency on the display continues to change while th...

Страница 14: ...ss the g DN or f UP button to tune in the desired RDS station NOTE With the monitor display closed when the BAND button is pressed and held for at least 2 seconds while a station name is displayed the sub display shows the station frequency for 2 seconds 4 Press the AF button again to deactivate the RDS mode 5 Press the FUNC button to activate the normal mode The FUNC indicator will turn off Tips ...

Страница 15: ... Local station being tuned becomes too weak to receive press the same preset button to tune in a Regional station in other district NOTE For presetting the RDS stations refer to the Radio Operation section The RDS stations can be preset in the FM1 FM2 and FM3 bands only Receiving RDS Regional Local Stations 1 When the monitor display is open press and hold the SETUP button for at least 2 seconds T...

Страница 16: ...ime the volume level will be automatically adjusted to the level memorized In the T INFO mode the SEEK tuning selects only the TP stations g g g g g DN f f f f f UP FUNC P PTY PTY T INFO RDS Operation PTY Programme Type Tuning 1 Press the FUNC button so that the FUNC indicator appears in the sub display To perform the same operation with the monitor display open press the FUNC button only when the...

Страница 17: ...radio or CD MD player e g DVD player Priority PTY Programme Type This function allows presetting of a programme type such as music category news etc You can listen to a programme in the preset programme type as the unit automatically gives priority to the preset programme type when it begins broadcasting and interrupts the programme you are currently listening This feature is functional when your ...

Страница 18: ... a few seconds When the CD Text Scroll Setting is set to SCROLL ON refer to page 35 the display scrolls When set to SCROLL OFF the scrolling is cancelled It continues until other operation is performed 4 To cancel the Radio Text mode press the R TEXT button 5 Press the FUNC button to return to the normal operation mode The FUNC indicator disappears from the display NOTES If there is no receivable ...

Страница 19: ...he CD player the player starts playing 2 To pause playback press the J button Pressing the J button again will resume playback 3 To eject the CD press the eject button on the CD player Music Sensor Skip 1 Momentarily press the g DN button once during CD play to return to the beginning of the current track If you wish to access the beginning of a track further back repeatedly press until you reach ...

Страница 20: ...d in the sub display REPEAT REPEAT ALL off RPT RPT ALL off g g g g g DN f f f f f UP M I X RPT SCAN When the monitor display is open displayed in the monitor display In case a 6 disc CD changer is connected In CD changer mode press the FUNC button to light the FUNC indicator in red and go to step 1 In case a 12 disc CD changer is connected In changer mode press the FUNC button twice to light the F...

Страница 21: ... CD changer is connected In CD changer mode press the FUNC button to illuminate the FUNC indicator and go to step 1 In case a 12 disc CD changer is connected In changer mode press the FUNC button twice to illuminate the FUNC indicator and go to step 1 M I X ALL M I X off Scanning Programmes 1 Press the SCAN button to activate the Scan mode The first 10 seconds of each track will be played back in ...

Страница 22: ...nto all spaces The operations described in steps 3 to 5 must be made within 10 seconds The input mode will be cancelled if no action is taken for over 10 seconds Removing power from the unit may delete these titles Use caution when manipulating the power cord Titling Discs It is possible to title your favourite CD s NOTE The Parking Brake must be engaged to access the Title display mode screen Att...

Страница 23: ...ngers NOTE The controls on the CVA 1003R for CD Changer operation are operative only when a CD Changer is connected 1 Press the SOURCE button to activate the CD changer mode The display shows the disc number and track number NOTE The source indicator varies depending on the connected source CD Player Changer Operation Optional 2 Press the Disc Select buttons 1 through 6 corresponding to one of the...

Страница 24: ...c mode can be switched each time you press the BAND button see Switching Disc Mode on page 41 Multi Changer Selection Alpine s Ai NET system will support up to 6 CD Changers When operating two or more changers the KCA 400C Multi Changer Switching device must be used If you use 1 Switching device you can connect up to 4 CD Changers If you use 2 Switching devices you can connect up to 6 CD Changers ...

Страница 25: ...rarily pause play To resume play press the J button for a second time 3 Press the eject c button on the MD player when you want to eject the MD Music Sensor Skip 1 Momentarily press the g DN button once to return to the beginning of the current track If you wish to access the beginning of a track further back repeatedly press until you reach the desired track 2 Press the f UP button once to advanc...

Страница 26: ... repeatedly Press the RPT button repeatedly until the RPT Repeat indicator disappears to deactivate the repeat play MD Player Operation Optional g g g g g DN f f f f f UP M I X RPT M I X Random Play 1 Press the M I X button in the play or pause mode The M I X indicator will illuminate and the tracks on the disc will be played back in a random sequence After all the tracks on the disc have been pla...

Страница 27: ...that portion J J J J J SOURCE g g g g g DN f f f f f UP Playing DVD Video CD CD If an optional Alpine DVD video CD CD player is connected to the CVA 1003R you can control it from the CVA 1003R WARNING It is dangerous and illegal in many states for the driver to watch the TV Video while driving the vehicle The driver may be distracted from looking ahead and an accident could occur Install the CVA 1...

Страница 28: ...n DVD changer mode press the FUNC button to illuminate the FUNC indicator and go to step 1 Chapter repeat play Title repeat play Repeat Off normal play Track repeat play Disc repeat play Repeat Off video CD only Controlling DVD Changer If an optional Alpine DVD Changer is connected to the CVA 1003R the DVD Changer can be controlled from the CVA 1003R 1 Press the SOURCE button The DVD Changer appea...

Страница 29: ...tion System is connected the display shows the navigation screen 1 Press the SOURCE button to select the Navigation mode NOTE If the Navigation mode does not appear in the display by pressing the SOURCE button set the external setting of NAV IN to ON Refer to Setting the External Input on page 38 SOURCE ...

Страница 30: ...t NO TEXT will be displayed when the CD does not contain CD Text information 2 NO TITLE appears if the title has not been input About Title and Text Title Lets you input characters for the unit to display You can enter the name of a CD as a title You cannot assign titles to MDs with this unit You can however display MD titles that were assigned when it was recorded Some characters may not be displ...

Страница 31: ...n the sub monitor NOTES Some characters may not be displayed correctly with this device depending on the character type The display may not show all the information of the CD Text depending on the CD changer TITLE DISPLAY DISC NAME 2 TITLE DISPLAY TRACK NAME 2 TITLE DISPLAY DISC NAME 2 TITLE DISPLAY TRACK NAME 2 CLOCK DISPLAY ELAPSED TIME DISPLAY ...

Страница 32: ...ES If no buttons are pressed within 10 seconds the Bass control setting will be turned off automatically Depending on the type of external audio processors connected to the unit you may not be able to set some settings The settings of the Bass will be individually memorized for each source FM MW LW and CD until the setting is changed Depending on the connected devices some functions and display in...

Страница 33: ...s are pressed within 5 seconds the Treble control setting will be turned off automatically Depending on the type of external audio processors connected to the unit you may not be able to set some settings The settings of the Treble will be individually memorized for each source FM MW LW and CD until the setting is changed Depending on the connected devices some functions and display indications do...

Страница 34: ...ound signals bypass the surround circuits and directly go to the line output The equalizer curve therefore becomes flat 1 Press and hold the bass engine button for at least 2 seconds to select the DEFEAT mode 2 Press the g DN or f UP button to set DEFEAT to ON OFF 3 When turning DEFEAT ON you can return the settings that you adjusted to the default settings DEFAULT Bass Level 0 Bass Centre Freq 80...

Страница 35: ...ness between MIN 16 and MAX 16 When it reaches the minimum or maximum point the display shows MIN or MAX respectively To set another setting press the Preset 1 button or another Preset button 4 After setting is completed press the SETUP button to return to normal mode NOTE The brightness setting for the Blue screen background and the brightness of the Picture source AUX DVD NAV will be individuall...

Страница 36: ...and the TINT of the Picture source AUX DVD NAV will be individually memorized Switching the Background Screen 1 When the monitor display is open press and hold the SETUP button for at least 2 seconds The SETUP screen appears 2 Press the Preset 1 button to activate the DISPLAY setting mode Press the Preset 1 button again to select BACK GROUND 3 Press g DN or f UP button to select the desired settin...

Страница 37: ...he SETUP button to return to normal mode NOTE The unit scrolls only CD text names and MD title Setting Automatic Opening Closing of Monitor When the Automatic Opening Closing mode is AUTO the monitor automatically opens when the ignition key is turned to the ACC or ON position The monitor automatically closes when the ignition key is turned OFF 1 When the monitor display is open press and hold the...

Страница 38: ...e beep will not be produced when a button on the unit is pressed To set another setting press the Preset 2 button or another Preset button 4 After setting is completed press the SETUP button to return to normal mode g g g g g DN f f f f f UP Preset 2 SETUP TUNE CLOCK Setting the Clock Display 1 When the monitor display is open press and hold the SETUP button for at least 2 seconds The SETUP screen...

Страница 39: ...button to select RETURN then press the TUNE button or the g DN or f UP button 5 After setting is completed press the SETUP button to return to normal mode Selecting Rear Monitor When using the optional expansion BOX KCE 103V If AUX NAV is to ON in Setting the External Input page 38 and if a rear seat monitor and navigation system are connected to the CVA 1003R you can switch the picture sound of t...

Страница 40: ... 1 When the monitor display is open press and hold the SETUP button for at least 2 seconds The SETUP screen appears 2 Press the Preset 3 button to select the AUXILIARY setting mode Press the Preset 3 button to select the desired external input AUX IN or NAV IN If the expansion BOX KCE 103 not supplied is connected and the unit is set to Expand Box ON page 40 you can select AUX 1 IN AUX 2 IN NAV IN...

Страница 41: ... display is open press and hold the SETUP button for at least 2 seconds The SETUP screen appears 2 Press the Preset 5 button to activate the FM setting mode Press the Preset 5 button again to select CONDITION 3 Press the g DN or f UP button to select the desired setting HI FI Sound quality priority setting NORMAL Standard setting STABLE Noiseless priority setting To set another setting press the P...

Страница 42: ...oice guidance in 7 steps To turn off the navigation system s voice guidance press this button repeatedly until OFF appears To set another setting press the Preset 6 button or another Preset button 4 After setting is completed press the SETUP button to return to normal mode NOTES The volume level of the audio will be automatically reduced when the voice guidance of the Navigation system starts When...

Страница 43: ...nitor displays a normal picture wider to fit in the wide screen monitor by unevenly stretching out The centre portion of the picture is stretched out only slightly in order to make the important centre portion of the picture look natural In the Mode 3 Cinema the monitor displays a normal picture by stretching out the picture horizontally and vertically This mode is good for displaying a cinema typ...

Страница 44: ...watch the video portion of another source while listening to current source 1 Press the V SEL button to select the video position Example When not connecting the expansion BOX Picture RADIO AUX NAV Voice RADIO RADIO RADIO When connecting the expansion BOX KCE 103V Picture RADIO AUX1 AUX2 NAV Voice RADIO RADIO RADIO RADIO If a DVD player or DVD changer is connected the DVD picture will be displayed...

Страница 45: ...ast Forward and Backward 18 Repeat Play 18 M I X Random Play 19 Scanning Programmes 19 Controlling CD Changer 21 Multi Changer Selection 22 MD Player Operation Optional Playing Mini Disc MD 23 Music Sensor Skip 23 Fast Forward and Backward 24 Repeat Play 24 M I X Random Play 24 DVD Video CD CD Player Operation Optional Playing DVD Video CD CD 25 Still Pause 25 Chapter DVD Track Video CD Sensor 25 ...

Страница 46: ... Movement of displayed picture is abnormal Temperature in the vehicle is too high Allow the vehicle s interior temperature to cool Unclear or noisy display Fluorescent plate is worn out Replace the fluorescent plate Navigation system inoperative Connections with the navigation system are improper Check the connections with the navigation system and connect the cables correctly and firmly Unclear p...

Страница 47: ...ne eject button If the magazine does not eject consult your Alpine dealer A disc is left inside the CD changer Press the EJECT button to activate the eject function When the CD changer finishes the eject function insert an empty CD magazine into the CD changer to receive the disc left inside the CD changer No magazine is loaded into the CD Changer Insert a magazine No indicated disc Choose another...

Страница 48: ... LCD Operation System TFT active matrix Number of Picture Elements 336 960 pcs 1 440 234 Effective Number of Picture Elements 99 99 or more Illumination System U shaped cold cathode fluorescent tube FM TUNER SECTION Tuning Range 87 5 108 0 MHz Mono Usable Sensitivity 0 7 µV Alternate Channel Selectivity 90 dB Signal to Noise Ratio 65 dB Stereo Separation 35 dB MW TUNER SECTION Tuning Range 531 1 6...

Страница 49: ...to use only the specified accessory parts Use of other than designated parts may damage this unit internally or may not securely install the unit in place This may cause parts to become loose resulting in hazards or product failure ARRANGE THE WIRING SO IT IS NOT CRIMPED OR PINCHED BY A SHARP METAL EDGE Route the cables and wiring away from moving parts like the seat rails or sharp or pointed edge...

Страница 50: ...it is in place make sure the locking pins are fully seated in the down position This can be done by pressing firmly in on the unit while pushing the locking pin down with a small screwdriver This ensures that the unit is properly locked and will not accidentally come out from the dashboard Install the Supplied Front Frame Removal 1 Use a small screwdriver or similar tool to push the locking pins t...

Страница 51: ...out noise prevention measures so consult your dealer for further information Parking Brake Lead Connection If necessary use a pinch connector to connect the parking brake lead etc Connection Diagram of SPST Switch Sold Separately If the ACC power supply is not available NOTE If your vehicle has no ACC power supply add an SPST Single Pole Single Throw switch sold separately If the switched power ig...

Страница 52: ...ake signal lead Ignitin key Battery Front Right Rear Right Rear Left Front Left Speakers Yellow White Brown Blue White Blue Pink Black Yellow Blue Red Black White Brown REMOTE OUT AUX2 REMOTE OUT AUX1 PARKING BRAKE BATTERY POWER ANT IGNITION GND REMOTE TURN ON AUDIO INTERRUPT IN To the instrument cluster illumination lead Orange ILLUMINATION Grey Grey Black Violet Black Violet Green Green Black Wh...

Страница 53: ...od chassis ground on the vehicle Make sure the connection is made to bare metal and is securely fastened using the sheet metal screw provided 9 Power Antenna Lead Blue Connect this lead to the B terminal of your power antenna if applicable NOTE This lead should be used only for controlling the vehicle s power antenna Do not use this lead to turn on an amplifier or a signal processor etc Battery Le...

Страница 54: ...er Ai NET Sold Separately Yellow Red White Yellow REMOTE IN White Brown REMOTE OUT AUX1 White Brown When Subwoofer is set to OFF Output is from Rear speakers When Subwoofer is set to ON Output is from Subwoofer For details on how to set the Subwoofer to ON OFF see Subwoofer Control On and OFF on page 39 When connecting the DVD changer DVD Changer Sold Separately To VIDEO OUT terminal Yellow CD Cha...

Страница 55: ... DVD Video Player AUX Audio Input AUX1 Connectors not used for this system Remote Control Output Lead White Brown Connect this lead to the remote control input lead This lead outputs the controlling signals from the remote control Ai NET Cable Included with CD Changer Ai NET Cable Included with DVD Changer RCA Extension Cable Included with DVD Changer RGB NTSC Output Switch To display the picture ...

Страница 56: ...Red White Extension Box KCE 103V Sold Separately Yellow Red White KCE 150V Sold Separately TV Tuner Sold Separately COLOUR CONTROL Navigation System Sold Separately Rear Monitor Sold Separately Yellow Red White CD Changer Ai NET Sold Separately When Subwoofer is set to OFF Output is from Rear speakers When Subwoofer is set to ON Output is from Subwoofer For details on how to set the Subwoofer to O...

Страница 57: ...tch When connecting an equalizer or divider using Ai NET feature place this switch in the EQ DIV position When no device is connected leave the switch in the NORM position NOTE Be sure turn the power off to the unit before changing the switch position AUX Audio Input AUX1 Connector AUX Video Input AUX1 Connectors To AUX Input2 Terminals of the KCE 103V Connect to the AUX Input AUX1 Connecters of t...

Страница 58: ...56 EN ...

Отзывы: