Alpine CDA-7969R Скачать руководство пользователя страница 16

14

-EN

Setting RDS Reception Mode and
Receiving RDS Stations

The RDS (Radio Data System) is a radio
information system using the 57 kHz subcarrier of
regular FM broadcast. The RDS allows you to
receive a variety of information such as traffic
information, station names, and to automatically
re-tune to a stronger transmitter that is
broadcasting the same programme.

1

Press the 

F

 button so that the FUNC indicator

will illuminate.

2

Press the 

F1 

(AF) button to activate the RDS

mode.

3

Press the 

DN 

g

 or 

f


UP 

button to tune in

the desired RDS station.

NOTE

When the BAND button is pressed and held for more than
2 seconds while a station name is displayed, the display
shows the station frequency for 5 seconds.

When the RDS station signal received has
become weak:

AF seek mode

, press and hold the F1 (AF)

button for at least 2 seconds to have the unit
automatically seek a stronger station in the AF
list.

If there is no AF station, the display shows
"SEEK END."

4

Press the 

F1 

button again to deactivate the RDS

mode.

5

Press the 

button to activate the normal mode.

The FUNC indicator will turn off.

RDS Operation

Tips

The RDS digital data includes the followings:

PI

Programme Identification

PS

Programme Service Name

AF

List of Alternative Frequecncies

TP

Traffic Programme

TA

Traffic Announcement

PTY

Programme Type

EON

Enhanced Other Networks

R.TEXT Radio Text Information

Recalling Preset RDS Stations

1

Press the 

F

 button so that the FUNC indicator

will illuminate.

2

Press the 

F1 

(AF) button to activate the RDS

mode.
The display shows "AF" when the RDS mode is
activated.

3

Press the 

button to activate the normal mode.

The FUNC indicator will turn off.

4

Make sure that the FUNC indicator light goes
out, then press the F1 through F6 buttons in
which your desired RDS station is preset.
If the preset station's signal is weak, the unit
automatically searches and tunes to a stronger
station in the AF (Alternative Frequencies) list.

5

If the preset station and the stations in the AF list
cannot be received:
The unit searches again for a station in the PI
(Programme Identification) list.
If there are still no stations receivable in the area,
the unit displays the frequency of the preset
station and the preset indicator disappears.

If the signal level of the Regional (Local) station
being tuned becomes too weak to receive, press
the same F1 through F6 buttons to tune in a
Regional station in other district.

NOTE

For presetting the RDS stations, refer to the Radio
Operation section. The RDS stations can be preset in the
FM1, FM2 and FM3 bands only.
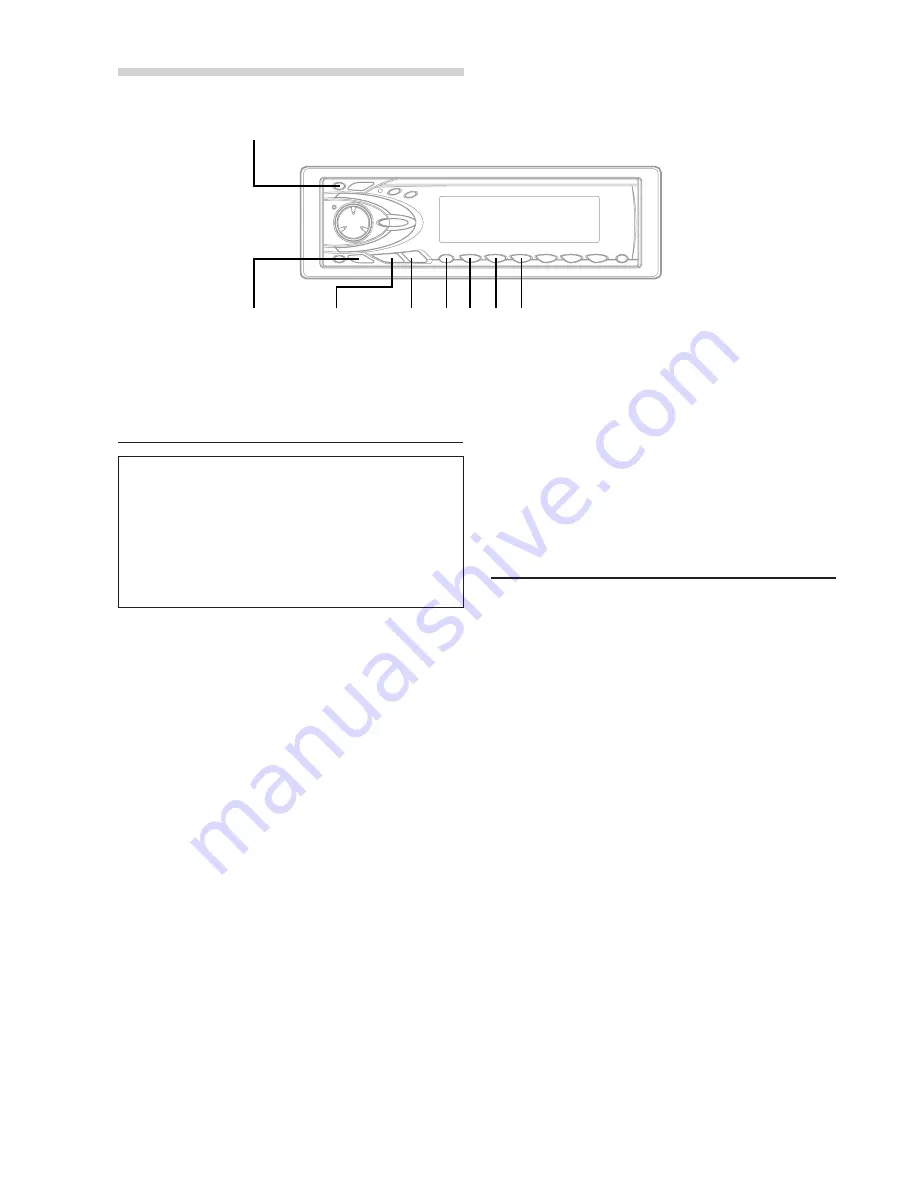
INTLZ

TUNE

DN 

g


f

 UP F F1 F2 F3

Содержание CDA-7969R

Страница 1: ...in Tel 34 45 283588 ALPINE ELECTRONICS OF AUSTRALIA PTY LTD 6 8 Fiveways Boulevarde Keysborough Victoria 3173 Australia Tel 03 9769 0000 ALPINE ELECTRONICS GmbH Kreuzerkamp 7 11 40878 Ratingen Germany...

Страница 2: ...le ofrecen m s M s selecciones musicales m s versatilidad y m s ventajas Un cambiador Alpine de CD a ade m s opciones musicales a su equipo de sonido Todos los modelos pueden controlarse desde las un...

Страница 3: ...Setting 11 Radio Operation Manual Tuning 12 Automatic Seek Tuning 12 Manual Storing of Station Presets 13 Automatic Memory of Station Presets 13 Tuning to Preset Stations 13 Auto Station Search While...

Страница 4: ...t in fire USE THIS PRODUCT FOR MOBILE 12V APPLICATIONS Use for other than its designed application may result in fire electric shock or other injury DO NOT PLACE HANDS FINGERS OR FOREIGN OBJECTS IN IN...

Страница 5: ...r other such instrument then insert the disc again Irregular Shaped Discs Be sure to use round shape discs only for this unit and never use any special shape discs Use of special shape discs may cause...

Страница 6: ...nected For details contact your Alpine dealer Basic Operation Open Button F1 F2 F DN g f UP Initial System Start Up 1 Immediately after installing or applying power to the unit it should be initialize...

Страница 7: ...press the INTLZ button for at least 2 seconds to return to the normal mode Movable display Adjusting Volume Balance Between Left and Right Fader Between Front and Rear 1 Press the MODE button repeated...

Страница 8: ...e INTLZ button for at least 2 seconds to activate the normal mode TUNE f UP INTLZ Audio Mute Function Activating this function will instantly lower the volume level by 20 dB 1 Press the MUTE button to...

Страница 9: ...l mode is SCROLL MANU The unit scrolls only CD text names The disc titles input manually refer to page 20 cannot be scrolled The display of CD text will scroll even for text less than 12 characters Su...

Страница 10: ...ger cannot be used Blackout Mode On and Off When the Blackout mode is turned on the display will turn off to reduce power consumption This additional power enhances the sound quality 1 Press and hold...

Страница 11: ...n 5 seconds the setup menu returns to the normal audio display Selecting DHE Mode Using digital signal processing technology DHE Digital Harmonics Enhancer operates on harmonic components which determ...

Страница 12: ...ency band to adjust 63Hz 160Hz 400Hz 1kHz 16kHz 6 3kHz 2 5kHz 4 While the FUNC Function indicators is flashing press either the DN g button or the f UP button to adjust to the desired level To adjust...

Страница 13: ...aker is corrected by 5 1 ms so that its sound reaches the listening position at the same time as the sound of other speakers Example 2 Listening Position All Seats Adjust the time correction level of...

Страница 14: ...Automatic Seek Tuning 1 Press the SOURCE button until a radio frequency appears in the display 2 Press the BAND button repeatedly until the desired radio band is displayed Each press changes the band...

Страница 15: ...tic memory has been completed the tuner goes to the station stored in the preset location No 1 NOTE If no stations are stored the tuner will return to the original station you were listening to before...

Страница 16: ...Programme Service Name AF List of Alternative Frequecncies TP Traffic Programme TA Traffic Announcement PTY Programme Type EON Enhanced Other Networks R TEXT Radio Text Information Recalling Preset RD...

Страница 17: ...nks If you do not want to listen to the traffic information being received lightly press the F2 button to skip that traffic information message The T INFO mode will remain in the ON position to receiv...

Страница 18: ...d does not broadcast the traffic information the receiver automatically tunes in the related station that broadcasts the traffic information when it occurs RDS Operation TUNE 4 Press the F2 button to...

Страница 19: ...ain To change the programme category perform the step 3 To disable the PRIORITY PTY function press the F4 button NOTE In the PRIORITY PTY function unlike in the T INFO function the volume does not inc...

Страница 20: ...below 1 Press and hold the INTLZ button for at least 2 seconds 2 Press the f UP button repeatedly to select D OUT Each press of the f UP button scrolls the modes as shown CD Player Operation NOTE If...

Страница 21: ...e FUNC indicator and go to step 1 within 5 seconds In case a 12 disc CD changer is connected In changer mode press the F button twice to illuminate the FUNC indicator and go to step 1 within 5 seconds...

Страница 22: ...g A for example 4 Press the J button to store the first character The first character will stop blinking and the display will automatically advance to the next character When that character begins to...

Страница 23: ...ible With a CD Changer connected to the Ai NET input of the CDA 7969R the CD Changer will be controllable from the CDA 7969R Using the KCA 400C the Multi Changer Switching device multiple changers can...

Страница 24: ...ching device must be used If you use 1 Switching device you can connect up to 4 CD Changers If you use 2 Switching devices you can connect up to 6 CD Changers 1 Press the SOURCE button on the CDA 7969...

Страница 25: ...of the external audio processor you purchased This button is used in conjunction with an optional Ai NET processor Remote Control Operation Controls on Remote Control 1 Mute Button Press the button to...

Страница 26: ...or equivalent 1 Opening the battery cover Slide out the battery cover while firmly pressing outward 2 Replacing the battery Put the batteries in the case observing the polarities as illustrated 3 Clo...

Страница 27: ...s in the following checklist This guide will help you isolate the problem if the unit is at fault Otherwise make sure the rest of your system is properly connected or consult your authorized Alpine de...

Страница 28: ...s the magazine eject button and pull out the magazine Check the indication Insert the magazine again If the magazine cannot be pulled out consult your Alpine dealer Magazine ejection not possible Pres...

Страница 29: ...0 7 V Alternate Channel Selectivity 80 dB Signal to Noise Ratio 65 dB Stereo Separation 35 dB MW TUNER SECTION Tuning Range 531 1 602 kHz Sensitivity IEC Standard 25 1 V 28 dB LW TUNER SECTION Tuning...

Страница 30: ...contact the dealer where you purchased this product to have the work done USE SPECIFIED ACCESSORY PARTS AND INSTALL THEM SECURELY Be sure to use only the specified accessory parts Use of other than d...

Страница 31: ...e make sure the locking pins are fully seated in the down position This can be done by pressing firmly in on the unit while pushing the locking pin down with a small screwdriver This ensures that the...

Страница 32: ...or Plug Amplifier Amplifier Amplifier Subwoofers Rear Right CD Changer Ai NET Sold Separately Antenna ISO Antenna Plug Ignition Key To power antenna To the instrument cluster illumination lead To ampl...

Страница 33: ...21B to this component The Digital Output Connector Connect this to any other optical digital products of ALPINE The digital signal will be output when the CD mode is on Remote Control Interface Connec...

Страница 34: ...32 EN...

Отзывы: