background image

52 


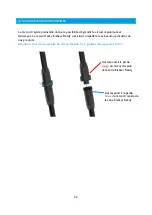
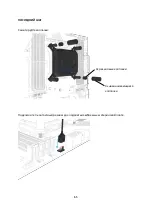
UTILISATION RACCORDS RAPIDES  


Le raccord rapide préinstallé donne la possibilité d’agrandir le circuit rapidement et 
facilement. Le raccord est « Eisbaer Ready » et ainsi compatible avec beaucoup d’autres de 
nos produits.  

Attention: Lors de l’ouverture du raccord rapide 2 à 3 gouttes d’eau peuvent sortir.


Correspond à la partie 

rouge 

du raccord rapide 

de la série Eisbaer Ready  

Correspond à la partie 

bleue 

du raccord rapide de 

la série Eisbaer Ready  


Содержание EISBAER EXTREME

Страница 1: ...EISBAER EXTREME LIQUID CPU COOLER...

Страница 2: ...L FTER ANSCHLIESSEN 18 AUSGLEICHSBEH LTER AUFF LLEN 19 HANDHABUNG SCHNELLVERSCHLUSS 20 ERWEITERUNG MIT GPX EISWOLF 21 ENGLISH 22 SAFETY INSTRUCTIONS 22 MOUNTING MATERIAL 23 TECHNICAL DETAILS 24 MOUNTI...

Страница 3: ...MENTR PROCESSEUR 42 AM4 AVEC PLAQUE ARRI RE 43 AM4 SANS PLAQUE ARRI RE 44 AM3 AM3 AM2 AM2 FM1 FM2 FM2 G34 C32 940 939 45 TR 4 46 2011 2011 3 2066 47 1151 1150 1155 1156 1366 48 DERNI RE ETAPE 49 INSTA...

Страница 4: ...EISWOLF 69 70 70 71 72 73 73 73 XPX EISBLOCK 74 CPU 74 CPU 74 AM4 75 AM4 76 AM3 AM3 AM2 AM2 FM1 FM2 FM2 G34 C32 940 939 77 TR 4 78 2011 2011 3 2066 79 1151 1150 1155 1156 1366 80 81 82 83 84 EISWOLF A...

Страница 5: ...5...

Страница 6: ...tiven Charakter Wir bernehmen keine Gew hr f r die Richtigkeit dieser Angaben Hinsichtlich der Art und des Umfangs der Lieferung sind allein die in Bestellung und Auftragsbest tigung enthaltenen Angab...

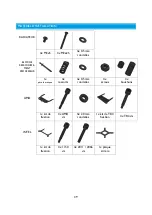
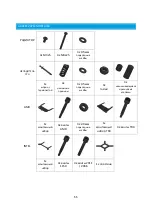
Страница 7: ...ER 1x W rmeleitpaste 4x Druckfedern 4x 0 5 mm Unterlegscheiben 4x Muttern 4x Gummi Schraubenkappen AMD 1x Set Halterung 4x AMD Schrauben 4x 2 0 mm Unterlegscheiben 1x Set TR4 Halterung 4x TR4 Schraube...

Страница 8: ...8 TECHNISCHE DETAILS Ma e in mm...

Страница 9: ...k nnte sonst besch digt werden W hlen Sie die passenden M3 Schrauben 5 mm oder 25 mm L nge in Abh ngigkeit von Ihrem PC Geh use Die zus tzlichen Montagebohrungen bieten noch mehr Flexibilit t beim Au...

Страница 10: ...agen Sie einen erbsengro en Klecks W rmeleitpaste auf die CPU auf Verteilen Sie die Paste mit Hilfe eines Plastikstreifens oder hnlichem zu einer gleichm igen d nnen Schicht 0 5 mm Schichtdicke VORBER...

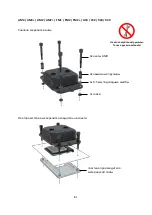
Страница 11: ...scheiben 0 5 mm 4x Unterlegscheiben 2 0 mm 4x Muttern AM4 MIT BACKPLATE Montieren Sie zun chst die Schrauben Im zweiten Schritt fixieren Sie den K hler auf dem Sockel Backplate des Mainboardhersteller...

Страница 12: ...t das Haltemodul Montieren Sie die Schrauben und fixieren Sie anschlie end den K hler mit Hilfe der Original Gewinde auf dem Sockel 4x Druckfedern 4x Unterlegscheiben 0 5 mm 4x Unterlegscheiben 2 0 mm...

Страница 13: ...x Muttern 4x AMD Schrauben AM3 AM3 AM2 AM2 FM1 FM2 FM2 G34 C32 940 939 Montieren Sie zun chst die Schrauben Im zweiten Schritt fixieren Sie den K hler auf dem Sockel Kein Werkzeug benutzen nur handfes...

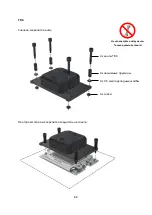
Страница 14: ...4 Schrauben 4x Druckfedern 4x Unterlegscheiben 0 5 mm 4x Muttern TR 4 Montieren Sie zun chst die Schrauben Im zweiten Schritt fixieren Sie den K hler auf dem Sockel Kein Werkzeug benutzen nur handfest...

Страница 15: ...ben keine durchgehenden Montagebohrungen im Sockelbereich Drehen Sie die Schrauben in diesem Fall nicht weiter als 4 mm ein Montieren Sie den K hler wie dargestellt 4x Druckfedern 4x Unterlegscheiben...

Страница 16: ...eiten Schritt fixieren Sie den K hler auf dem Sockel Kein Werkzeug benutzen nur handfest anziehen 4x Druckfedern 4x Unterlegscheiben 0 5 mm 4x Intel 1150 Schrauben 4x Muttern beiliegende Backplate Ent...

Страница 17: ...17 4x Gummikappen 4x Schraubenkappen DER LETZTE SCHLIFF Schraubenkappen aufsetzen 3 Pin Stecker f r Logo Beleuchtung am Mainboard anschlie en...

Страница 18: ...D L FTER ANSCHLIESSEN Schlie en Sie die Kabel wie dargestellt an Stromversorgung Pumpe Steuerung Pumpe Steuerung Stromversorgung L fter 4 Pin PWM Auslesen und Regulieren der Drehzahl Mainboard Netztei...

Страница 19: ...zu berpr fen Sp testens wenn die Pumpe ungew hnlich laut arbeitet sollte dringend Fl ssigkeit nachgef llt werden Wir empfehlen ausschlie lich klare K hlfl ssigkeiten aus unserer eigenen Produktion CKC...

Страница 20: ...zu erweitern Der Verschluss ist Eisbaer Ready und damit kompatibel zu vielen anderen Produkten aus unserem Sortiment Achtung Beim Aufdrehen des Schnellverschusses k nnen 2 3 Tropfen Wasser entweichen...

Страница 21: ...n Sie Beim Erweitern des Kreislaufes mit Komponenten ohne Schnellverschluss muss vorher die gesamte K hlfl ssigkeit abgelassen werden 4 K hlfl ssigkeit nachf llen Durch leichtes hin und herbewegen des...

Страница 22: ...uncements or price lists have a purely informative character We do not undertake warranty for the correctness of these data As to the kind and the range of delivery the data contained in the order and...

Страница 23: ...5 mm washers CPU COOLER 1x thermal paste 4x springs 4x 0 5 mm washers 4x nuts 4x rubber screw caps AMD 1x bracket set 4x AMD screws 4x 2 0 mm washers 1x TR4 bracket set 4x TR4 screws INTEL 1x bracket...

Страница 24: ...24 TECHNICAL DETAILS Dimensions in mm...

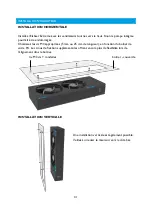
Страница 25: ...opriate M3 screws 5 mm or 25 mm length depending on your PC case The additional mounting holes offer even more flexibility for alignment in the case VERTICAL MOUNTING 4x M3 screws washers case top pan...

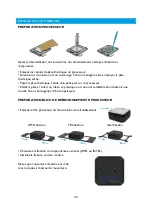
Страница 26: ...ol Apply a pea sized blob of thermal paste to the center of the CPU Spread the paste using a spatular or similar to an even thin layer 0 5 mm layer thickness PREPARING THE CPU COOLER Remove the protec...

Страница 27: ...screws 4x springs 4x 0 5 mm washers 4x 2 0 mm washers 4x nuts AM4 WITH BACKPLATE First mount the screws Next fix the cooler to the base original backplate from motherboard Do not use tools Tighten onl...

Страница 28: ...is case first remove the original bracket Mount the screws and then fix the cooler using the original thread on the base 4x springs 4x 0 5 mm washers 4x 2 0 mm washers 4x nuts 4x thread of the origina...

Страница 29: ...4x 0 5 mm washers 4x nuts 4x AMD screws AM3 AM3 AM2 AM2 FM1 FM2 FM2 G34 C32 940 939 First mount the screws Next fix the cooler to the base Do not use tools Tighten only by hand original backplate fro...

Страница 30: ...30 4x TR 4 screws 4x springs 4x washers 0 5 mm 4x nuts TR 4 First mount the screws Next fix the cooler to the base Do not use tools Tighten only by hand...

Страница 31: ...Socket motherboards have continuous threaded mounting holes in the base In this case do not tighten the screws more than 4 mm Mount the cooler as shown 4x springs 4x 0 5 mm washers 4x Intel 2011 2066...

Страница 32: ...t the screws Next fix the cooler to the base Do not use tools Tighten only by hand 4x springs 4x 0 5 mm washers 4x Intel 1150 screws 4x nuts included backplate Remove the protective film from the adhe...

Страница 33: ...33 4x rubber caps 4x screw caps THE FINISHING TOUCH Install the screw caps Connect the 3 pin connector for the logo lighting to the mainboard...

Страница 34: ...34 CONNECTING THE PUMP AND FANS Connect the cables as shown pump power pump control fan control and power 4 Pin PWM read out and regulation of the speed motherboard power supply motherboard...

Страница 35: ...oler it is advisable to check the level If the pump is running unusually loud liquid should be topped up urgently We only recommend clear coolants from our own production CKC or Eiswasser Crystal no U...

Страница 36: ...e connectors are Eisbaer Ready and therefore compatible with many other products from our range Attention 2 3 drops of water can escape when unscrewing the quick release mechanism This is normal Corre...

Страница 37: ...the image below Note When expanding the circuit with components without quick release fasteners you must drain all the coolant first 4 Top up the coolant You must remove the air from the loop To do t...

Страница 38: ...ces informations Concernant le type et volume de la livraison seulement les informations contenues dans la commande et la confirmation de la commande sont d cisives 2 En cas de d faut couvert par la...

Страница 39: ...les BLOC DE REFROIDISSE MENT PROCESSEUR 1x p te thermique 4x ressorts 4x 0 5 mm rondelles 4x crous 4x bouchons AMD 1x kit de fixation 4x AMD vis 4x 2 0 mm rondelles 1x kit de TR4 fixation 4x TR4 vis I...

Страница 40: ...40 DETAILS TECHNIQUES Dimensions en mm...

Страница 41: ...ag e Choisissez les vis M3 appropri es 5 mm ou 25 mm de longueur en fonction du bo tier de votre PC Les trous de fixation suppl mentaires offrent encore plus de flexibilit lors de l alignement dans le...

Страница 42: ...te thermique taille d un petit pois sur le processeur Etalez la p te l aide d un ruban en plastique ou d un outil semblable afin d obtenir une couche fine et homog ne 0 5mm paisseur PREPARATION BLOC D...

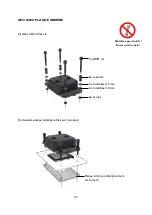
Страница 43: ...ondelles 0 5 mm 4x rondelles 2 0 mm 4x crous AM4 AVEC PLAQUE ARRI RE Installez d abord les vis En deuxi me tape installez le bloc sur le socket Plaque arri re du fabricant de la carte m re N utilisez...

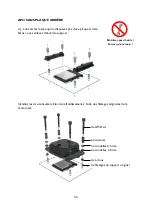
Страница 44: ...Dans ce cas enlevez d abord le support Installez les vis et ensuite le bloc de refroidissement l aide des filetages originales de la carte m re 4x ressorts 4x rondelles 0 5 mm 4x rondelles 2 0 mm 4x...

Страница 45: ...crous 4x AMD vis AM3 AM3 AM2 AM2 FM1 FM2 FM2 G34 C32 940 939 Installez d abord les vis En deuxi me tape installez le bloc sur le socket Plaque arri re originale du fabricant de la carte m re N utilise...

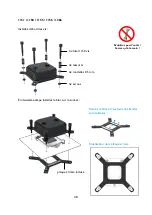
Страница 46: ...46 4x TR 4 vis 4x ressorts 4x rondelles 0 5 mm 4x crous TR 4 Installez d abord les vis En deuxi me tape installez le bloc sur le socket N utilisez pas d outils Serrez qu la main...

Страница 47: ...disposent pas de trous d installation percent enti rement la carte m re dans la partie du socket Dans ce cas l ne visez pas plus profond que 4mm les vis Installez le bloc comme montr 4x ressorts 4x ro...

Страница 48: ...deuxi me tape installez le bloc sur le socket N utilisez pas d outils Serrez qu la main 4x ressort s 4x rondelles 0 5 mm 4x Intel 1150 vis 4x crous plaque arri re incluse Retirez le films protecteurs...

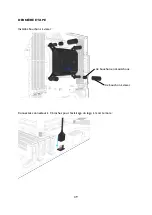
Страница 49: ...49 4x bouchon en caoutchouc 4x bouchon visser DERNI RE ETAPE Installez bouchons visser Connectez connecteur 3 broches pour l clairage du logo la carte m re...

Страница 50: ...POMPE ET VENTILATEURS Installez les c bles comme montr Alimentation pompe Contr le pompe Contr le et alimentation ventilateur 4 broches PWM affichage et contr le vitesse Carte m re Bloc d alimentatio...

Страница 51: ...wolf nous conseillons de v rifier le niveau d eau Au plus tard si la pompe tourne de mani re tr s bruyante il est fortement conseill re remplir le liquide de refroidissement Nous conseillons uniquemen...

Страница 52: ...cilement Le raccord est Eisbaer Ready et ainsi compatible avec beaucoup d autres de nos produits Attention Lors de l ouverture du raccord rapide 2 3 gouttes d eau peuvent sortir Correspond la partie r...

Страница 53: ...Veuille noter que le l agrandissement du circuit par de nouveaux composants le circuit doit d abord tre vid du liquide de refroidissement 4 Remplir liquide de refroidissement Les composants sont purg...

Страница 54: ...B 14 BGB 3 ALPHACOOL INTERNATIONAL GMBH 4 ALPHACOOL INTERNATIONAL GMBH ALPHACOOL INTERNATIONAL GMBH 5 ALPHACOOL INTERNATIONAL GMBH ALPHACOOL INTERNATIONAL GMBH ALPHACOOL INTERNATIONAL GMBH 6 ALPHACOOL...

Страница 55: ...55 4x M3x5 4x M3x25 4x 0 5 O CPU 1x 4x 4x 0 5 4x 4x D 1x 4x D 4x 2 0 1x R4 4x R4 INTEL 1x 4x 1150 4x 2011 2066 1x...

Страница 56: ...56...

Страница 57: ...57 4x M3 Eisbaer Extreme M3 5 25...

Страница 58: ...58 XPX EISBLOCK CPU c CPU CPU 0 5 CPU AMD INTEL AMD INTEL TR4...

Страница 59: ...59 4x D 4x 2 0 4x AM4 4x 4x 0 5 a...

Страница 60: ...60 AM4 o 4x 4x 0 5 4x 2 0 4x 4x 4x D...

Страница 61: ...61 4x 4x 0 5 4x 4x D AM3 AM3 AM2 AM2 FM1 FM2 FM2 G34 C32 940 939...

Страница 62: ...62 4x TR 4 4x 4x 0 5 4x TR 4...

Страница 63: ...63 4 2011 2011 3 2066 2011 3 4 4x 4x 0 5 4x 2011 2066...

Страница 64: ...64 1151 1150 1155 1156 1366 4x 4x 0 5 4x 1150 INTEL 4x...

Страница 65: ...65 4x 4x 3...

Страница 66: ...66 4 ATX...

Страница 67: ...67 GPX Eiswolf CKC Eiswasser Crystal a...

Страница 68: ...68 Eisbaer Ready 2 3 Eisbaer Ready Eisbaer Ready...

Страница 69: ...69 GPX EISWOLF 1 2 3 4 Eiswolf GPX...

Страница 70: ...2 13 1 14 3 ALPHACOOL 4 ALPHACOOL INTERNATIONAL GMBH ALPHACOOL INTERNATIONAL GMBH 5 ALPHACOOL INTERNATIONAL GMBH ALPHACOOL INTERNATIONAL GMBH ALPHACOOL INTERNATIONAL GMBH 6 ALPHACOOL INTERNATIONAL GMB...

Страница 71: ...71 4x M3x5 4x 4x 0 5 mm CPU 1x 4x 4x 0 5 mm 4x 4 x AMD 1x 4x AMD 4x 2 0 mm 1x TR4 4x TR4 INTEL 1x 4 1150 4x 1x...

Страница 72: ...72 mm...

Страница 73: ...73 Eisbaer Extreme PC M3 5 mm 25 mm 4x M3...

Страница 74: ...74 XPX EISBLOCK CPU CPU CPU 0 5 mm CPU AMD INTEL IN OUT CPU AMD Intel TR4...

Страница 75: ...75 4x AMD 4x 4 0 5 mm 4 2 0 mm 4x AM4...

Страница 76: ...76 AM4 4x 4 0 5 mm 4 2 0 mm 4x 4x 4x AMD...

Страница 77: ...77 4x 4 0 5 mm 4x 4x AMD AM3 AM3 AM2 AM2 FM1 FM2 FM2 G34 C32 940 939...

Страница 78: ...78 4x TR 4 4x 4x 0 5 mm 4x TR 4...

Страница 79: ...79 4 mm 2011 2011 3 2066 2011 3 4 mm 4x 4 0 5 mm 4x Intel 2011 2066...

Страница 80: ...80 1151 1150 1155 1156 1366 4x 4 0 5 mm 4x Intel 1150 4x...

Страница 81: ...81 4 x 4x 3...

Страница 82: ...82 4 PWM...

Страница 83: ...83 Eisbaer Extreme GPX Eiswolf CKC Eiswasser Crystal UV...

Страница 84: ...84 Eisbaer 2 3 Eisbaer Eisbaer...

Страница 85: ...85 EISWOLF AIO 1 PC 2 3 1 4 PC Eiswolf GPX...

Страница 86: ......

Страница 87: ......

Страница 88: ...r Str 1 38122 Braunschweig Support 49 0 531 28874 0 Fax 49 0 531 28874 22 E Mail info alphacool com General Manager Fabian Noelte WEEE Reg Nr DE 544444 Trade Register Amtsgericht Braunschweig HRB 2023...

Отзывы: