background image

5


Introduction 


The SADPmini Logger software consists of three parts, a downloading facility called 
‘Export DATA’, a remote logging facility called ‘External LOG’ and a stored data 
reviewing facility called ‘Review DATA’. See the associated sections in this manual for 
more details on each operation. 

6


Operation 

6.1


Startup 


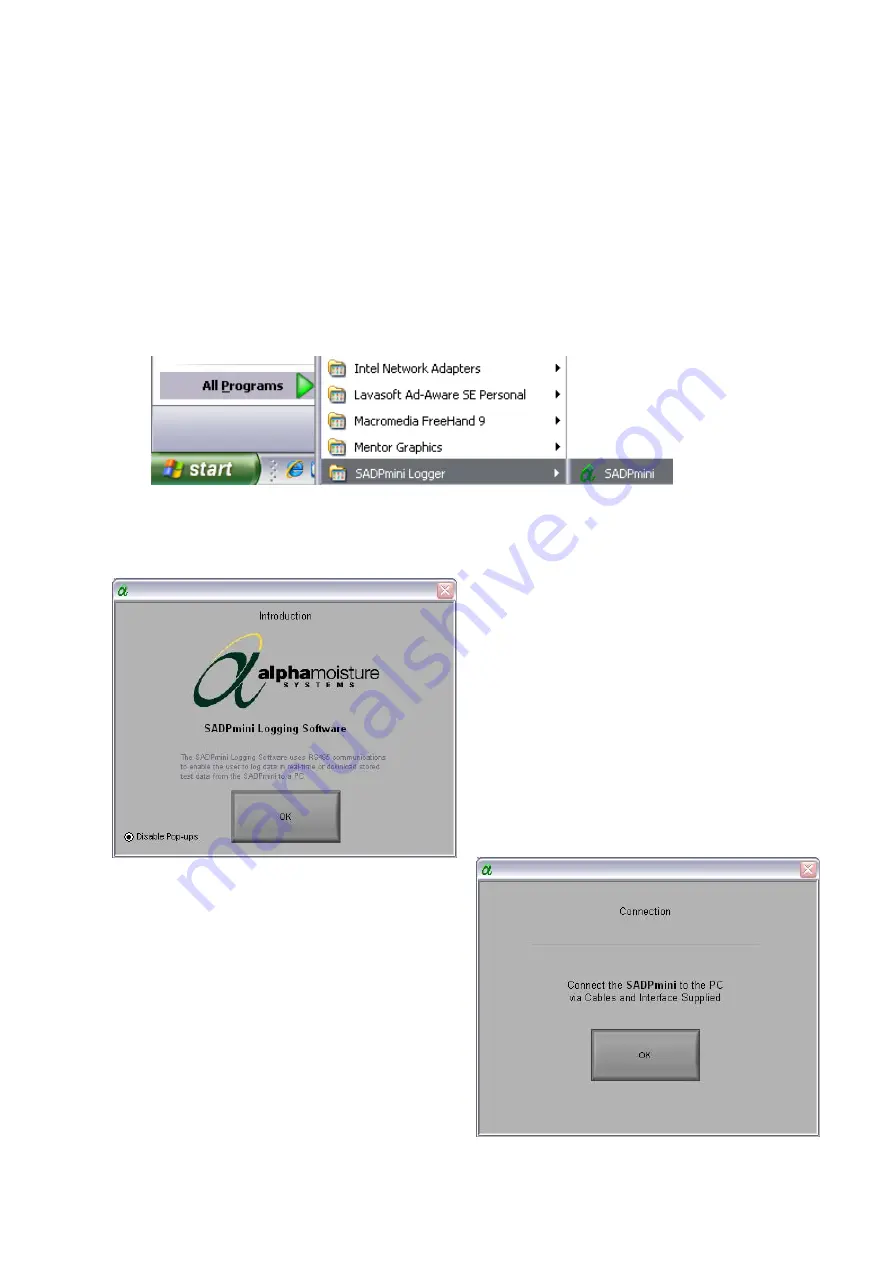
Start the program by pressing the ‘Start’ button, selecting ‘All Programs’ followed by 
‘SADPmini Logger’ and ‘SADPmini’. The splash screen shown in 6.1.1 below will 
appear as the program starts.


6.1.1


Splash Screen 

 
Click on the OK button to continue to the 
next screen.  
 
The radio button in the bottom left hand 
corner will be explained in the section 
‘Disabling Pop-ups’. 


6.1.2


Connection Pop-up Screen 

 
Using either the USB to RS485 Interface or the 
Serial to RS485 Interface connect the SADPmini 
to the logging PC or laptop computer, using the 
associated cables, (See the SADPmini user 
manual for more details). 
 
Click on the OK button to continue to the next 
screen. 
 

Note:

 See the section on ‘Disabling Pop-ups’ to prevent 

this screen appearing.    


Page 2 of 10 

Содержание SADPmini Logger

Страница 1: ...ini Logger Software Version 2 8 Instruction Manual Alpha Moisture Systems Alpha House 96 City Road Bradford BD8 8ES England Tel 44 1274 733100 Fax 44 1274 733200 Email mail amsytems co uk Web www amsy...

Страница 2: ...Page ii...

Страница 3: ...Instruction Manual for the SADPmini Logger Software 1225 SADPmini Logger User Manual doc Issue 14 0 1 3 12 Page iii...

Страница 4: ...1 Splash Screen 2 6 1 2 Connection Pop up Screen 2 6 1 3 Main Screen 3 6 2 EXPORT DATA 4 6 2 1 Export DATA Pop up Screen 4 6 2 2 Downloading Screen 4 6 3 EXTERNAL LOG 5 6 3 1 External LOG Pop up Scre...

Страница 5: ...lation directory of c sadpmini 2 8 3 2 Manual Installation If the Software does not automatically install follow the sequence below 1 Place the CD into the CD drive 2 Press the Start button and select...

Страница 6: ...The splash screen shown in 6 1 1 below will appear as the program starts 6 1 1 Splash Screen Click on the OK button to continue to the next screen The radio button in the bottom left hand corner will...

Страница 7: ...our Windows Manual for information on how to find out your COM port setting SADPmini Unit Address selector default setting 1 This control sets the address that the SADPmini will respond to see section...

Страница 8: ...that the PC Comms function has been activated on the SADPmini There are 20 TAG locations available in each SADPmini Each location can store up to 20 separate blocks of data Downloading a TAG automatic...

Страница 9: ...section 6 1 3 Download selected tags button This control starts the process of downloading the required TAGs After the button is pressed an indicator appears that calculates the number of samples that...

Страница 10: ...communicating with the SADPmini Press the Exit to return to the Main Screen Ensure that the correct cables are connected that the correct Address and Com Port settings have been set and that the PC C...

Страница 11: ...ED turns light green and the data points are automatically written to the default file test txt Clicking on the LED again turns the LED dark green and stops writing data to file Note Data points are a...

Страница 12: ...panel This panel appears when the function is first run and whenever the Select File button is pressed It operates in the same way as a normal File selector panel within Microsoft Windows Select the f...

Страница 13: ...e left mouse button Digital Display indicators The following information is read from the selected file and displayed in four digital display indicators located above the graphical display TAG Name Sa...

Страница 14: ...bled are Initial Pop up Screen see section 6 1 2 Export DATA Pop up Screen see section 6 2 1 External LOG Pop up Screen see section 6 3 1 The pop up screens can be re enabled at any time by de selecti...

Отзывы: