Alpha Communications VESTA2 GB2 Скачать руководство пользователя страница 23

USER MENU

23

VESTA2 G 2 MONITOR

B

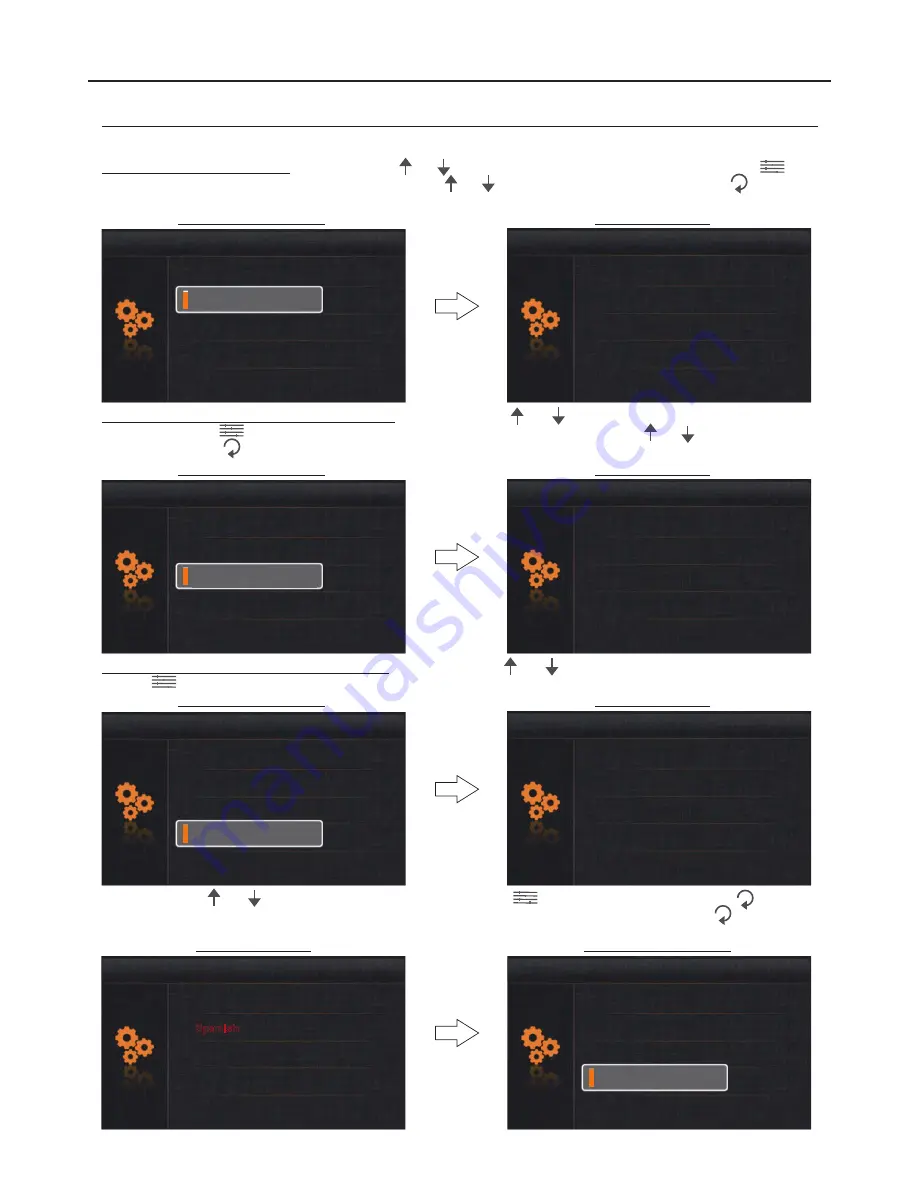
5.2 To access the ring volume

, use push buttons

and

to go to option “Ring volume” and press push button

. The

following selection screen will be displayed. Use buttons and

to select the ring volume. Press option

to exit and

return to the #rst selection screen.

Selection screen

Autoswitch ON Time

Ring Tune

Settings

Language

First selection screen

Current:    6

Adjust

Continued from the previous page.

Ring Volume

5.3 To access the auto switch-on time setting

, use push buttons

and

to go to option “Autoswitch ON Time” and

press push button

. The following selection screen will be displayed. Use push buttons

and

to select the required

time. Press option

to exit and return to the #rst selection screen.

Selection screen

Ring Tune

Settings

Language

First selection screen

Current:    30sec

Adjust

Ring Volume

Autoswitch ON Time

5.4 To access the language selection setting

, use push buttons

and

to go to option “Language” and press push

button

. The following selection screen will be displayed.

Selection screen

Ring Tune

Settings

First selection screen

English

Language

Ring Volume

Autoswitch ON Time

Use push buttons

and

to select the language. Press push button

to con#rm and then press option

to exit and

return to the #rst selection screen. To return to the menu screen without making a change, press option

.

Ring Tune

Settings

First selection screen

Ring Volume

Autoswitch ON Time

Spanish

French

Portugues

Selection screen

English

Language

Spanish

French

Portugues

Language

Language

Continued overleaf

Содержание VESTA2 GB2

Страница 1: ......

Страница 2: ...uction 2 Contents 2 Safety precautions 2 Characteristics 3 System operation 3 Monitor description Description 4 Function and menu buttons 4 Status LEDS 4 Connection terminals 4 Configuration dip switc...

Страница 3: ...dicates that the call is being made and LED will turn on If vocal synthesis is activated then a call message will indicate a call is is in progress being made At this moment the apartment s monitor re...

Страница 4: ...s the end of line Set to ON in monitors where the bus cable terminates Set to OFF only in intermediate monitors Dip1toDip5 Set the monitor address addresses 0 to 31 Switches set to OFF have a value of...

Страница 5: ...IP 4 5 6 C 11 ode 1 2 3 ON DIP 4 5 6 C 12 ode 1 2 3 ON DIP 4 5 6 C 13 ode 1 2 3 ON DIP 4 5 6 C 14 ode 1 2 3 ON DIP 4 5 6 C 15 ode 1 2 3 ON DIP 4 5 6 C 16 ode 1 2 3 ON DIP 4 5 6 C 17 ode 1 2 3 ON DIP 4...

Страница 6: ...nitor s surface box to the wall Positioning the monitor 1 2 3 Avoid dusty or smoky environments or locations near sources of heat x 4 30 6 Connect the cables to the monitor see page 4 position the mon...

Страница 7: ...the embedding box Positioning the embedding box and mounting the terminal block Positioning the monitor Avoid dusty or smoky environments or locations near sources of heat Screws supplied with the emb...

Страница 8: ...r panel Monitor description upon receiving a call and during communication Door panel that made the call End call communication Door 1 activated Activate door release Start stop communication To open...

Страница 9: ...ns to standby To open the door press the door release push button during the call one press will activate the lock release for 5 seconds 9 VESTA2 G 2 MONITOR B 00 30 DS 1 00 30 DS 1 1 4 Answering a ca...

Страница 10: ...and 25 Activating doctor mode To activate doctor mode the monitor must be in standby mode Then press push button for 10 seconds Status LED will blink to indicate that the doctor mode function is acti...

Страница 11: ...d brightness level Press push button to change the next option Colour or press to exit the settings menu 00 30 DS 1 Bri 5 ghtness To adjust colour the monitor must be in communication or auto switch o...

Страница 12: ...leaf VESTA2 G 2 MONITOR B First menu screen Second menu screen First menu screen Description of the menu push buttons Menu access and function selection push button Menu back push button Menu scroll d...

Страница 13: ...nel DS 1 and the elapsed connection time The connection will last for 30 seconds or until option is pressed To establish audio and video communication with the selected door panel press push button Th...

Страница 14: ...uttons and to go to the option corresponding to camera CM from which to visualise an image The following screen will display the image from the selected camera with address 1 it will also indicate the...

Страница 15: ...r call Select Name List Call Making an intercom call Selection screen Call Guard Unit Inner call Select Name List Call Then press push button to make the call The following call screen will be display...

Страница 16: ...tion is pressed Receiving an intercom call During communication If during an intercom call there is a call from the door panel to either apartment the said intercom call will be cancelled The monitor...

Страница 17: ...call Press push button to accept the call and establish communication or press option to cancel it If the call is accepted communication will last for one and a half minutes or until push button is pr...

Страница 18: ...or press option to cancel it If the call is accepted communication will last for one and a half minutes or until push button is pressed again or option is pressed Making an intercom call Receiving an...

Страница 19: ...Door Intercom Playback Do not disturb USER MENU 19 VESTA2 G 2 MONITOR B 1 hour 8 h s our Normal Do not disturb Always Selection screen 1 our h 8 h s our Normal Do not disturb Always Continued overlea...

Страница 20: ...tus LED will turn on indicating that the function is activated The monitor will not receive door panel nor intercom calls Do not disturb mode will be activated for 8 hours To deactivate do not disturb...

Страница 21: ...vious steps until the complete telephone number has been entered To save and exit press option Editing screen 6 Input numbers If no answer Divert calls No divert Divert options Edit numbers Tel 619171...

Страница 22: ...e Second menu screen Ring Volume Autoswitch ON Time Ring Tune Settings Language First selection screen To change the door panel and intercom ringtones and the door bell use push buttons and to go to t...

Страница 23: ...ime Press option to exit and return to the rst selection screen Selection screen Ring Tune Settings Language First selection screen Current 30sec Adjust Ring Volume Autoswitch ON Time 5 4 To access th...

Страница 24: ...re 6 1 To access the default settings function press push button The following screen will be displayed Press push button again to con rm and retain the default settings ringtone ring volume and auto...

Страница 25: ...enu Without second lock release menu default setting 8016 Not active m 8017 Yes active m enu if BUS is busy default setting enu if BUS is busy 9015 9016 Intercom calls enabled Intercom calls disabled...

Страница 26: ...ted in the monitor see Installer setup on pages 24 and 25 SECOND DOOR RELEASE MENU 26 VESTA2 G 2 MONITOR B DS 1 00 30 1 DS 1 00 30 2 1 2 Do not use dissolvents detergents or cleaning products that con...

Страница 27: ...27 NOT S E VESTA2 G 2 MONITOR B...

Страница 28: ...ch on process Menu scroll up push button Viewing door panel call camera videos and deleting videos MM GB2 module and FA GB2 power supply required To access the menu the monitor must be in standby Then...

Страница 29: ...ess push button to Delete con rm the deletion or press option to cancel the deletion and return to the previous screen 2016 02 02 17 46 12 Selection screen 2016 02 02 17 46 12 Delete To change the dat...

Отзывы: