Alnor HRQ-PremAIR-BUT-LCD Скачать руководство пользователя страница 22

ALNOR

®


systemy wentylacji

jest prawnie chronionym znakiem i technicznym patentem. Prawo do zmian zastrzeżone.

22

w

w

w

.a

ln

or

.c

om

.p

l

Instrukcja obsługi

HRQ-PremAIR-BUT-LCD

!

!

1. Touch the MENU button   again and again until the HEAT EXCHANGER menu icon   shows.

2. Touch the OK button  , to enter the HEAT EXCHANGER menu.

3. Touch the UP button   or the DOWN button   again and again until the desired HEAT EXCHANGER mode 

appears:

4. Touch the OK button  , to set the HEAT EXCHANGER mode and return to the default screen. Once the 

HRU communicates that the new HEAT EXCHANGER mode has been applied, the correct HEAT EXCHANGER 

mode icon shows on the default screen. This can take up to a minute.

5. Touch the BACK button  , to return to the default screen without changing the HEAT EXCHANGER mode.

4.5 SENSOR VALUES menu

1. Touch the MENU button   again and again until the SENSOR VALUES menu icon   shows.

2. Touch the OK button  , to enter the SENSOR VALUES menu.

3. Touch the UP button   or the DOWN button  , again and again to go through the sensor values.  

The 2-digit display shows the sensor.
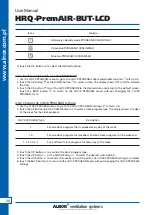
Icon

Message displayed

BYPASS mode

HEAT EXCHANGER mode

____

No communication

No communication

AUTO

BYPASS in auto

HEAT EXCHANGER 

in auto

BYPASS open

HEAT EXCHANGER off

Wył.

BYPASS closed

HEAT EXCHANGER on

4.3 FILTER RESET menu 

IMPORTANT:

This menu is only visible when the filter is dirty. Replace the filter in the HRU before you do  

a FILTER RESET on the device. In the HRU-PremAIR air handling units  the icon signaling dirty filter 

appears every 90 days (from RESET).

1. Touch the MENU button  . The FILTER RESET icon   shows.

2. Touch the OK button  , to enter the FILTER RESET menu.

3. The device sends a filter reset message to the HRU. The TIMER mode icon   shows.

4. The DEFAULT screen shows. If the FILTER RESET was successful, the FILTER RESET icon   disappears.

4.4 HEAT EXCHANGER menu 

NOTE:

This menu is only visible if your HRU supports bypass functionality.

The heat exchanger increases the temperature of the air inflow. If you do not want the air inflow to be 

warmed up, you can disable the heat exchanger.

When the bypass is open, the inflow of air does not pass the heat exchanger.

Содержание HRQ-PremAIR-BUT-LCD

Страница 1: ...Sterownik HRQ PremAIR BUT LCD INSTRUKCJA OBS UGI USER MANUAL Wersja version 0921 Controller HRQ PremAIR BUT LCD...

Страница 2: ...dzenia 5 3 3 1 Przyciski pojemno ciowe 6 3 3 2 Ikony na wy wietlaczu LCD 6 3 3 3 Ekran domy lny 7 4 Obs uga i menu 7 4 1 W czanie ekranu 7 4 2 Tryb roboczy 7 4 2 1 Wyb r trybu AUTO 7 4 2 2 Wyb r trybu...

Страница 3: ...User Manual Spis tre ci Contents 6 Konfiguracja 13 6 1 Ustawianie PO CZENIA 13 6 2 Menu USTAWIENIA i zmiana ustawie 13 6 2 1 Przej cie do menu USTAWIENIA 13 6 2 2 Zmiana ustawie 13 6 2 3 Zapisanie ust...

Страница 4: ...s a ostrzegawcze NIEBEZPIECZE STWO Nieprzestrzeganie tych wskaz wek prowadzi do mierci powa nych obra e cia a lub uszkodze urz dzenia OSTRZE ENIE Nieprzestrzeganie tych wskaz wek mo e prowadzi do niez...

Страница 5: ...3 1 Przeznaczenie Urz dzenie stanowi interfejs u ytkownika oraz instalatora do monitorowania i zmiany ustawie pod czonych central wentylacyjnych nawiewno wywiewnych z odzyskiem ciep a seria HRU PremAI...

Страница 6: ...ywistej 2 cyfry L Wska nik usterki nale y zapozna si z instrukcj centrali w celu przegl du kod w usterek M Menu DATA i CZAS N Menu WARTO CI CZUJNIKA menu USTAWIENIA O Menu PO CZENIE Pr dko Tryb Wysoka...

Страница 7: ...wbudowanego zegara nie dzia a zatem PROGRAM CZASOWY 4 2 1 Wyb r trybu AUTO Aby uruchomi tryb AUTO nale y dotyka przycisk W G R lub W D do momentu pojawienia si na ekranie ikony trybu AUTO Tryb AUTO do...

Страница 8: ...ik 4 cyfrowy wskazuje aktualn warto Ikona Wy wietlany komunikat Tryb OBEJ CIE Tryb WYMIENNIK CIEP A ____ Brak komunikacji Brak komunikacji AUTO OBEJ CIE w trybie auto WYMIENNIK CIEP A w trybie auto W...

Страница 9: ...OGRAM CZASOWY 3 Za pomoc przycisku MENU mo na przechodzi przez dost pne funkcje menu PROGRAM CZASOWY Numer warto ci czujnika Nazwa warto ci czujnika Uwagi 1 Wersja czujnika centrali 2 Jako powietrza O...

Страница 10: ...u PROGRAMU CZASOWEGO nale y dotkn przycisk POWR T 4 6 2 Zmiana ustawie PROGRAMU CZASOWEGO 1 Za pomoc menu PROGRAM CZASOWY mo na zmieni ustawienia PROGRAMU CZASOWEGO patrz sekcja 4 6 2 Aby wybra rodzaj...

Страница 11: ...ikony menu DATA I CZAS 2 Nast pnie dotkn przycisk OK aby wej do menu DATA I CZAS 3 Za pomoc przycisku W G R lub W D ustawi rok 4 Dotkn przycisku OK aby przej do nast pnego ekranu 5 Za pomoc przycisku...

Страница 12: ...dzenia W przypadku zauwa enia uszkodzenia lub braku cz ci nale y od czy urz dzenie od zasilania 5 4 Rozruch OSTRO NIE Upewni si e zasilanie zosta o prawid owo pod czone Patrz sekcja 5 2 1 UWAGA Aby us...

Страница 13: ...i cie przycisku POWR T spowoduje wyj cie z menu instalatora 6 2 Menu USTAWIENIA i zmiana ustawie UWAGA Nale y zapozna si z instrukcj centrali aby uzyska informacje na temat dost pnych ustawie 6 2 1 Pr...

Страница 14: ...0 100 w zale no ci od jednostki 6 Pr dko wentylatora wyci gowego tryb HOME 10 100 w zale no ci od jednostki 7 Pr dko wentylatora nawiewnego tryb HOME 0 100 w zale no ci od jednostki 8 Pr dko wentylat...

Страница 15: ...i WEEE 7 2 Wymiary Wymiary wys x szer x g 55 mm x 55 mm x 35 mm 7 3 Warunki otoczenia Temperatura pracy 0 40 C Wilgotno wzgl dna 5 95 bez kondensacji Warunki wysy ki i transportu 20 60 C 7 4 Specyfika...

Страница 16: ...19 3 3 1 Capacitive buttons 20 3 3 2 Icons on the LCD 20 3 3 3 Default screen 21 4 Operation and menus 21 4 1 Make the screen come on 21 4 2 Operating mode 21 4 2 1 Select AUTO mode 21 4 2 2 Select M...

Страница 17: ...gi User Manual Spis tre ci Contents 6 Configuration 27 6 1 Set the BINDING 27 6 2 SETTINGS menu and change settings 27 6 2 1 Enter the SETTINGS menu 27 6 2 2 Change a setting 27 6 2 3 Keep a setting 2...

Страница 18: ...ns of the original text 1 3 Symbols and signal words used DANGER Means that death serious personal injury or damage to the device will occur if you do not obey the instructions CAUTION Means that mino...

Страница 19: ...ice is a user and installation interface to monitor and set the connected heat recovery unit HRU PremAIR series Any other use of the device is not in accordance with its intended use 3 2 Working princ...

Страница 20: ...screen 3 3 2 Icons on the LCD A CLOCK PROGRAM MENU B ON OFF indicator C TIMER mode D PARTY mode E HEAT EXCHANGER menu F STANDBY mode G FILTER RESET monu H Ventilator speeds One of these four icons ca...

Страница 21: ...rt the PARTY mode touch the UP button or the DOWN button again and again until the PARTY mode icon comes on 4 2 5 Select TIMER mode To start the TIMER mode touch the UP button or the DOWN button again...

Страница 22: ...ton again and again to go through the sensor values The 2 digit display shows the sensor Icon Message displayed BYPASS mode HEAT EXCHANGER mode ____ No communication No communication AUTO BYPASS in au...

Страница 23: ...2 Touch the OK button to enter the CLOCK PROGRAM menu 3 Touch the MENU button again and again to go through the available CLOCK PROGRAM functions Sensor value number Sensor value name Uwagi 1 SW versi...

Страница 24: ...rn to the CLOCK PROGRAM menu with out changing the CLOCK PROGRAM state 4 6 2 Change the CLOCK PROGRAM settings 1 Use the CLOCK PROGRAM menu to go to the CLOCK PROGRAM settings refer to 4 6 2 Touch the...

Страница 25: ...enter the DATE AND TIME menu 3 Touch the UP button or the DOWN button to set the year Touch the OK button to go to the next screen 4 Touch the UP button or the DOWN button to set the month Touch the...

Страница 26: ...to the device If the enclosure of the device shows signs of damage or if parts are missing the device must be disconnected from its power source 5 4 Commissioning CAUTION Make sure that the power supp...

Страница 27: ...installer menu 6 2 SETTINGS menu and change settings NOTE Refer to the HRU manual for the available settings 6 2 1 Enter the SETTINGS menu 1 Touch the MENU button again and again to go through the me...

Страница 28: ...exhaust 10 100 Depending on the units 7 High speed supply 0 100 Depending on the units 8 High speed exhaust 10 100 Depending on the units 9 Boost speed supply 0 100 Depending on the units 10 Boost sp...

Страница 29: ...7 1 Certifications LVD and EMC directive Rohs and WEEE compliant 7 2 Dimensions Dimensions H x W x D 55 mm x 55 mm x 35 mm 7 3 Ambient conditions Operating temperatures 0 40 C Relative humidity 5 95 n...

Отзывы: