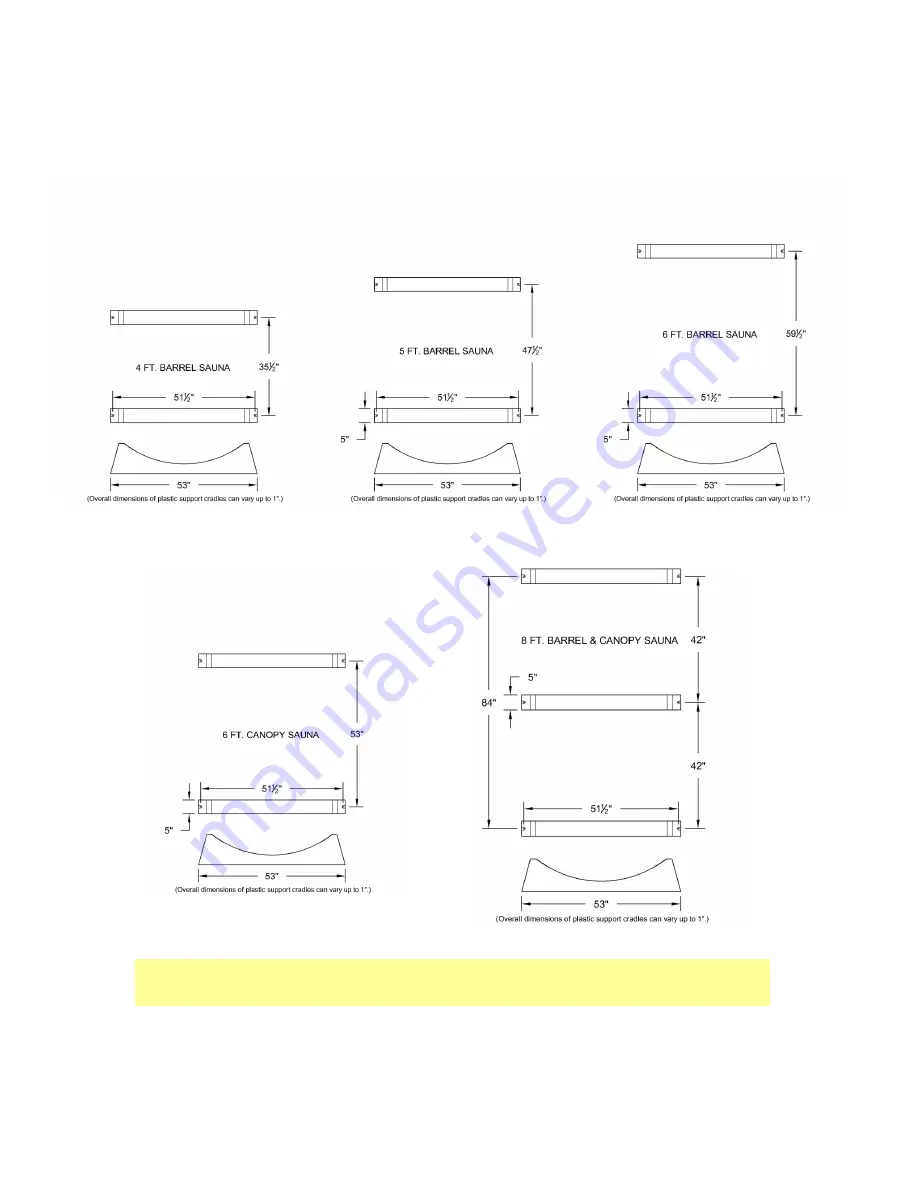
5
Cradle Placement Guide
Note: For the 8’ Grandview Sauna, a fourth cradle is added. The two center cradles are to be evenly spaced between the end cradles.
Страница 1: ...Barrel Saunas Standard Barrel Canopy Barrel Grandview Barrel Rustic Barrel Huntington Barrel Installation Owner s Manual Revised September 2016...
Страница 2: ...ll probably shower during or after each sauna bath so consider having a shower installed nearby Besides the shower you may want to have a lounging area set aside for relaxing after your sauna session...
Страница 3: ...you should not experience water dripping into the sauna However you will experience water seepage especially on the top and sides of the sauna This is because of the porous characteristics of the woo...
Страница 4: ...the cradle bases are parallel to each other Keeping every thing level and square is very important to insure proper assembly and function Place the drain stave exactly in the center of the cradle bas...
Страница 5: ...5 Cradle Placement Guide Note For the 8 Grandview Sauna a fourth cradle is added The two center cradles are to be evenly spaced between the end cradles...
Страница 6: ...d away from the end sections prior to tightening the bands It will seem like you have too many staves in place but this is good as the bands will then draw them down and tight to the end sections for...
Страница 7: ...ng nuts check to make sure bands are still spaced evenly Tighten nuts and install black vinyl thread protectors See Figure 3 You may place the brackets at the same level or vary them at different heig...
Страница 8: ...t and screw the bench into place Install center supports on 6 and 8 models only as shown in illustration Be sure to sink screw heads below the surface so you will not burn yourself while using sauna S...
Страница 9: ...urer s installation and hookup instructions Refer to the heater installation instructions for further heater installation details Your fence kit will arrive banded with stretch wrap It consists of fou...
Страница 10: ...provided screws to position waterproof Power Supply where most convenient on the outside of the sauna 4 Connect to POWER Plug into any standard outlet or have your electri cian hardwire it into a 115...
Страница 11: ...manufacturer s instructions Improper placement of heater stones can result in low er than desired heat temperatures The first time you turn the heater on set it to the maximum setting and operate it f...
Страница 12: ...V 24966 Sales Service 888 355 3050 Email sales almostheaven com Web www almostheaven com ELECTRICAL Typical wiring requirements for distances of up to 30 feet from the breaker box are as follows 4 5kw...
Страница 13: ...wimming pool STEP 3 Enter the sauna initially for about 5 to 15 minutes Bring a towel into the sauna onto which you can sit or lay Leave the sauna room once you have begun to perspire freely STEP 4 No...