AllSee POS Android Advertising Displays Скачать руководство пользователя страница 30

POS Android Advertising Display (Network) Hardware User Manual 


Page 29 

should use a Horizontal template and if your screen is installed in Portrait orientation you 
should use a Vertical template. 

3.2  How do I update my screen if it is not connected to the internet? 

(Plug and play method) 

If your screen is not connected to the internet for whatever reason and you still want to update it 
you can do so by a physical plug and play method.   

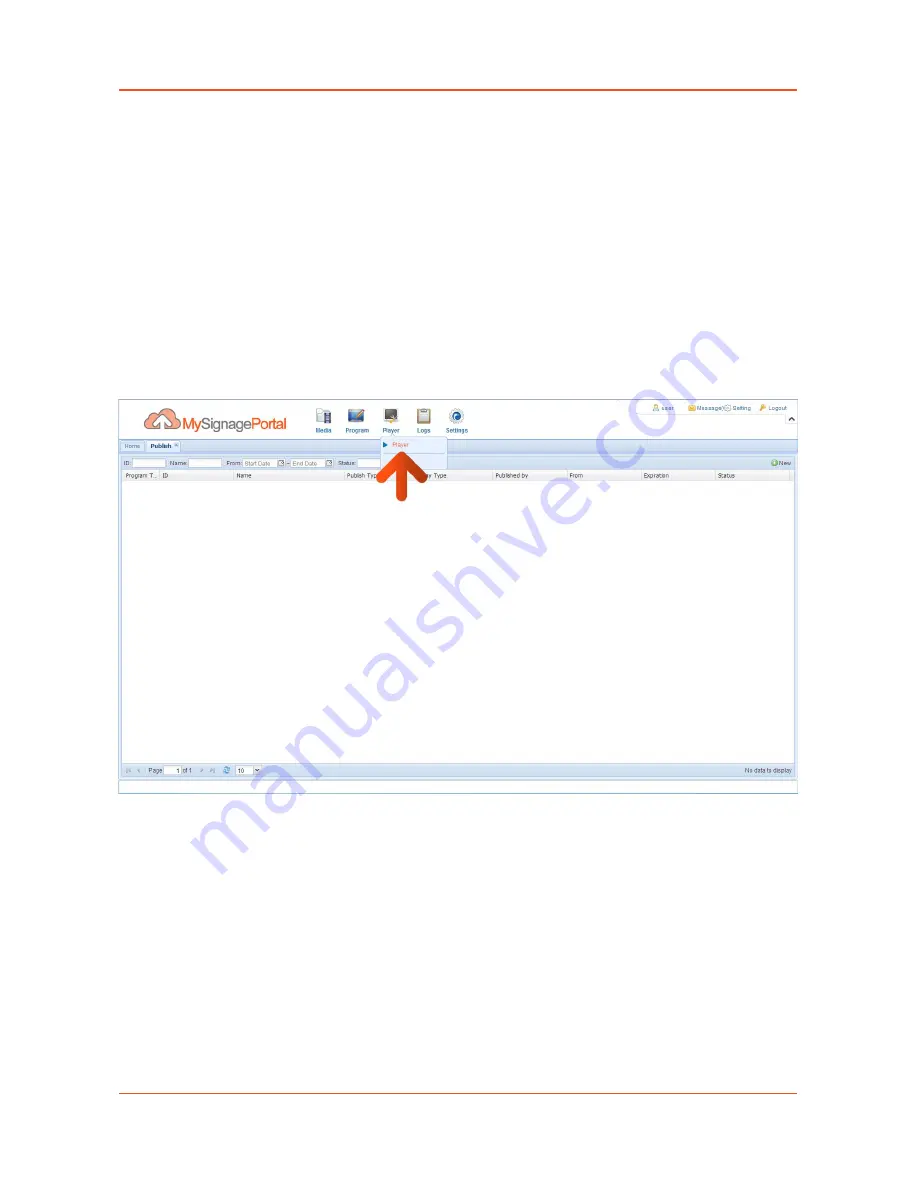
Begin by taking the normal steps to create a playlist and publish as normal. Then hover over the 
“Player” section of the Top Menu then click on “Player”. You will see a list of all of your screens. 


Содержание POS Android Advertising Displays

Страница 1: ...POS Android Digital Advertising Display Network Hardware User Manual Manual Version POSW3 0...

Страница 2: ...th any objects Remove protective covering from the screen before you use the display Shut off the power supply before cleaning Use a soft lint free cloth instead of a tissue to wipe the screen You may...

Страница 3: ...mer Strategy 23 1 7 7 File Management 25 1 7 8 Exit 25 2 System Operation 26 2 1 Supported Media Files 26 2 2 Inputs 27 3 F A Qs and Troubleshooting Guide 28 3 1 Why is my screen displaying Error Scre...

Страница 4: ...POS Android Advertising Display Network Hardware User Manual Page 3 Table of Figures Figure 1 Product Overview 4 Figure 2 Home Screen 8 Figure 3 Screen inputs 27...

Страница 5: ...no objects filled with liquids such as vases should be placed on the product For user convenience a number of operations can be performed through the remote control Attention 1 Do not change any defau...

Страница 6: ...5 1 3 Remote Control Sensor The Infrared remote control sensor can be accessed through the air vents of the screen from either the top bottom or left hand side as you are facing the screen Below is an...

Страница 7: ...POS Android Advertising Display Network Hardware User Manual Page 6 1 4 Remote Control...

Страница 8: ...e User Manual Page 7 1 5 Replacing the Remote Control Battery 1 Slide the battery cover off as shown below 2 Remove the used batteries 4 Insert the two new AAA batteries with their terminals correspon...

Страница 9: ...splay Network Hardware User Manual Page 8 1 6 Home Screen Once your screen has powered up and begins to play content press the STOP button on the remote control to go back to the Home Screen pictured...

Страница 10: ...r Strategy File Management and Exit Press to select the right item press PLAY to confirm selection To get back to the side menu press the LEFT navigation button on the remote control 1 7 1 System Sett...

Страница 11: ...e right item then PLAY to confirm selection Screen Mode Here you can set the screens orientation so as the OSD and content display correctly There are 4 options as pictured below 0 Displays in landsca...

Страница 12: ...aying There are 5 options as pictured below Close The screen doesn t display time Top Left The time will be displayed on top left of the screen Top Right The time will be displayed on top right of the...

Страница 13: ...r Manual Page 12 Play Log When the slider is turned on blue the screen will record all media files that are displayed USB This allows you to enable or disable the USB port If you want to be able to up...

Страница 14: ...nisation Host set the screen as the unique host in a network and the slave screens will synchronise from this host Slave as a slave the screen will play synchronised content with of host Sync Methods...

Страница 15: ...Yes and press PLAY to restore factory settings this will restore all system settings back to default Auto Start This feature allows your screen to start playing the pre loaded content as soon as it h...

Страница 16: ...ase press the LEFT navigation button the remote control you can now navigate though the Main Menus sub menus The sub menus within this section are Work Mode Content Management Content Storage and Mach...

Страница 17: ...POS Android Advertising Display Network Hardware User Manual Page 16 Content Storage This should be set to Internal Memory Machine Name This feature will tell you what your screen s name is on the CMS...

Страница 18: ...Menus sub menus To set accurate values first select the top date field by pressing PLAY Server Configuration This section contains the information that allows the screen to communicate with the serve...

Страница 19: ...hat the port number is inputted correctly to the screen IP Mode This feature is only available when the screen is set to LAN mode It allows you to set a static IP should this be necessary In most case...

Страница 20: ...entials to connect Navigate to your Wi Fi network from the list of available networks then press PLAY This will then prompt you to input your password if required Press PLAY while the password filed i...

Страница 21: ...are able to retrieve an accurate time from the server using Network Time Protocol you shouldn t need to input manual values the settings should be as follows To set manual values first select the top...

Страница 22: ...POS Android Advertising Display Network Hardware User Manual Page 21 Set the time using the same method saving when complete...

Страница 23: ...your screen please set the Control Mode to Manual There are two Setting Modes Daily allowing you to set the same on off times for every day of the week or Weekly allowing you to set individual on off...

Страница 24: ...and switch to different AV inputs at different times of the day This can be achieved remotely using the CMS however if you wish to input these values manually you can do so Volume Timer To enable thi...

Страница 25: ...ising Display Network Hardware User Manual Page 24 Navigate to a timer field and press PLAY on your remote control Activate the timer set a volume level and also a start and end time Finally navigate...

Страница 26: ...ed space and free space You can also format the disk You should be extremely careful here as formatting the disk will result in a total loss of data 1 7 8 Exit Highlighting and selecting this section...

Страница 27: ...uld be a maximum of 1920x1080 resolution for Landscape screens and be a maximum of 1080x1920 resolution for Portrait screens Video Container MP4 AVI MPG Codec MPEG 1 MPEG 2 MPEG 4 XVID H 264 Width 192...

Страница 28: ...Hardware User Manual Page 27 2 2 Inputs USB Universal Serial Bus for updating internal media player RJ45 LAN Local Area Network Input for Power over Ethernet and network connection RS 232 for remote...

Страница 29: ...e 90 or 270 If it is displaying in the incorrect orientation you can change it from the Main Menu 1 If your screen is playing content begin by pressing Stop on your remote control this should take you...

Страница 30: ...e my screen if it is not connected to the internet Plug and play method If your screen is not connected to the internet for whatever reason and you still want to update it you can do so by a physical...

Страница 31: ...dvertising Display Network Hardware User Manual Page 30 Right click on the screen you have sent the playlist to and select Program Package The Program Package window will then appear click the Pack Pr...

Страница 32: ...31 The Program Package Type window will then appear Tick the Select All checkbox to send all timer download display and current weather data to the screen as well Then click OK After a few minutes an...

Страница 33: ...hrome select the option Show in folder Inside the zipped folder that has been downloaded should be two folders MEDIA and SYSTEM Copy these two folders onto a blank USB stick and then plug it into the...

Страница 34: ...5 Click Save 6 A message will appear asking if you would like to save all slides as JPEG s 7 Once you have selected Yes The JPEG images will be saved and are ready to use NOTE For the best resolution...

Страница 35: ...roid Advertising Display Network Hardware User Manual Page 34 2 Once you have finished downloading Format Factory launch the software 3 Next access the Video section of the Top Menu then click on All...

Страница 36: ...POS Android Advertising Display Network Hardware User Manual Page 35 4 Now click Add File 5 Next locate and select the video files you wish to convert and click Open...

Страница 37: ...POS Android Advertising Display Network Hardware User Manual Page 36 Now click Output Setting 6 Set your Video Settings to the following values then click OK...

Страница 38: ...POS Android Advertising Display Network Hardware User Manual Page 37 7 Click OK 8 Click Start...

Страница 39: ...id Advertising Display Network Hardware User Manual Page 38 9 Your video will now be converted You can track it s progress with the Convert State bar 10 Now click Output Folder to access your converte...

Страница 40: ...POS Android Advertising Display Network Hardware User Manual Page 39 11 You will now be redirected to your converted videos Please copy them to a location more convenient for uploading later...

Страница 41: ...eps 1 Select HD Video tab then the to HD MP4 tab 2 Change audio quality to 448 kbps and change video quality to 12000 output image setting to custom size with custom aspect ratio and video resolution...

Страница 42: ...ng Display Network Hardware User Manual Page 41 3 6 My moving GIF files will not move As the screen recognises any gif file as an image it will display the first frame of a moving gif for the allocate...

Отзывы: