


10
The needles of the meters should be between 10 o’clock and 2 o’clock. However, because of the
floating power supply circuit, even if a needle falls to the extreme left or right of a meter, there is
no danger to the connected amplifier or speakers because any possible DC leakage will be so small
it cannot do any damage; in fact, it can hardly even be measured.
Initially, and from time to time as may be necessary (this should be very infrequently, if ever, for
example, when replacing a 6080 tube), the meters are used to roughly balance the 6080 third gain
stage tubes for DC control in both channels.
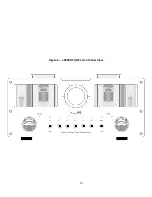
Using a small, flat blade screwdriver, turn the screw head located immediately above each of the
meters on the L-9000’s face (see Figure 4) clockwise and counter-clockwise until the needles of both
meters are between 10 o’clock and 2 o’clock. It is not necessary for the needles to be between the
two lines in the centre of the meter. It is also not necessary for the meters to be exactly in exactly
the same location; anywhere between 10 o’clock and 2 o’clock is fine.
Please be patient
; it could take some time to get an approximate balance, but once set, it should
rarely, if ever, move.
The Allnic Audio L-9000 OTL/OCL is now ready for operation. At this point, you can power on your
sources and, finally, your stereo power amplifier or mono-blocks.
OPERATION
From this point on, operation is straight-forward. All functions are controlled from the front panel
or the remote control. Of course, BE CAREFUL about differences in gain between your sources.
Generally, disc players and tuners will have greater gain than phono stages. That means the volume
setting for listening to your turntable might be too high for listening to digital disks or streaming
devices.
To avoid surges to the speakers, it is best to change from input to input only with the “operate”
button set to mute (the light above the button will not be illuminated when the button is in the
“mute” position).
When you are finished listening, turn off your stereo power amplifier or mono-block amplifiers.
Then turn off the L-9000 OTL/OCL by depressing the power button on the front panel. The power
switch on the left side panel should stay in the “on” position – this will keep key circuitry warm, and
your L-9000 OTL/OCL will be ready to play when the soft-start turns on the L-9000 OTL/OCL next
time you want to listen. Turn off your sources last.
Содержание L-9000
Страница 1: ...ALLNIC AUDIO L 9000 OTL OCL LINE STAGE PREAMPLIFIER OWNER S MANUAL...
Страница 14: ...14 FIGURES Figure 1 L 9000 OTL OCL Left Side Panel View...
Страница 15: ...15 Figure 2 L 9000 OTL OCL Rear Panel View Figure 3 L 9000 OTL OCL Remote Control...
Страница 16: ...16 Figure 4 L 9000 OTL OCL Front Panel View...
Страница 17: ...17 Figure 5 L 9000 OTL OCL Top View...


