background image

36

Standards: This product meets the following standards. 

!

1

RFI Emission

EN55022 Class A, EN61000-3-2,
EN61000-3-3

!

2

Warning: In a domestic environment this product may cause radio 
interference in which case the user may be required to take adequate 
measures.

!

3

Immunity

EN55024

!

4

Electrical Safety

EN60950, UL1950 (UL/cUL)

!

5

Laser

EN60825

Safety

!

6

Warning: Class 1 Laser product.

!

7

Warning: Do not stare into the laser beam.

!

8

Electrical Notices
Warning:
 Electric Shock Hazard
To prevent electric shock, do not remove the cover. No user-serviceable 
parts inside. This unit contains hazardous voltages and should only be 
opened by a trained and qualified technician. To avoid the possibility of 
electric shock, disconnect electric power to the product before connecting or 
disconnecting the LAN cables.

!

9

Lightning Danger
Danger:
 Do not work  on equipment or cables during periods of  lightning 
activity.

!

10

Caution: Power cord is used as a disconnection device. To de-energize 
equipment, disconnect the power cord.

U.S. Federal Communications Commission

Radiated Energy

Note: This equipment has been tested and found to comply with the 
limits for a Class A digital device pursuant to Part 15 of FCC Rules. 
These limits are designed to provide reasonable protection against 
harmful interference when the equipment is operated in a commercial 
environment. This equipment generates, uses, and can radiate radio 
frequency energy and, if not installed and used in accordance with this 
instruction manual, may cause harmful interference to radio 
communications. Operation of this equipment in a residential area is 
likely to cause harmful interference in which case the user will be 
required to correct the interference at his own expense.

Note: Modifications or changes not expressly approved of by the 
manufacturer or the FCC, can void your right to operate this equipment.

Industry Canada

This Class A digital apparatus meets all requirements of the Canadian 
Interference-Causing Equipment Regulations.

Cet appareil numérique de la classe A respecte toutes les exigences du 
Règlement sur le matériel brouilleur du Canada.

Содержание AT-PBC18

Страница 1: ...AT PBC18 Rackmountable Chassis for use with PowerBlade Series Modules Quick Install Guide PN 613 50145 00 Rev B ...

Страница 2: ...f their respective owners Allied Telesyn Inc reserves the right to make changes in specifications and other information contained in this document without prior written notice The information provided herein is subject to change without notice In no event shall Allied Telesyn Inc be liable for any incidental special indirect or consequential damages whatsoever including but not limited to lost pro...

Страница 3: ...tant L annexe B contient les instructions de sécurité relatives à l installation de cet équipement Lorsque vous voyez le symbole reportez vous à l annexe B pour consulter la traduction de ces instructions dans votre langue Tärkeää Liite B sisältää tämän laitteen asentamiseen liittyvät käännetyt turvaohjeet Kun näet symbolin katso käännettyä turvaohjetta liitteestä B Importante l Appendice B contie...

Страница 4: ......

Страница 5: ...rmation x Tell Us What You Think x Chapter 1 Overview 1 Key Features 2 Status LEDs 3 Power Supply 4 AC Power Supply 4 DC Power Supply 5 Optional Management Module 5 Chapter 2 Installing the PowerBlade PBC18 7 Verifying Package Contents 7 Preparing the Site 7 Reviewing Safety Precautions 8 Installing the PowerBlade PBC18 on a Desktop 10 Installing the PowerBlade PBC18 in a Rack 14 Warranty Registra...

Страница 6: ...py 24 Hot Swapping a Power Supply 25 Chapter 5 Installing an Optional Management Module 27 Installing an Optional Management Module 28 Chapter 6 Troubleshooting 31 Appendix A Technical Specifications 33 Physical Characteristics 33 Temperature 33 Power Requirements 33 Agency Certifications 33 Appendix B Translated Safety Statements 35 ...

Страница 7: ...s the most recent documentation software and technical information for all of our products For product guides select Support Services from our web site After you have performed the procedures in this quick install guide you should download the following guides from our web site PowerBlade PBC18 Installation Guide PN 613 50144 00 AT S31 User s Guide PN 613 50205 00 The installation and user s guide...

Страница 8: ...pport You can request technical support online by accessing the Knowledge Base at http kb alliedtelesyn com You can use the Knowledge Base to submit questions to our technical support staff and review answers to previously asked questions Telephone Support For technical support by telephone contact Allied Telesyn at one of the following locations Americas United States Canada Mexico Central Americ...

Страница 9: ...tralia Tel 1 800 000 880 Japan Tel 81 3 3443 5640 France Belgium Luxembourg The Netherlands Middle East Africa Tel 33 0 1 60 92 15 25 United Kingdom Denmark Norway Sweden Finland Iceland Tel 0044 1235 442500 North America Toll free 1 800 762 1664 Fax 1 425 806 1050 Europe Africa and the Middle East Tel 44 1793 501401 Fax 44 1793 431099 Latin America the Caribbean Virgin Islands Tel international c...

Страница 10: ...he password For Sales or Corporate Information You can contact Allied Telesyn for sales or corporate information at the location below Allied Telesyn Inc 19800 North Creek Parkway Suite 200 Bothell WA 98011 Tel 1 425 487 8880 Fax 1 425 489 9191 Tell Us What You Think If you have any comments or suggestions on how we might improve this or other Allied Telesyn documents please fill out the General E...

Страница 11: ...ong with six LEDs to notify you of power and management status The chassis also has a Reset button that allows you to reset the optional management module See Figure 1 The back of the chassis features a PWR 1 expansion slot for the main power supply a PWR 2 expansion slot for an optional redundant power supply and an optional management module expansion slot See Figure 2 Figure 1 PowerBlade PBC18 ...

Страница 12: ...eset button for use with the management module only Hot swappable AC or DC power supplies An expansion slot for the main power supply and an optional redundant power supply One expansion slot for an optional management module PBM02 Management MDI X MDI LNK STATUS PWR RESET RS 232 Terminal 10Base T Optional Management Main Power Supply Optional Power Supply Module Expansion Slot Expansion Slot PWR ...

Страница 13: ...n The optional redundant power supply if installed is functioning normally Management Module Status Amber The module is performing a self test Flashing Amber The module is downloading the firmware from a host PC Red The module or management software is malfunctioning Green The module is installed and online LINK Green A valid link has been detected on the RJ 45 port 100M Not used at this time FDX ...

Страница 14: ...oth power supplies must be AC or both must be DC Powering ON or OFF the chassis depends on the type of power supply installed For an AC model you connect or disconnect the power cord For a DC model you connect or disconnect the DC power cables or power OFF the DC circuit to which the power supply is connected For instructions on hot swapping refer to Hot Swapping a Power Supply on page 25 AC Power...

Страница 15: ...ry if you want to locally or remotely monitor and configure the modules and ports The management module features a Link Power and Status LED as well as a Reset button See Figure 5 The LEDs and the Reset button are duplicated on the front of the chassis for easy monitoring or to reset the management module You may need to reset the module after completing the installation adding or hot swapping a p...

Страница 16: ......

Страница 17: ...nly This quick install guide Warranty card Preparing the Site Be sure to observe the following guidelines when planning the installation of your chassis Make sure that the chassis power is accessible and cables can be easily connected Cables must be away from sources of electrical noise such as radios transmitters broadband amplifiers power lines fluorescent or halogen light fixtures Air flow arou...

Страница 18: ...r There are no user serviceable parts inside The unit contains hazardous voltages and should only be opened by a trained and qualified technician 8 Warning Lightning Danger Do not work on this equipment or cables during periods of lightning activity 9 Caution Power cord is used as a disconnection device To de energize equipment disconnect the power cord AC model only 10 Warning Electrical Type Cla...

Страница 19: ...c Codes 15 Caution Lithium Battery Should only be changed by trained and qualified technician Danger of explosion if battery incorrectly replaced Replace only with the same or equivalent type recommended by the manufacturer Dispose of used batteries according to the manufacturer s instructions Attention Il y a danger d explosion s ily y a remplacement incorrect de la batterie Remplacer uniquement ...

Страница 20: ...fe location In case you need to return the chassis to Allied Telesyn you will need to ship the unit back using as much of the original packaging material as possible 2 Place the chassis upside down on a level secure surface 3 Attach one of the rubber feet to each corner of the chassis then turn the chassis right side up See Figure 6 Figure 6 Attaching the Rubber Feet Caution Power cord is used as ...

Страница 21: ...reaker should be installed at the supply end of the cable to be used with this LAN equipment Always connect the wiring to the LAN equipment first before connecting the wiring to the breaker To avoid the danger of physical injury from electrical shock do not work with hot feeds Always be sure that the breaker is in the OFF position before connecting the wiring to the breaker 16 b Identify the posit...

Страница 22: ... d Connect the frame ground wire to the terminal marked with the ground symbol by inserting the wire into the terminal block and tightening the connection with a flathead screwdriver See Figure 9 Warning When installing this equipment always ensure that the frame ground connection is installed first and disconnected last 18 Figure 9 Connecting the Stripped Wire 8 mm 1 mm 0 31 in 0 039 in PWR 2 PWR...

Страница 23: ...e rack using multiple cable ties not provided This will help minimize the chance of the connections being disturbed by casual contact with the wiring It is recommended that you use at least four cable ties 10 centimeters 4 inches apart with the first one located within 15 centimeters 6 inches of the terminal block Note This system will work with a positive grounded or negative grounded DC system 2...

Страница 24: ... following procedure 1 Remove the rubber feet from the bottom of the chassis if attached as shown in Figure 10 Figure 10 Removing the Rubber Feet 2 Attach the brackets to either the front or middle of the side of the chassis as shown in Figure 11 Figure 11 Attaching the Brackets to the PowerBlade PBC18 19 inch Bracket 19 inch Bracket 23 and 25 inch Installation A Installation B 23 and 25 inch Brac...

Страница 25: ...s to the rack with 4 screws not provided for each side See Figure 12 Note The brackets are designed to be installed in the center of a 3U high opening on a standard rack Figure 12 Installing the Chassis to a Rack Caution Power cord is used as a disconnection device To de energize equipment disconnect the power cord AC model only 10 19 inch Version 23 or 25 inch Version ...

Страница 26: ...e applying power to the chassis Refer to Installing an Optional Management Module on page 27 for instructions The PowerBlade PBC18 is now ready for use Proceed to Chapter 3 for instructions on installing a PowerBlade Series Switch or Media Converter Modules Warranty Registration When you have finished installing the product you should register your product by completing the enclosed warranty card ...

Страница 27: ...ifications for your specific PowerBlade module This guide can be found on Allied Telesyn s web site at www alliedtelesyn com To install a PowerBlade module in the chassis perform the steps below 1 Remove a blank faceplate from the chassis front panel by loosening the thumbscrew A PowerBlade module can be installed in any expansion slot See Figure 13 Figure 13 Removing a Blank Faceplate Note Do not...

Страница 28: ...o the chassis backplane See Figure 14 Figure 14 Installing a PowerBlade Module 4 Secure the module to the chassis by tightening the thumbscrew 5 Verify that the PR LED on the module is green If the LED is OFF refer to Troubleshooting on page 31 for instructions 6 Verify the MissingLink Link Test ML LT button is set correctly Refer to the PowerBlade PBC18 Installation Guide for instructions 7 Conne...

Страница 29: ...e packaging material in a safe location Caution Wear a grounding device and observe electrostatic discharge precautions when installing the PowerBlade module in the chassis Failure to observe this caution could result in damage to the PowerBlade module 4 Slide the module gently into place aligning it with the guiderail until it firmly connects to the chassis backplane See Figure 14 5 Secure the ne...

Страница 30: ......

Страница 31: ...power supply will provide full power to the chassis thereby preventing a system failure The main and optional power supply can be hot swapped meaning that should either power supply fail the failed power supply can be removed and replaced with a new power module while the chassis is operating Network operation will not be interrupted The power modules to be hot swapped must be the same type You ca...

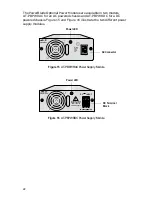
Страница 32: ...ure 15 and Figure 16 illustrate the two different power supply modules Figure 15 AT PBPWRAC Power Supply Module Figure 16 AT PBPWRDC Power Supply Module PBPWRAC AC INPUT 100 240AC 50 60Hz 3A MAX 150W AC Connector Power LED PBPWRDC FOR CENTRALIZED DC POWER CONNECTION INSTALL ONLY IN A RESTRICTED AREA 36 60VDC 1 0A DC INPUT DC Terminal Power LED Block ...

Страница 33: ...lot gently seating the power supply s connector into the chassis backplane See Figure 18 Figure 18 Installing the Main Power Supply 4 Secure the power supply to the chassis by tightening the two thumbscrews 5 Apply power to the module by connecting the AC power cord or DC wires Refer to page 11 Step 4 for an AC unit or Step 5 for a DC unit 6 The power supply s Power LED should be ON If the LED is ...

Страница 34: ... the power supply for the shipping package and store the packaging material in a safe location 3 Slide the optional power supply into the slot gently seating the power supply s connector into the chassis backplane See Figure 20 Figure 20 Installing an Optional Power Supply 4 Secure the optional power supply to the chassis by tightening the two thumbscrews PWR 2 PWR 1 PBM02 Management MDI X MDI LNK...

Страница 35: ...t be used together in the same chassis 1 To remove a failed power module you must power OFF the appropriate power source To do this perform one of the following For an AC model unplug the power cord from the power outlet and then unplug the power cord from the failed module For a DC model follow the steps below Warning When installing this equipment always ensure that the frame ground connection i...

Страница 36: ...nnect the main and redundant power supplies to separate outlets or DC circuits to increase the proctection to your chassis from operational failure 6 Apply power to the new module by connecting the AC power cord or DC wires Refer to page 11 Step 4 for an AC unit or Step 5 for a DC unit 7 The new power supply s LED should be ON If the LED is OFF refer to Troubleshooting on page 31 for instructions ...

Страница 37: ...al managment The management module also features a 10Base T twisted pair port with an RJ 45 connector The twisted pair port is used for remote management The RJ 45 has a maximum operating distance of 100 meters 328 feet and supports 10 Mbps half duplex operation The management module features Link Power and Status LEDs as well as a Reset button See Figure 21 The LEDs and the Reset button are dupli...

Страница 38: ... this equipment always ensure that the frame ground connection is installed first and disconnected last 18 a Remove the positive and negative feed wires from the terminal block by loosening the screws to the wire connection with a flathead screwdriver b Remove the frame ground wire from the terminal block by loosening the screw to the wire connection with a flathead screwdriver 2 Remove the blank ...

Страница 39: ...ires Refer to page 11 Step 4 for an AC unit or Step 5 for a DC unit 7 Check to be sure that the Status and PWR LED on the front of the management module are green If one or both of the LEDs are OFF refer to Troubleshooting on page 31 for instructions 8 For local management attach one end of the RS 232 cable with the DB 9 connector to the RS 232 port on the management module and the other end of th...

Страница 40: ...MDI MDI X button to the MDI X OUT position The management module is now ready to be configured To manage and configure the PowerBlade Optional Management Module refer to the AT S31 User s Guide This guide can be downloaded from Allied Telesyn s web site at www alliedtelesyn com ...

Страница 41: ...on on the front of the PowerBlade PBC18 or on the management module for about 1 second The Status LED will flash once after which the management module is ready for use Caution Using the Reset button will briefly interrupt network operations on 100 Mbps PowerBlade Series Modules 3 Check to be sure that the fans are operating If a fan is not operating it is likely that a power supply has failed If ...

Страница 42: ......

Страница 43: ... to 122 F Maximum Storage 25 C to 70 C 13 F to 158 F Humidity 5 to 95 maximum non condensing Power Requirements Input Supply Voltage AC 110 to 240 V AC 3A maximum DC 48 V DC 3A maximum AC Input Frequency 50 60 Hz 3 Power Consumption 35 watts maximum Agency Certifications Electrical Safety UL1950 UL cUL TUV EN60950 NOM and CE EMI RFI FCC Class A EN55022 Class A VCCI EN610003 2 EN61000 3 3 Immunity ...

Страница 44: ......

Страница 45: ... la traduction en plusieurs langues des instructions de sécurité figurant dans ce guide Tärkeää Tämä liite sisältää tässä oppaassa esiintyvät turvaohjeet usealla kielellä Importante questa appendice contiene traduzioni in più lingue degli avvisi di sicurezza di questa guida Viktig Dette tillegget inneholder oversettelser til flere språk av sikkerhetsinformasjonen i denne veiledningen Importante Es...

Страница 46: ...To de energize equipment disconnect the power cord U S Federal Communications Commission Radiated Energy Note This equipment has been tested and found to comply with the limits for a Class A digital device pursuant to Part 15 of FCC Rules These limits are designed to provide reasonable protection against harmful interference when the equipment is operated in a commercial environment This equipment...

Страница 47: ...o the breaker 17 Warning Do not strip more than the recommended amount of wire Stripping more than the recommended amount can create a safety hazard by leaving exposed wire on the terminal block after installation 18 When installing this equipment always ensure that the frame ground connection is installed first and disconnected last 19 Caution Safety Hazard Check to see if there are any exposed c...

Страница 48: ...üssen Geerdet Sein Der Netzstecker darf nur mit einer vorschriftsmäßig geerdeten Steckdose verbunden werden Ein unvorschriftsmäßiger Anschluß kann die Metallteile des Gehauses unter gefährliche elektrische Spannungen setzen 12 Steckbares Gerät Die Anschlußbuchse sollte in der Nähe der Einrichtung angebracht werden und leicht zugänglich sein 13 Vorsicht Die Entlüftungsöffnungen dürfen nicht versper...

Страница 49: ...atterie oder einem gleichwertigen Batterietyp nach Empfehlung des Herstellers ersetzen Gebrauchte Batterien nach Anweisungen des Herstellers beseitigen Standarder Dette produkt tilfredsstiller de følgende standarder 1 Radiofrekvens forstyrrelsesemission EN55022 Klasse A EN61000 3 2 EN61000 3 3 2 Advarsel Iet hjemligt miljø kunne dette produkt forårsage radio forstyrrelse Bliver det tilfældet påkræ...

Страница 50: ...edninger med den 17 Advarsel Man bør ikke afisolere mere af ledningerne end anvist for så kan sådanne blanke ledninger udgøre et faremoment efter montering på klemmerækken 18 Advarsel Ved installering af dette udstyr skal steljord altid forbindes først og aftages sidst 19 Forsigtig Fare Se omhyggeligt efter om der stikker blanke kobbertråde ud fra klemmeforbindelserne Ved korrekt montering er det ...

Страница 51: ...de omgevingslucht ongehinderd toelaten voor afkoeling 14 Bedrijfstemperatuur De omgevingstemperatuur voor dit produkt mag niet meer bedragen dan 40 graden Celsius 15 Alle Landen het toestel installeren overeenkomstig de lokale en nationale elektrische voorschriften 16 Waarschuwing Op de kabel die op de LAN apparatuur wordt aangesloten dient een zekering van 10 amp te worden gemonteerd aan de zijde...

Страница 52: ...alifié Pour éviter tout risque d électrocution débrancher le matériel avant de connecter ou de déconnecter les câbles LAN 9 Danger De Foudre Danger Ne pas manier le matériel ou les câbles lors d activité orageuse 10 Attention Le cordon d alimentation sert de mise hors circuit Pour couper l alimentation du matériel débrancher le cordon 11 Équipement De Classe 1 Électrique Ce Matériel Doit Être Mis ...

Страница 53: ...ne mise à la terre positive ou négative 21 Pile en Lithium Doit uniquement être remplacée par un technicien dûment qualifié Attention Un danger d explosion existe en cas de remplacement incorrect de la pile Remplacer uniquement avec une pile du même type ou d un type recommandé par le fabricant Mettre au rebut les piles usagées conformément aux instructions du fabricant Standardit Tämä tuote on se...

Страница 54: ...sta johtimesta päällystettä enempää kuin on suositeltu Päällysteen poistaminen suositusta pidemmältä matkalta voi aiheuttaa turvallisuusriskin sillä riviliittimeen jää asennuksen jälkeen paljaita johtimia 18 Varoitus Kun asennat tätä laitetta varmista aina että runkomaadoitettu liitin kytketään ensin ja irrotetaan viimeiseksi 19 Huomio Turvallisuusriski Tarkista ettei asennetusta johtimesta näy pa...

Страница 55: ...nsentire il libero ricircolo dell aria ambiente per il raffreddamento 14 Temperatura Di Funzionamento Questo prodotto è concepito per una temperatura ambientale massima di 40 gradi centigradi 15 Tutti I Paesi installare il prodotto in conformità delle vigenti normative elettriche nazionali 16 Avvertenza A titolo di cautelativo installare un interruttore di sicurezza da 10 ampere sull estremità in ...

Страница 56: ... farlige spenninger og må kun åpnes av en faglig kvalifisert tekniker For å unngå elektrisk sjokk må den elektriske strømmen til produktet være avslått før LAN kablene til eller frakobles 9 Fare For Lynnedslag Fare Arbeid ikke på utstyr eller kabler i tordenvær 10 Forsiktig Strømledningen brukes til å frakoble utstyret For Å Deaktivisere utstyret må strømforsyningen kobles fra 11 Elektrisk Type 1 ...

Страница 57: ...ømssystemer 21 Litiumbatteri Må kun byttes ut av en faglig kvalifisert tekniker Forsiktig Eksplosjonsfare hvis batteriet feilinnsettes Batteriet må bare erstattes med samme type eller en tilsvarende type som er anbefalt av fabrikanten Batteriene må kasseres i samsvar med fabrikantens instruksjoner Padrões Este produto atende aos seguintes padrões 1 Emissão de interferência de radiofrequência EN550...

Страница 58: ...não trabalhe com alimentadores ligados Verifique sempre se o disjuntor está na posição off desligado antes de ligar os cabos ao mesmo 17 Aviso Não corte mais fio do que recomendado Cortar mais do que o recomendado pode ser perigoso por deixar fio exposto no terminal depois da instalação 18 Aviso Ao ligar este equipamento instale sempre primeiro a ligação à terra e desligue a sempre em último 19 At...

Страница 59: ...ligrosas en las partes metálicas que están expuestas 12 Equipo conectable el tomacorriente se debe instalar cerca del equipo en un lugar con acceso fácil 13 Atencion Las aberturas para ventilación no deberán bloquearse y deberán tener acceso libre al aire ambiental de la sala para su enfriamiento 14 Temperatura Requerida Para La Operación Este producto está diseñado para una temperatura ambiental ...

Страница 60: ...kerhet 6 Varning Laserprodukt av klass 1 7 Varning Laserstrålning när enheten är öppen 8 Tillkännagivanden Beträffande Elektricitetsrisk Risk för elektrisk stötför att undvika elektrisk stöt ta ej av locket Det finns inga delar inuti som behöver underhållas Denna apparat är under högspänning och får endast öppnas av en utbildad kvalificerad tekniker För att undvika elektrisk stöt koppla ifrån prod...

Страница 61: ...ad som anges ovan Skalas för mycket isolering av kan fara uppstå om oskyddad tråd vidröras på anslutningsplinten efter anslutningen 18 Varning Vid anslutning av denna utrustning skall man alltid se till att jordtråden ansluts först och lossas sist 19 Obs Fara Kontrollera om små koppartrådar sticker ut ifrån den anslutna tråden Om anslutningen utförts riktigt sticker inga trådar ut från anslutnings...

Страница 62: ......

Отзывы: