AT-SBx908 GEN2 Installation Guide for Virtual Chassis Stacking
113
3. Verify that the On/Off switch on AT-SBxPWRSYS1-80 DC Power
Supply is in the Off position. Refer to Figure 67.
Figure 67. On/Off Switch on the AT-SBxPWRSYS1-80 DC Power Supply
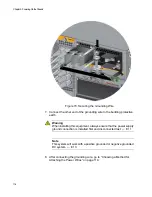
4. Use an 8 mm wrench to remove the grounding post nut and washer,
shown in Figure 68 on page 114, from the power supply.
On/Off Switch
Содержание AT-FAN08
Страница 10: ...Figures 10...
Страница 12: ...Tables 12...
Страница 16: ...Preface 16...
Страница 38: ...Chapter 1 Overview 38...
Страница 60: ...Chapter 2 Virtual Chassis Stacking 60...
Страница 80: ...Chapter 4 Installing the Chassis 80 Figure 32 Chassis Orientations in the Equipment Rack Continued...
Страница 82: ...Chapter 4 Installing the Chassis 82 Figure 34 Example of Adjusting the Equipment Rack Brackets...
Страница 104: ...Chapter 4 Installing the Chassis 104...
Страница 140: ...Chapter 5 Powering On the Chassis 140...
Страница 166: ...Chapter 7 Cabling the AT XEM2 Line Card Ports 166...
Страница 214: ...Appendix A Technical Specifications 214...


