background image

8

Easy Start

Easy Start

Easy Start

Easy Start

Easy Start

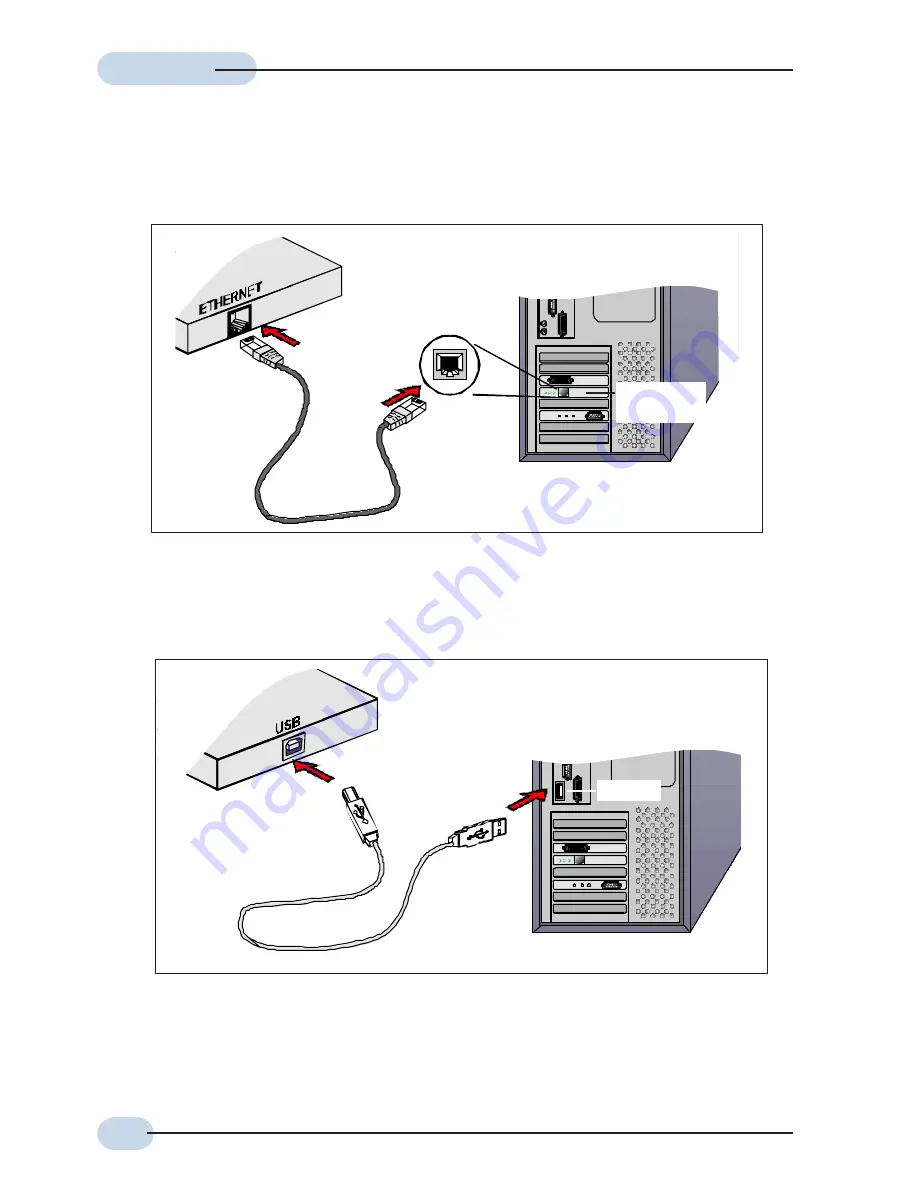
Back view of a computer

Ethernet Network cable

Ethernet Port

Back view of

the ADSL

Router

Ethernet

Network Card

Back view of a

computer

USB cable

USB

Port

Back view of

the ADSL Router

1.1.2(a) Connecting to the Ethernet

(This connection is not required if you are connecting to an Ethernet Switch/Hub for multiple-

users connection).

1.1.2(b) Connecting to the USB

You may now proceed to 

Step 1.2

.

You may now proceed to 

Step 1.2

.

Содержание AT-AR236E

Страница 1: ...1 Connecting the ADSL Router to Your Computer Notebook 6 Step 2 Configuring Your Ethernet Network Card Installing Your USB Device 10 Step 3 Configuring Your Internet Browser 18 Step 4 Connecting to the Internet 19 Product warranty does not apply to damage caused by lightning power surges or wrong voltage usage This product is for use only in UL Listed computers ...

Страница 2: ...d USB Port on the ADSL Router at the same time or expand the Ethernet connection of the ADSL Router with an Ethernet Hub Switch This documentation assumes that you have already installed an Ethernet card on your computer notebook Minimum System Requirements Pentium MMX 233MHz A CD ROM Drive Ethernet card installed with TCP IP Protocol required only if you are connecting to the ETHERNET port of you...

Страница 3: ...Vdc 1A Only Different countries are bundled with different types of power adapter The above illustration is only a representative 3 Depending on your country of purchase your package may or may not come with a POTS Splitter The POTS Splitter is required if you are connecting a Telephone Set to the Ethernet Modem Please refer to Step 1 2 Connecting to the ADSL Line for details POTS Splitter can als...

Страница 4: ...ghts up when the ADSL connection is established Flickers when the ADSL Router is trying to establish a connection with the ADSL Service Provider o ETH ACT Lights up when the Ethernet cable is properly connected from your ADSL Router to the Ethernet Card Flickers when the ADSL is transmitting receiving data p USB Lights up when the USB device driver is successfully installed in your Computer Notebo...

Страница 5: ...ill be lost Please refer to the below footer3 on how to activate the reset function p DC IN To connect to the Power Adapter that comes with your package Back Panel 3 To activate the reset function Ensure that your ADSL Router is powered on Use a paper clip or a pencil tip to depress the reset button and release At this point the DSL indicator light will go off followed by the USB and ETHERNET indi...

Страница 6: ... your Computer Notebook has an Ethernet Port If an Ethernet Port is present please proceed to section 1 1 2 a Connecting to the Ethernet If an Ethernet Port is not present locate the USB Port on your Computer Notebook and proceed to section 1 1 2 b Connecting to the USB 1 1 2 For Multiple Users Connection You may connect one computer notebook to the Ethernet Port and another one to the USB Port on...

Страница 7: ...escriptions try the following Picture A gives the illustration of an Ethernet Port All Ethernet Ports have 8 conductors on it Do not mistaken with the LINE Port Picture B that has only 6 conductors The Ethernet Port is slightly bigger than the LINE Port A ETHERNET B LINE Locating the USB Port on your Computer Notebook The USB Port on your Computer Notebook can often be identified by the label USB ...

Страница 8: ... Router Ethernet Network Card Back view of a computer USB cable USB Port Back view of the ADSL Router 1 1 2 a Connecting to the Ethernet This connection is not required if you are connecting to an Ethernet Switch Hub for multiple users connection 1 1 2 b Connecting to the USB You may now proceed to Step 1 2 You may now proceed to Step 1 2 ...

Страница 9: ...with built in Microfilter is a device that allows you to connect both your Telephone cable and Telephone Set to the same Telephone Wall Socket The device at the same time helps to eliminate background noise on the telephone line ensuring the best possible phone performance Telephone Wall Socket Telephone cable Back view of the ADSL Ethernet Modem Telephone Wall Socket POTS Splitter Connect the Tel...

Страница 10: ...d to your ADSL Router Power on your Computer s Notebook s Please proceed to Step 2 Step 1 3 Connecting to the Power Outlet Connect your ADSL Router to the Power Outlet via the Power adapter that comes with your ADSL Router package Back view of the ADSL Router Connect the other end of the Power Adapter to the Power Outlet ...

Страница 11: ...mputer notebook is connected to the Ethernet Port of the ADSL Router proceed with section 2 1 If your computer notebook is connected to the USB Port of the ADSL Router proceed with section 2 2 If your computers notebooks are connected to both the Ethernet Port and USB Port of your ADSL Router please proceed with both sections 2 1 and 2 2 2 1 Configuring Your Ethernet Network Card 1 Proceed with th...

Страница 12: ...se Ensure that your ADSL Router is powered on Restart your system Proceed to Step 3 2 1 2 For Windows 2000 Windows XP i Windows 2000 a From your Windows desktop right click on the icon My Network Places and select Properties b At the Network and Dial up Connections window right click on the Local Area Connection icon and select Properties Windows XP Instructions are based on default Start menu opt...

Страница 13: ...nected to the USB Port of your ADSL Router 2 The following screen shots illustrated serve only as examples For any dissimilarities please follow closely the instructions prompted on your Computer Notebook 3 For Windows 98 Second Edition users you may be prompted for your Windows CD ROM Have it ready by your side 2 2 Installing the USB Device Driver iv Select Search for the best driver for your dev...

Страница 14: ...ns you may be prompted for your Windows CD ROM during installation At the prompt replace the Installation CD in your CD ROM Drive with your Windows CD ROM and click OK At the Copying Files dialog box enter the path of your Windows CD ROM and click OK vi Select The updated driver Recommended DSL Router USB Remote NDIS Network Device and click Next vii Click Next to proceed installation with indicat...

Страница 15: ... Installation CD into your CD ROM Drive iii At the following prompt select Specify the location of the driver Advanced option and click Next iv Click Removable Media option and click Next v Click Next again to proceed installation with the indicated driver vi Click Finish to complete the USB driver installation vii Restart your system when prompted Proceed to Step 3 ...

Страница 16: ...arch for a suitable driver for my device recommended option and click Next v Click CD ROM drives option and click Next vi At the next prompt click Next to proceed installation with the indicated driver vii You may be prompted with Digital Signature Not Found dialog box during installation This happens when Windows detects your driver as a new version Click Yes to proceed with the installation viii...

Страница 17: ...ve iii At the following prompt select Install from a list or specific location Advanced option and click Next iv Click Search removable media option and click Next v You may be prompted with Hardware Installation dialog box This happens when Windows detects your driver as a new version Click Continue Anyway to proceed with the installation vi Click Finish when prompted Upon completion proceed to S...

Страница 18: ...your Proxy Server is not enabled v Click OK to close the dialog box You may now proceed to Step 4 to establish your Internet connection 3 2 Netscape Navigator i From your Windows desktop double click on your Navigator icon to launch your Browser ii Depending on your Netscape versions carry out one of the following instructions Click Options Network Preferences Select Proxies Ensure that the No Pro...

Страница 19: ... for the usernameand password to login to the Web Management Enter admin for the username and password for the Password factory defaults Click OK Note that this username and password is not the same as the username and password given by your ADSL Service Provider to connect to the Internet iii Click Quick Start and then follow by Easy Login iv Enter the relevant information given by your ADSL Serv...

Отзывы: