background image

DRY2407N_SVG

1

1.  

Light Sensors

Figure 33

7.   Close cover for coin drop.
8.   Move spring back over cover catch.
9.   Reinstall coin drop into machine.
10.  Reconnect electrical power to machine and drop.
11.  Add a coin to drop to verify that coin drop is operating prop-

erly and that electrical connection is working properly.

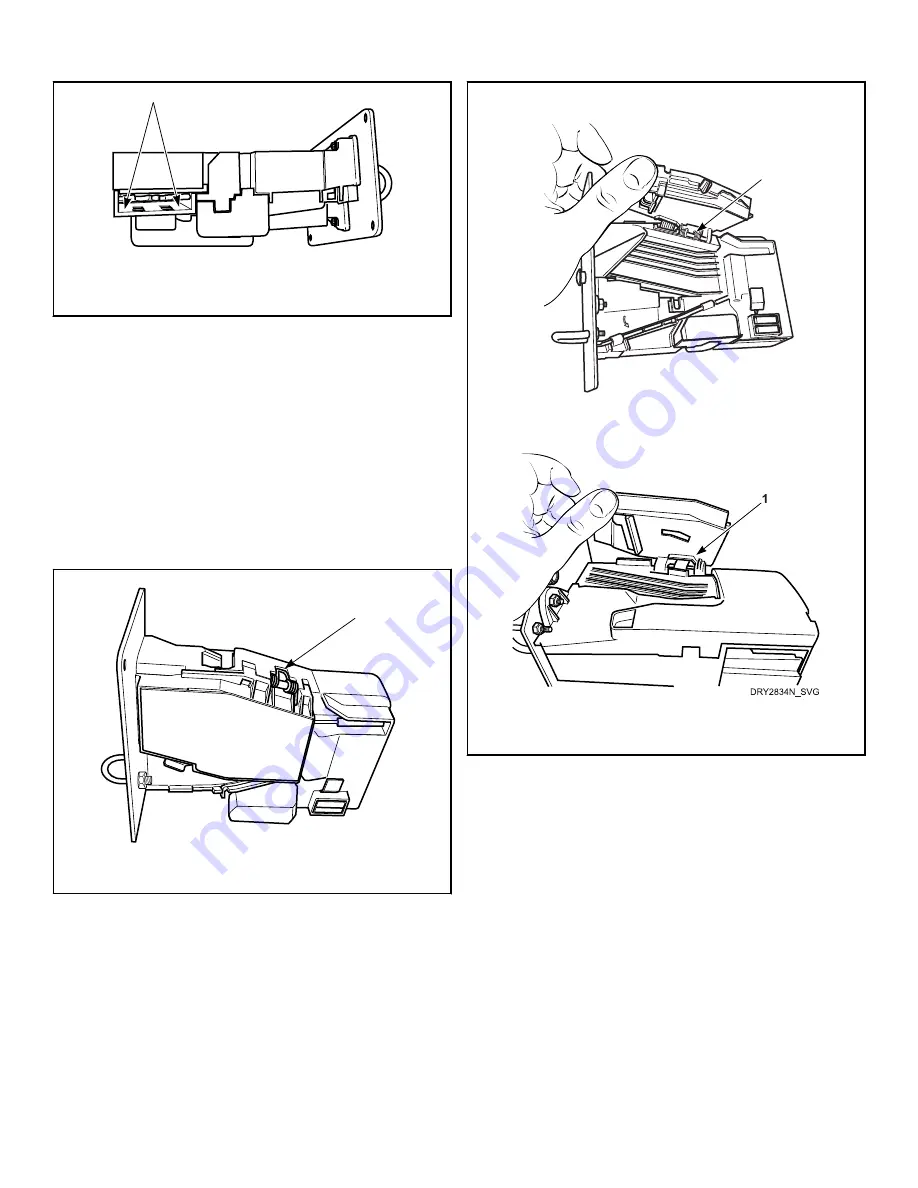
 Coin Drops with New-Style Spring

Refer to 

Figure 34 

.

DRY2404N_SVG

1

1.  

Spring

Figure 34

1.   Disconnect electrical power to machine and drop.
2.   Remove coin drop from machine.
3.   Open cover of coin drop. Refer to 

Figure 35 

.

NOTE: Do not overbend the spring by opening cov-
er too far.

Pre-2018


DRY2408N_SVG

1


2018 and Later


1.  

Spring

Figure 35

4.   Clean the coin path with a soft brush and wipe exposed surfa-

ces with an alcohol moistened lint-free cloth. Refer to 

Figure

36 

.

Adjustments

©

 Copyright, Alliance Laundry Systems LLC -

 DO NOT COPY or TRANSMIT

  69

  Part No. D515519R3

Содержание BD3NGBGS303EW01

Страница 1: ...mbers DRY726C_SVG Original Instructions Keep These Instructions for Future Reference CAUTION Read the instructions before using the machine If this machine changes ownership this manual must accompany machine www alliancelaundry com Part No D515519R3 December 2018 ...

Страница 2: ......

Страница 3: ...er Assembly or Burner Shuts Off Prematurely 26 Dryer Heater Assembly or Burner Repeatedly Cycles Off On Limit Thermostat 27 Dryer Heater Assembly or Burner Does Not Shut Off 29 Clothes Do Not Dry in Dryer 30 Clothes Are Too Hot When Removed From Dryer 31 Excessive Chattering or Vibrating Noise in Dryer 32 Excessive Humming or Whistling Noise in Dryer 33 Electronic Control Troubleshooting 34 Error ...

Страница 4: ...ck Gas Models 61 Sensor Check Gas Models 61 Igniter Check Gas Models 61 Ignition Control Grounding Check Silicon Nitride Ignition 61 Thermal Fuse Electric Models 62 Heater Assembly Electric Models 62 Cycling or Limit Thermostat 62 Door Switch 62 Thermistor 63 Internal Wiring of Dryer Motor Switch 64 Adjustments 65 Leveling Legs 65 Burner Flame Gas Models 65 Cleaning Non Electronic Coin Drop 66 Cle...

Страница 5: ...ct according to the manufacturer s instruc tions may result in conditions which can produce serious injury death and or property damage Do not repair or replace any part of the product or attempt any servicing unless specifically recom mended or published in this Service Manual and unless you understand and have the skills to car ry out the servicing Whenever ground wires are removed during serv i...

Страница 6: ...stand Locating an Authorized Service Person Alliance Laundry Systems is not responsible for personal injury or property damage resulting from improper service Review all service information before beginning repairs Warranty service must be performed by an authorized technician using authorized factory parts If service is required after the war ranty expires Alliance Laundry Systems also recommends...

Страница 7: ...UW01 SSEWYFGW173TW41 BD3NGBGS403UW01 HTENYASP293CW01 SDEBXAGS433AW01 SSGBCAGS113TW01 BD3NGBSS403UN01 HTENYASP295CW01 SDEBXAGS543DW01 SSGBCAGW113TW01 BD3NLBGS403UW01 HTGBCASP115TW01 SDEBXRGS153TW01 SSGBXAGS113TW01 BD3NLBSS403UN01 HTGBDASP095CW01 SDEBXRGS173TW01 SSGBXAGW113TW01 BD3NXAGS403UW01 HTGBXASP095CW01 SDEBXRGS173TW02 SSGBYAGS113TW01 BD3NXFGS403UW01 HTGBXASP114FW01 SDEBXRGS303NW22 SSGBYAGW113...

Страница 8: ...BLBGS403UT01 SDENXRGS173CW02 SSGWXAGW113TW01 BDGNGBGS303EW01 NDEBXAGS403UW01 SDENXRGS173TW01 SSGWYAGS113TW01 BDGNLBGS303EW01 NDEBXRGS303NW22 SDENXRGS173TW02 SSGWYAGW113TW01 BDGNXAGS303EW01 NDENXAGS303UW01 SDENXRGS433AW01 SSGWYAGW113TW41 BDGNXFGS303EW01 NDGBLBGS303ET01 SDENXRGS433LW01 SSGWYFGW113TW01 BT3JGASG403UW01 NDGBXAGS303EW01 SDENYAGS153CW01 SSGWYFGW113TW41 BT3JGASG403UW06 NDGNXAGS303EW01 SDE...

Страница 9: ...JXAGS403UG01 SDGBCAGS113TW01 STENXASP283CW01 HDEBXAGS543DW01 PDEBCRGS173TG02 SDGBCRGS113TQ01 STENXASP285CW01 HDEBXAGS543FW01 PDEBERGS173CG02 SDGBCRGS113TW01 STENXASP293CW01 HDEBXRGS153CW01 PDEBXRGS173CG02 SDGBCRGS113TW02 STENXASP295CW01 HDEBXRGS173CW01 PDEBXRGS173TG02 SDGBLBSS303EN01 STENXASP433AW01 HDEBXRGS303NW22 PDEBXRGS433AG02 SDGBXAGS111FW28 STENXASP433AW12 HDEBXRGS543FW01 PDEJCAGS174TG01 SDG...

Страница 10: ...JXAGS114TW01 SDGNYAGS113TW01 STGBCASP115TW01 HDGBYAGS113CW01 PDGJXAGS303UG01 SDGNYBGS113TN01 STGBXASP114FW01 HDGBYRGS113CW01 PDGJXAGS304AG01 SDGNYBGS113TW01 STGBXASP115TW01 HDGBYRGS113TW01 PDGJXAGS543ZG01 SDGNYRGS113CW01 STGBXASP124DW01 HDGNEAGS113CW01 PS3JGAGS403UG01 SDGNYRGS113TW01 STGBXASP304AW01 HDGNERGS113CW01 PS3JXAGS403UG01 SDGWCAGS113TW41 STGBXASP304AW12 HDGNXAGS113CN01 PSEJCAGS174TG01 SDG...

Страница 11: ...JXASP403UG06 SSENXAGW283CW01 STGNYASP115TN01 HSGNXAGW093CW01 PT3JGAJG403UG06 SSENXAGW293CW01 STGNYASP115TW01 HSGNXAGW123DW01 PT3JGAJP403UG06 SSENXAGW433AW01 STGNYFSP113TW01 HSGNXAGW543DW01 PT3JGASG403UG06 SSENXAGW433LW01 STGNYFSP115TW01 HSGNXFGW093CW01 PT3JGASP403UG06 SSENXAGW543DW01 STGNZASP113NW22 HSGNYAGW093CW01 PT3JXASG403UG06 SSENXFGW293CW01 STGWCASP115TW41 HSGNYFGW093CW01 PT3JXASP403UG06 SSE...

Страница 12: ... Fan 4 Gas Valve 5 Air Duct 6 Heater Duct The dryer uses heated air to dry loads of laundry When the motor is started the exhaust fan pulls room temperature air in through louvers at the rear of the dryer and over the heat source burner flame for gas and heating element for electric The heated air moves through the heater duct and into the cylinder where it cir culates through the wet load The air...

Страница 13: ...ryer before serv icing Never start the Dryer with any guards panels re moved Whenever ground wires are removed during serv icing these ground wires must be reconnected to ensure that the dryer is properly grounded W001R1 IMPORTANT Refer to wiring diagram for aid in testing dryer components Dryer Troubleshooting Copyright Alliance Laundry Systems LLC DO NOT COPY or TRANSMIT 13 Part No D515519R3 ...

Страница 14: ...ce if inoperative Yes Is motor dead won t run No Refer to Adjustments section to check motor switch and motor windings Yes Has motor overload protector cycled No Refer to Adjustments section to check motor switch motor windings and main windings Yes Is motor centrifugal switch sticky or plugged with lint No Wait two or three minutes for overload protector to reset If protector cycles repeatedly re...

Страница 15: ...n for obstruction Yes Is wiring broken loose or incorrect No Firmly press connection block onto motor switch Yes Is power cord miswired No Refer to wiring diagram Yes Refer to wiring diagram for correct wiring Yes Dryer Troubleshooting Copyright Alliance Laundry Systems LLC DO NOT COPY or TRANSMIT 15 Part No D515519R3 ...

Страница 16: ...e broken loose or incorrect wiring No Check cylinder for binding and out of round condition front and rear bulkheads for warping support rollers for binding cylinder seals and glides for wear or damage and clothes lodged between cylinder baffle and bulkhead Yes Are motor switch functions inoperative No Refer to wiring diagram Yes Is there a short in motor winding No Refer to Adjustments section to...

Страница 17: ...r binding Check cylinder seals and glides for wear or damage Yes Is belt routed on wrong side of idler lever No Replace or reconnect spring Yes Is there oil on cylinder No Reroute belt Yes Is belt inside out No Wipe oil from cylinder Yes Is idler arm binding No Reinstall belt with ribbed surface against cylinder Yes Is dryer overloaded No Add grease between idler arm and motor mount Replace idler ...

Страница 18: ...to parts manual for correct motor part number Yes Is idler arm bent No Check belt part number against correct part number in parts manual and replace belt if needed Yes Replace idler arm Yes Dryer Troubleshooting Copyright Alliance Laundry Systems LLC DO NOT COPY or TRANSMIT 18 Part No D515519R3 ...

Страница 19: ...r switch inoperative No Remove dust or lint and spray with a cleaner and lubricant Yes Is the control time improperly programmed No Test switch and replace if inoperative Yes Reprogram to correct cycle time Refer to Dipswitch section for settings Yes Dryer Troubleshooting Copyright Alliance Laundry Systems LLC DO NOT COPY or TRANSMIT 19 Part No D515519R3 ...

Страница 20: ...When Door is Open Is door switch miswired Replace door switch No Rewire door switch Refer to wiring diagram Yes Dryer Troubleshooting Copyright Alliance Laundry Systems LLC DO NOT COPY or TRANSMIT 20 Part No D515519R3 ...

Страница 21: ... Models Is heater assembly inoperative No Test switch and replace if inoperative Yes Electric Models Is thermal fuse inoperative No Test heater assembly and replace if cold Ohms do not read between 9 and 10 5 Ohms Yes Gas Models Is gas supply insufficient No Test thermal fuse and replace if inoperative Refer to Test Procedures section Yes Gas Models Are gas valve coils inoperative No Check gas shu...

Страница 22: ...restricted in gas orifice Yes Check harness connections to gas valve coils sensor and main harness Reconnect as required No Is thermistor inoperative No Clean out gas orifice Yes Is wiring broken loose or incorrect No Test thermistor and replace if inoperative Refer to Test Procedures section Yes Refer to wiring diagram Yes Dryer Troubleshooting Copyright Alliance Laundry Systems LLC DO NOT COPY o...

Страница 23: ...blue wires On gas coils Has flame sensor failed with contacts open Yes Check selector switch thermostats motor switch and wiring No Is igniter broken or Ohms open No Replace sensor Yes Replace igniter Yes Dryer Troubleshooting Copyright Alliance Laundry Systems LLC DO NOT COPY or TRANSMIT 23 Part No D515519R3 ...

Страница 24: ...upplied with unit for exhaust requirements Yes Is gas supply insufficient Yes Replace sensor or correct gas supply problem No Is igniter cracked No Check gas supply and pressure Make sure gas shut off valve is turned on Yes Are gas valve coils inoperative or intermittent No Replace igniter and bracket Yes Check coils and replace appropriate coils Refer to Dryer Test Procedures section Yes Dryer Tr...

Страница 25: ...Are igniter and bracket improperly installed on burner tube assembly No Check gas supply and pressure Make sure gas shutoff valve is turned on Yes Is sensor improperly installed on burner housing No Loosen screw and properly position igniter and bracket on burner tube assembly Yes Loosen screw and properly position the sensor on the burner housing Yes Dryer Troubleshooting Copyright Alliance Laund...

Страница 26: ...losed gas shut off valve or correct low pressure Yes Gas Models Is burner flame improperly adjusted Yes Refer to Gas Burner Conversion Procedures supplied in gas burner conversion kit No Cycling off on limit thermostat No Adjust flame Refer to Adjustments section Yes Gas Models Is sensor contact closing No Refer to next flowchart Yes Is thermistor inoperative No Replace sensor or adjust burner fla...

Страница 27: ...mble dryer ductwork and clean Yes Is hinged damper on exhaust system weather hood not free to open No Disassemble and clean exhaust system Yes Is limit thermostat cycling at too low a temperature No Free hinged damper or replace weather hood Yes Is there an air leak around loading door Door not sealing due to damaged seal or inoperative door catch No Replace thermostat Yes Is thermistor inoperativ...

Страница 28: ... at cylinder seal s Is there an air leak at front panel seal No Check and replace seal s if necessary Yes Check and replace seal if necessary Yes Dryer Troubleshooting Copyright Alliance Laundry Systems LLC DO NOT COPY or TRANSMIT 28 Part No D515519R3 ...

Страница 29: ...perative Yes Is wiring incorrect No Refer to Dryer Motor Does Not Stop paragraph Yes Has heater assembly shorted No Refer to wiring diagram Yes Does dryer heat in a no heat cycle No Remove heater assembly and check for short Yes Replace output board Yes Dryer Troubleshooting Copyright Alliance Laundry Systems LLC DO NOT COPY or TRANSMIT 29 Part No D515519R3 ...

Страница 30: ... bath towels to load Yes Is exhaust system improper or inadequate No Clean lint filter Yes Does heater assembly or burner shut off prematurely No Refer to Installation Instructions supplied with unit for exhaust requirements Yes Gas Models Is gas line pressure too high or too low No Refer to Dryer Heater Assembly or Burner Shuts Off Prematurely paragraph Yes Is belt installed improperly low RPM co...

Страница 31: ...nd of cycle Yes Does dryer heat up in a no heat cycle No Test thermistor and replace if inoperative Yes Are seals inoperative No Replace output board Yes Add additional cool down time No Check and replace any inoperative seals between Loading door and front panel front panel and front bulkhead blower cover and air duct cylinder and front or rear bulkhead gap between air duct and filter mounting Ye...

Страница 32: ...yer to normal cycle and allow it to heat to operating temperature If the belt vibrates as it rotates around the cylinder replace the idler spring Yes Are rollers worn No Replace idler pulley and shaft Yes Check blower fan for missing or cracked fan blades Replace rollers Yes Dryer Troubleshooting Copyright Alliance Laundry Systems LLC DO NOT COPY or TRANSMIT 32 Part No D515519R3 ...

Страница 33: ...for missing or cracked fan blades No If the abnormal operating noise is loudest at the vent exit the problem is originating from the blower housing Replace the current housing and cover Yes Dryer Troubleshooting Copyright Alliance Laundry Systems LLC DO NOT COPY or TRANSMIT 33 Part No D515519R3 ...

Страница 34: ... Re aim external device and try again EI03 Invalid Command Code Incorrect machine type Before download ing ensure data is for current machine type EI04 Command Packet Time Out Communication failure Re aim external device and try again EI05 Invalid or Out of Range Data Incorrect machine type Before download ing ensure data is for current machine type and values entered are within the min imum and m...

Страница 35: ...ma chine prompts for card removal Right most decimal point Lit Network Communication Error Communication problem Wait for 1 5 mi nutes for error to clear If error doesn t clear power down and power up the ma chine Check all network connections If error persists replace control or network board ALArn Break in Alarm Error Service the service door or coin vault switches oFF Break in Alarm Shutdown Er...

Страница 36: ... check connection between user control and Machine ID chip or try replacing the user control or the Machine ID chip E Co Output Board Communication Communication failure Power down power up and try again If error persists check connection between user control and output board or try replacing the user con trol or the output board E 59 Door Input Acquisition Hardware failure Replace output board E ...

Страница 37: ...s From the coin drop is the 3 pin connector properly plugged in Yes Properly reseat connection and conduct diagnostic test again No Are the wires exiting the coin drop optical sensor cracked or broken Yes Properly reseat connection and conduct diagnostic test again No Replace electronic control No Replace the coin drop Yes Electronic Control Troubleshooting Copyright Alliance Laundry Systems LLC D...

Страница 38: ...lectronic control display EI0F or C No If PDA displays control mismatch select proper control type Yes Has IR communication been turned off EI0F Communication sequence checks out properly C Change electronic control and repeat procedure No Turn IR communication on refer to programming manual Yes Make sure that SDIO IrDA card is installed if required on PDA No Yes Electronic Control Troubleshooting...

Страница 39: ...trol Yes 3 Is there 120 or 240 Volts AC between pins H1 3 and H1 6 on the I O Control No Correct wiring between the user and I O control Yes Replace the I O control Yes Correct wiring to the I O control Make sure the machine is plugged in and power is on No Electronic Control Troubleshooting Copyright Alliance Laundry Systems LLC DO NOT COPY or TRANSMIT 39 Part No D515519R3 ...

Страница 40: ...No Display Electronic Control Troubleshooting Copyright Alliance Laundry Systems LLC DO NOT COPY or TRANSMIT 40 Part No D515519R3 ...

Страница 41: ... O control Yes 3 Is there voltage on the COM terminal of the door switch to a neutral wire No Correct wiring between door switch and control Also check neutral supply to control Yes Correct wiring to door switch No Check operation of the door switch Replace if necessary Yes Electronic Control Troubleshooting Copyright Alliance Laundry Systems LLC DO NOT COPY or TRANSMIT 41 Part No D515519R3 ...

Страница 42: ...Door Open Electronic Control Troubleshooting Copyright Alliance Laundry Systems LLC DO NOT COPY or TRANSMIT 42 Part No D515519R3 ...

Страница 43: ...cross terminals 5 and 4 of the motor 2 Is there voltage across H3 4 and H3 6 on the control No Replace the motor Yes 3 Is there voltage across H3 5 and H3 3 on the control No Correct the wiring to the motor Yes Refer to door open troubleshooting No Replace the I O control Yes Electronic Control Troubleshooting Copyright Alliance Laundry Systems LLC DO NOT COPY or TRANSMIT 43 Part No D515519R3 ...

Страница 44: ...Motor Will Not Start Electronic Control Troubleshooting Copyright Alliance Laundry Systems LLC DO NOT COPY or TRANSMIT 44 Part No D515519R3 ...

Страница 45: ...hermostat Yes 5 Is there voltage to the input side of the thermal fuse No Check and replace wiring between components Replace element Yes 6 Is there voltage on N O on top of heat relay No Replace thermo fuse Yes 7 Is there voltage on COM on top of heat relay No Correct wiring between the control and thermo fuse on the element Yes 8 Check for proper operation of centrifugal switch on motor Does it ...

Страница 46: ...No Heat Electric Electronic Control Troubleshooting Copyright Alliance Laundry Systems LLC DO NOT COPY or TRANSMIT 46 Part No D515519R3 ...

Страница 47: ...Refer to Note Yes 3 Is there voltage to the input of the limit thermostat referenced to neutral Correct wiring between limit thermostat and gas valve Yes 4 Is there voltage across N O and H1 4 neutral on the control Check for proper air flow making sure venting is not blocked and lint screen is clean Reset or replace limit thermostat Yes 5 Is there voltage across COM and H1 4 neutral on the contro...

Страница 48: ...No Heat Gas Electronic Control Troubleshooting Copyright Alliance Laundry Systems LLC DO NOT COPY or TRANSMIT 48 Part No D515519R3 ...

Страница 49: ...coin should roll down drop and be heard dropping into coin vault If coin does not fall into coin vault or if coin drop sensor does not register that coin has been entered follow troubleshooting instructions on follow ing page Refer to Figure 2 for path that coin follows when work ing properly IMPORTANT Never use oil to correct coin drop prob lems Oil residue will prevent coins from rolling proper ...

Страница 50: ...tments section for instructions on cleaning drop No Replace coin drop sensor Yes Replace coin drop No Electronic Coin Drops If coin drop is not accepting coins perform the following 1 Clean coin drop Refer to Cleaning Electronic Coin Drop 2 On electronic coin drops with an old style tension spring shown in Figure 3 and Figure 4 test and replace tension spring using the following instructions Remov...

Страница 51: ...DRY2088N_SVG 2 1 1 Tension Spring 2 Cover Catch Figure 5 2 Open cover for coin drop 3 Place a small flathead screwdriver under right side of tension spring and lift up Refer to Figure 6 MIX2B_SVG 3 2 1 1 Left Tab 2 Small Flathed Screwdriver 3 Right Side of Tension Spring Figure 6 4 Use screwdriver to move spring approximately 3 mm to left 5 Lift spring over left tab Refer to Figure 6 6 Rotate spri...

Страница 52: ... Refer to Figure 10 MIX5B_SVG 3 2 1 1 Left Tab 2 Center Tab 3 Small Flat Screwdriver Figure 10 13 Lift spring gently to place in position under left tab 14 Push spring to right until it snaps into position Refer to Fig ure 6 15 Close coin drop cover 16 Move tension spring over cover catch Refer to Figure 5 Reinstall Coin Drop Into Machine 1 Reinstall coin drop into machine 2 Reconnect electrical p...

Страница 53: ...otate timer out of OFF position and into cycle 5 Set test meter to read Ohms The following readings should be found a Motor circuit test L1 and M zero Ohms closed b Heat circuit test L2 and H zero Ohms closed c Timer motor test T and M 1702 and1709 suffix models or T and N all other models approximately 2460 3100 Ohms or apply live power to timer motor terminals and motor should run 1 N 2 Timer Mo...

Страница 54: ...t 80 130 Ohms 1 Terminal 1 2 Terminal 2 3 Terminal 3 4 Terminal 4 5 Terminal 5 6 Terminal 6 7 Motor Disconnect Block 8 Motor Switch 9 Motor and Exhaust Assembly 10 Drive Motor Figure 12 Test Procedures Copyright Alliance Laundry Systems LLC DO NOT COPY or TRANSMIT 54 Part No D515519R3 ...

Страница 55: ...f the following steps or when replacing inoperative motor switch W290 NOTE Disconnect terminal 5 wire yellow or copper from motor switch before testing start terminals NOTE Reconnect terminal 5 wire yellow or copper to motor switch before testing run terminals Test Procedures Copyright Alliance Laundry Systems LLC DO NOT COPY or TRANSMIT 55 Part No D515519R3 ...

Страница 56: ...motor switch Replace switch No Run Terminals Manually depress actuator Continuity exists between switch terminal 6 and terminal 5 yellow or copper wire Yes Inoperative motor switch Replace switch No Heater Circuit Terminals Continuity broken between switch terminal 1 and switch terminal 2 Yes Inoperative motor switch Replace switch No Heater Circuit Terminals Manually depress actuator Continuity e...

Страница 57: ... check O K Yes Inoperative protector Replace motor No Motor Switch 1 Remove motor and exhaust fan assembly 2 Remove the two motor switch attaching screws Refer to Fig ure 13 Disconnect switch leads Remove motor switch 3 Remove thermal overload protector NOTE The thermal overload protector is unique to the motor from which it was removed and should only be used on that motor To reduce the risk of o...

Страница 58: ...t motor switch leads removed in Step 2 Refer to Figure 13 6 Test motor switch by following the step by step procedures Refer to Drive Motor 7 Before reinstalling the motor assembly apply power 120 VAC directly to motor terminals 4 and 5 Then start and run the motor at least 6 times making sure the motor and switch are operating properly NOTE The dryer manufacturer and parts suppliers are not liabl...

Страница 59: ...oil valve and a secon dary coil valve The split coil valve is opened when the dryer thermostat calls for heat while the secondary valve does not open until the igniter has attained ignition temperature 2 Pre Ignition Circuits When the dryer thermostat calls for heat circuits are completed through the holding coil sensor booster coil and igniter Both coils must be energized to open the split coil v...

Страница 60: ...ure the sensor contacts will re close in about 45 seconds This will close the secon dary valve and the burner system will be in the normal pre ignition circuit 6 Ignition Failure If flame is not established as sensor contacts open secondary valve will remain open until sensor contacts re close Sensor will continue to recycle the igniter and secon dary valve about once per minute until ignition is ...

Страница 61: ...adings Meter probes to ter minals Meter should read 50 Hertz 60 Hertz Holding Coil Ter minals 1 2 1700 285 Ohms 1365 230 Ohms Table 2 continues Coil Tolerance Readings Booster Coil Ter minals 1 3 685 115 Ohms 560 100 Ohms Secondary Coil Terminals 4 5 1680 285 Ohms 1325 230 Ohm Table 2 Silicon Nitride Ignition Both coils should read between 2400 2800 Ohms NOTE If meter registers any other readings ...

Страница 62: ...ge Hz Resistance Reading Red 5 240 V 60 Hz 10 39 31 Ohms Cold White 4 75 208 V 60 Hz 8 2 5 Ohms Cold Table continues Green 4 8 240 V 50 Hz 10 75 32 Ohms Cold Yellow 4 240 V 50 Hz 13 03 39 Ohms Cold Blue 3 1 240 V 50 Hz 16 7 5 Ohms Cold Orange 5 35 240 V 60 Hz 9 72 3 Ohms Cold Purple 4 25 208 V 60 Hz 9 27 3 Ohms Cold Cycling or Limit Thermostat 1 While supporting the access panel remove two screws ...

Страница 63: ...f access panel 2 Gently lower the access panel to disengage panel locators from bottom edge of front panel 3 Label and disconnect wires from thermistor NOTE Refer to wiring diagram when rewiring ther mistor 4 Set meter to read Ohms 5 Apply meter probes to the thermistor terminals 6 Meter should read that resitance is present thermistor is not open Test Procedures Copyright Alliance Laundry Systems...

Страница 64: ...valve to gas dryer before serv icing Never start the Dryer with any guards panels re moved Whenever ground wires are removed during serv icing these ground wires must be reconnected to ensure that the dryer is properly grounded W001R1 1 Motor Switch Attaching Screws Figure 20 Internal Wiring of Dryer Motor Switch Copyright Alliance Laundry Systems LLC DO NOT COPY or TRANSMIT 64 Part No D515519R3 ...

Страница 65: ...OT rock IMPORTANT DO NOT move the dryer at any time unless the dryer is completely assembled DO NOT slide the dryer across the floor once the leveling legs have been extended as the legs and base could become damaged 1 Dryer Base 2 Leveling Leg Figure 21 Burner Flame Gas Models 1 While supporting the access panel remove two screws from bottom edge of access panel 2 Gently lower the access panel to...

Страница 66: ...rt a coin through the coin drop If coin does not roll through drop continue with the following 5 Remove cotter pin from top of drop Refer to Figure 24 Save pin for reinstallation when cleaning is complete 6 Move metal clip closer to sensor so that it comes off frame Refer to Figure 24 7 Remove coin return from coin drop frame Refer to Figure 25 DRY4B_SVG 2 1 1 Coin Return 2 Coin Drop Frame Figure ...

Страница 67: ...o allow coin to follow through sensor 15 Reinstall coin drop into machine 16 Reconnect electrical power to machine and drop 17 Add a coin to drop to verify that coin drop is operating prop erly and that electrical connection is working properly NOTE If coin drop does not operate properly after above steps have been completed corrosion of metal or vandalized components within coin drop may be preve...

Страница 68: ... brush and wipe exposed surfa ces with an alcohol moistened cloth Refer to Figure 31 DRY2090N_SVG Figure 31 5 Clean residue from coin rail with an alcohol moistened cloth Refer to Figure 32 DRY2406N_SVG 1 1 Alcohol Moistened Cloth Figure 32 6 Clean light sensors with a soft brush or air spray duster Refer to Figure 33 Adjustments Copyright Alliance Laundry Systems LLC DO NOT COPY or TRANSMIT 68 Pa...

Страница 69: ...Style Spring Refer to Figure 34 DRY2404N_SVG 1 1 Spring Figure 34 1 Disconnect electrical power to machine and drop 2 Remove coin drop from machine 3 Open cover of coin drop Refer to Figure 35 NOTE Do not overbend the spring by opening cov er too far Pre 2018 DRY2408N_SVG 1 2018 and Later 1 Spring Figure 35 4 Clean the coin path with a soft brush and wipe exposed surfa ces with an alcohol moistene...

Страница 70: ...ree cloth Refer to Figure 37 Pre 2018 DRY2406N_SVG 1 2018 and Later 1 Alcohol Moistened Cloth Figure 37 6 Clean residue from coin rail and pendulum inside flap with an alcohol moistened soft brush Refer to Figure 38 Adjustments Copyright Alliance Laundry Systems LLC DO NOT COPY or TRANSMIT 70 Part No D515519R3 ...

Страница 71: ...rs Figure 39 8 Close cover for coin drop 9 Reinstall coin drop into machine 10 Reconnect electrical power to machine and drop 11 Add a coin to drop to verify that coin drop is operating prop erly and that electrical connection is working properly Adjustments Copyright Alliance Laundry Systems LLC DO NOT COPY or TRANSMIT 71 Part No D515519R3 ...

Отзывы: