068521
Page 21
SECTION 2
ASSEMBLY
Assembly Instructions
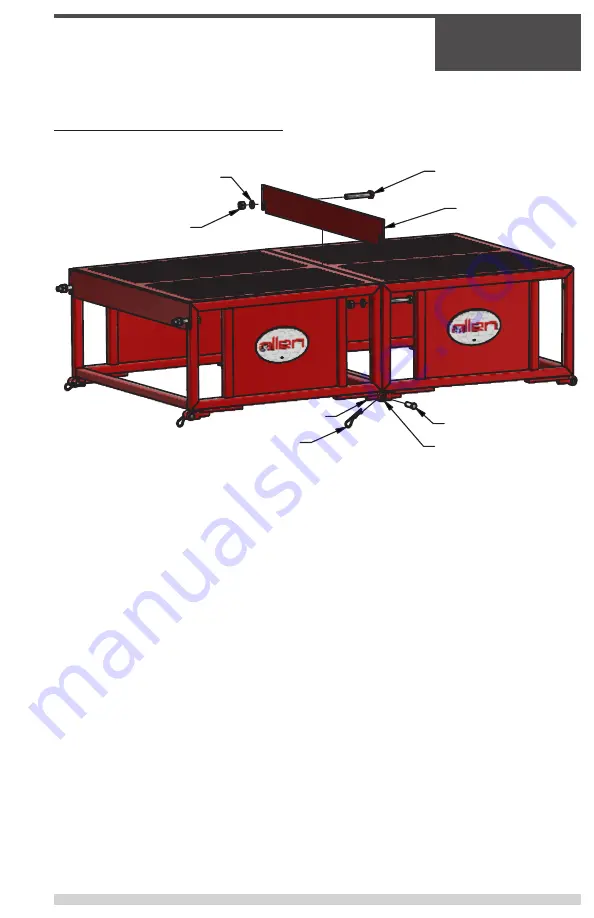
See below for assembly of the WB1224 workbridge.
Work Bridge Section Connections:
1. Align WB section so that the Connecting Clevis sits outside the rod end.
2. Insert clevis pin through connecting clevis, also passing through the Rod
End.
3. Inser haripin into hold on clevis pin, locking the clevis pin in place.
4. Do this for both sides o fthe WB section.
5.
Raise opposite WB section so that it is level with the first section, making
sure to leave room the spacer to be added.
6. Insert Bolt into hole provided in the WB Frame, do this for both sides of the
section.
7. Place spacer inbetween the two workbridge sections, hanging it on the
bolts that were inserted in Step 6.
8. Place Washer and Nut onto bolt and tighten, do this for both sides of the
section.
Note: Use the largest sections available, placing the largest sections in the center and the
smaller sections at the ends. This will reduce the number of hinge points where the load
bearing will be the greatest.
Spacer
Bolt
Washer
Nut
Hairpin
Cevis Pin
Rod End
Connecting Clevis
Содержание WB1224
Страница 10: ...SECTION 1 SAFETY 068521 Page 10 SECTION 1 SAFETY ...
Страница 20: ...SECTION 2 ASSEMBLY 068521 Page 20 SECTION 2 ASSEMBLY ...
Страница 24: ...SECTION 3 PARTS 068521 Page 24 SECTION 3 PARTS ...
Страница 38: ......
Страница 39: ......


