background image

99  •  Schlage  •  ENGAGE Managed Property User's Guide

My Team

Web Application

My Team

Adding Team Members allows other individuals to help the Administrator manage the property. Team 

members can be assigned roles to allow or limit specific capabilities.

 Note: 

Î

For specific capabilities of each role, se

Appendix A: Capabilities by Property Role

 on 

page 

205

.

Table 8.8 Team member roles

Type

Add Admins

Add Managers

Add Operators Add/edit users 

and devices

General 

maintenance

Administrators 

Managers 

Operators 

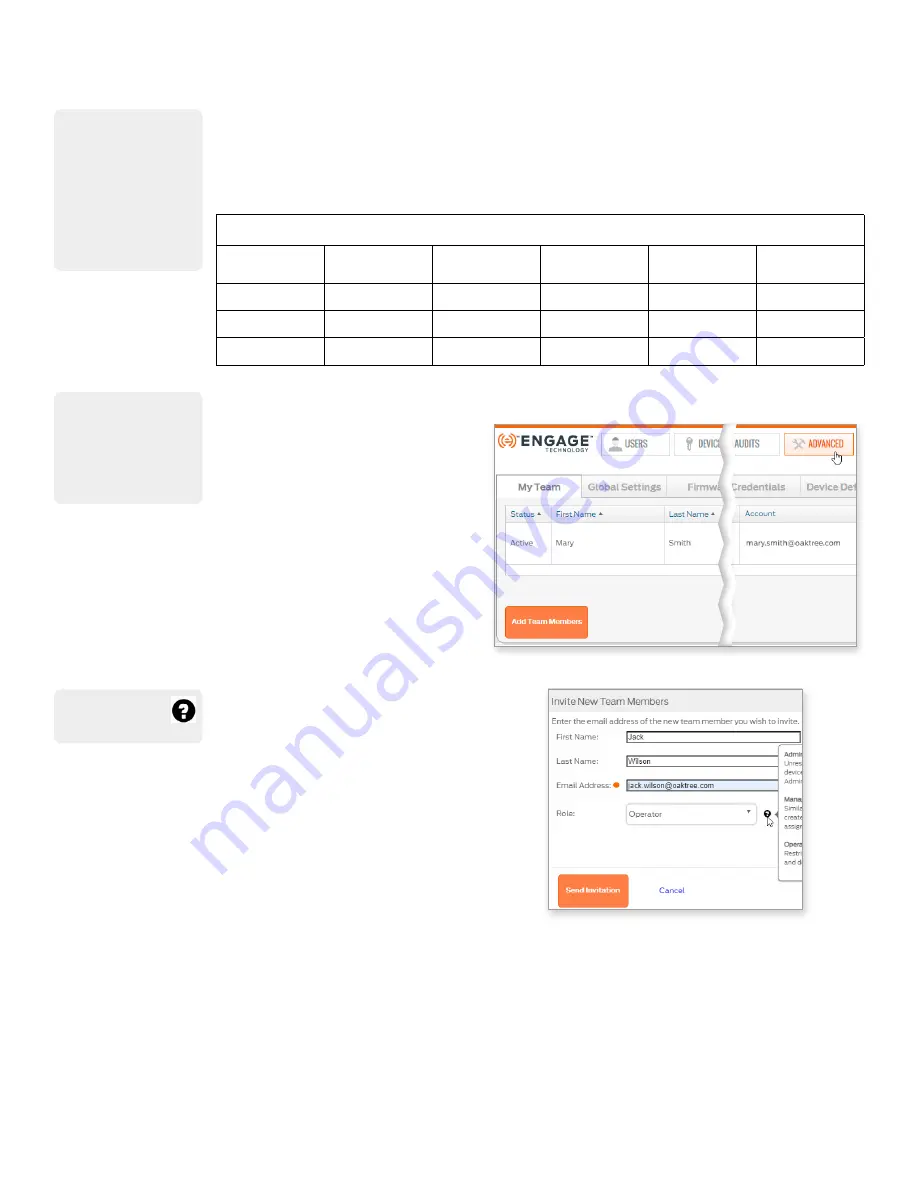
Add Team Member

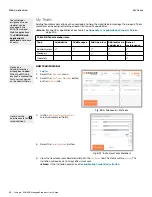
1. 

Log In.

2.  Select the 

Advanced

 menu. 

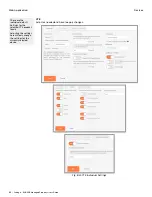
3.  Select the 

Add Team Member

 button 

on the 

My Team

 tab.

Fig. 8.96: Advanced > My Team

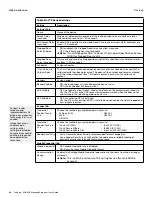
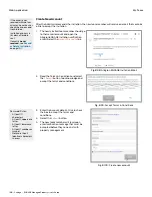
4.  In the 

Invite New Team Members


screen, complete all fields:

5.  Select the 

Send Invitation

 button.

Fig. 8.97: Invite New Team Members

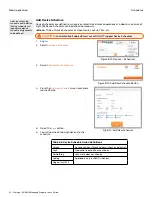
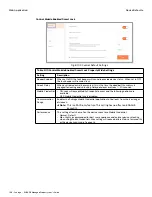
6.  View the new team member details listed in the 

My Team

 tab. The status will be 

Invited

. The 

invitation will expire six (6) days after it was sent. 

 Note: 

Î

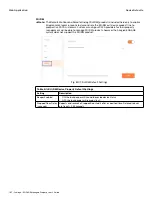
If the invitation expires, see 

Resend Mobile Credential Invitation

.

Team Member 

assignments and 

updates can be 

managed in the 

ENGAGE web and 

Mobile applications.
The 

ENGAGE web 

application is 

preferred

 due to ease 

of entry.

Notice one 

Administrator has 

already been added. 

When the ENGAGE 

account is created, the 

first user is assigned 

as the Administrator.

Hover over the 

question mark for 

role definitions.

Содержание SES20171127A

Страница 1: ...ENGAGE Managed Property 7 6 0 User s Guide...

Страница 2: ...APRIL 2021 Updates to ENGAGE 7 6 0 for Mobile Credential No Tour functionality and product updates SES20171127E 31 MAY 2020 Reformatted doc ENGAGE 7 5 with updates to Mobile Credentials Security Updat...

Страница 3: ...e Reference 64 Create Account 65 Log In 66 Create Site 67 Users 79 Devices 88 Device Groups 90 Schedules 95 Holidays 99 My Team 101 Global Settings 101 Firmware 102 Credentials 102 Device Defaults 108...

Страница 4: ...siness or budget and easily adapt to growing or changing business needs With the ENGAGE cloud based web and Mobile applications it s easy to configure settings manage users assign access privileges an...

Страница 5: ...T20W 40 04 00 MT20 39 00 00 The latest firmware and software versions are available on the ENGAGE Support Resources website When updates are available the latest firmware release notes are provided he...

Страница 6: ...geably with property throughout this document and both the web and Mobile applications Sync Mobile device communication with a device This updates all settings in the device and uploads the latest aud...

Страница 7: ...applications A self management system operated by the property owner Periodic device and system updates near real time Ability to manage up to 5000 credential assignments Ability to manage up to 500 d...

Страница 8: ...8 Schlage ENGAGE Managed Property User s Guide...

Страница 9: ...one can be used as your access credential instead of requiring a physical card or fob credential Field upgrade kits are available to retrofit an LE to the newer LEB version Built in Wi Fi allows LE an...

Страница 10: ...to retrofit an NDE80 to the newer NDEB version With built in Wi Fi NDE and NDEB Wireless Locks can connect directly to an existing Wi Fi network enabling automated updates to lock configuration and us...

Страница 11: ...ience of Mobile Credential access Your Mobile phone can be used as your access credential instead of requiring a physical card or fob Credential Schlage Control Mobile Enabled devices began manufactur...

Страница 12: ...lage wall mounted readers if desired Powered and relay outputs available for locking devices to include E strikes E trims mag locks Exit Devices Auto Operators etc The CTE works exclusively with the S...

Страница 13: ...of multi technology credentials The MT20W is used to enroll credentials into ENGAGE and to read and write data to smart card credentials for No Tour features When the MT20W is commissioned into an acc...

Страница 14: ...requency 2 4 GHz 802 11 b g NDE80 MT20W CTE MT reader Alternate Wireless Frequency 2 4 GHz 802 11 b g n LE LEB NDEB and CTE MTB reader Mandatory Connect Data Rate 24 Mbps when working with NDE and MT2...

Страница 15: ...oups should be defined before User access assignments are attempted New or modified Device Groups require Sync of devices before any group update is valid for that device Remember devices must be comm...

Страница 16: ...into each device upon commissioning or with the Sync process door file updated Scheduled Temporary Access for maintenance should use User Schedules to set the time of day and User Activation Expirati...

Страница 17: ...out of the box configuration with one exception Administrators may DISABLE Construction Mode after commissioning on NDE LE and CTE family of products FDR will not RESET the Block Construction setting...

Страница 18: ...istrators will want to recover save and reuse credentials whenever possible It is important to clear all credential assignments from a returned credential so that the credential will have all 11 door...

Страница 19: ...Activation and Expiration dates as needed 3 Click Save Fig 7 2 Update Resident Name 4 Hand the updated credential to the new resident Note The previous ENGAGE User Audit information is maintained for...

Страница 20: ...ned credential properly manage the ENGAGE property database and to make the credential available for reuse and reprogramming a Change the name on the credential to Unassigned or other b Set the User E...

Страница 21: ...perty User s Guide Remove User and Access from ENGAGE Daily System and Other Operations 6 Select the credential to be deleted from the Credentials list to continue 2886 7 Select Delete this credential...

Страница 22: ...th that credential to Sync overnight updated or perform No Tour programming before the deleted credential is denied access at the door ENGAGE Web Application displays the exclamation point Update ICON...

Страница 23: ...es can be scheduled by the ENGAGE Web Application when a Wi Fi network connection is available and properly enabled at the door Nightly Wi Fi updates require local Wi Fi network availability overnight...

Страница 24: ...and Other Operations Note If the device you need is not presented ensure the device is already commissioned and that you are within Bluetooth BLE range 2 Select the local device to be updated with the...

Страница 25: ...ide Updating Device Firmware Daily System and Other Operations Then Note The device starts flashing the RED LED when connected and communicating 4 Select Update Firmware in the connected device menu 5...

Страница 26: ...and reboot process will take a few minutes be patient Firmware Updates at the door Wi Fi Communication ENGAGE devices with local Wi Fi connectivity may have firmware updates performed at the door This...

Страница 27: ...Updating Device Firmware Daily System and Other Operations 2 Select the local device to be updated with the latest firmware In this case we chose Storage which is a Schlage LE device with its Wi Fi ne...

Страница 28: ...ations then 4 Select Update Firmware in the connected device menu Note Confirm the requested firmware update in the screen above When the firmware version on the device is current a Firmware is up to...

Страница 29: ...NING After the firmware is downloaded the new firmware will then automatically be installed into the device The device will blink the LED RED and GREEN while installing the new firmware update During...

Страница 30: ...firmware download can be performed by temporarily enabling a Wi Fi connection through the Administrator s Mobile device In this case the Storage device Wi Fi has been turned OFF in Settings and is not...

Страница 31: ...Device Firmware Daily System and Other Operations then 4 Select Update Firmware in the connected device menu 5 Select Update WARNING Follow the displayed instruction to temporarily enable the ENGAGE...

Страница 32: ...elow Perform the following steps on the Mobile device 1 Open the Settings menu on your Mobile device 2 Select the Wi Fi network settings menu 3 Connect to the local Wi Fi network with the same name as...

Страница 33: ...are update process is completed The device will automatically perform a RESET and will begin normal operation using the new firmware Note ENGAGE will use the selected device to create a local Wi Fi ne...

Страница 34: ...updated with the latest firmware revision and functionality Administrators can save time and keep their devices updated using Scheduled automatic over night firmware updates When devices support and...

Страница 35: ...selected for scheduled firmware updates 5 Select the Update Selected Devices button at the bottom of the screen to schedule the selected Overnight firmware updates and complete the schedule event 6 Se...

Страница 36: ...etwork settings are properly installed and working nightly updates will be gathered automatically No special action is required Use the ENGAGE Mobile Application Test Wi Fi feature to verify network s...

Страница 37: ...esired lock from the list we chose Storage Room 4 Select Device Audits button 5 View the available device Audits Note Use the column headers to quickly sort and find the displayed Audit data Audits Pr...

Страница 38: ...fic User Sort by Audit Types see below Sort by Start and Stop timeframes 4 Export Audits using the square EXPORT button Top Right corner of screen Data is saved into a csv file for easy spreadsheet an...

Страница 39: ...lication Follow these steps to update or enable Wi Fi connectivity in any ENGAGE Wi Fi enabled device New Wi Fi Network Setup 1 Open the ENGAGE Mobile application and log into your account An Android...

Страница 40: ...40 Schlage ENGAGE Managed Property User s Guide Viewing Audit Information Daily System and Other Operations Then 3 Once connected scroll down and Select Settings 4 Select Wi Fi menu under GENERAL...

Страница 41: ...i connectivity 2 View the full Wi Fi Configuration menu By default the Display Save Network List is enabled Note When enabled the Wi Fi network details you SAVE will be automatically stored by the Mob...

Страница 42: ...he Wi Fi network is available and the device Wi Fi details settings are correct Save an Available Network Saving an available network for a device allows for easier setup when enabling nightly Wi Fi a...

Страница 43: ...ion Daily System and Other Operations a Device will connect Fig 7 8 Device Fig 7 9 More Fig 7 10 Connecting 4 Once connected scroll down and select Settings 5 Select Wi Fi option Fig 7 11 Settings Fig...

Страница 44: ...ssible at your current location Select a Previously Saved Network Each time a unique Wi Fi network is entered and saved the network details are automatically saved by the Mobile device To select and t...

Страница 45: ...communication If you are unsure use the Test Wi Fi Connection menu or consult your local IT Administrator Network settings can be saved from different Wi Fi access point locations across your propert...

Страница 46: ...Information Daily System and Other Operations Fig 7 19 iOS Saved Fig 7 20 Android Saved Fig 7 21 iOS Test Fig 7 22 Android Test 4 Select Test Wi Fi Connection To test to verify that the Wi Fi network...

Страница 47: ...automated firmware updates and nightly call in updates using the ENGAGE Web Application Note Warning If the Wi Fi test fails to connect successfully Ensure your Wi Fi network SSID and Security setting...

Страница 48: ...ocess Sync is automatically enabled No additional action is required by the Administrator to enable nightly Call Ins other than making the proper Wi Fi settings in the device and allowing the device t...

Страница 49: ...e Synchronization Daily System and Other Operations 3 Select More to communicate connect with the Storage device then 4 Scroll down the screen to reveal the Settings menu at the bottom then 5 Select S...

Страница 50: ...locally available at the door when selected for a device Some properties may have more than one Wi Fi network SSID WARNING When the Wi Fi Connection fails recheck the following items Confirm that the...

Страница 51: ...ronization Daily System and Other Operations Then 5 Select the Wi Fi menu under the General heading Note This example is for WPA2 PEAP network security Username and Passwords are unique for this Wi Fi...

Страница 52: ...the Wi Fi connections is completed the Administrator will see the Success message below 8 Acknowledge the Success message Note The device now has its Wi Fi connection verified and will now automatical...

Страница 53: ...rrect Verify the local Wi Fi network is ON and available at this location Alternatively verify local Wi Fi network settings using a Mobile phone to connect to the same Wi Fi network intended for the d...

Страница 54: ...all ENGAGE enabled devices using Bluetooth communication or a local Wi Fi connection for faster updates when available Manual firmware updates using Bluetooth communication is required for Control de...

Страница 55: ...l be in an area without Wi Fi network connectivity or the device does not have its Wi Fi enabled ON Fig 7 27 Device Fig 7 28 More 3 Select More Wait a moment while the Mobile device connects with the...

Страница 56: ...uide Synchronization Daily System and Other Operations Fig 7 31 Current Version 5 Select the Update button Fig 7 32 Server Connecting Fig 7 33 Downloading Note While downloading a progress bar is show...

Страница 57: ...not usable until the device installs the update into its internal memory The device follows the successful firmware download with a firmware installation process that will take a few minutes While upd...

Страница 58: ...o to the ENGAGE web application https portal allegionengage com signin and log into your account 2 Select Advanced menu then the Firmware tab Compare the Current Firmware Version with the Latest Firmw...

Страница 59: ...evice is inoperative during the time it is being updated Control Mobile Enabled Smart Locks do not support automated firmware updates 4 When a selected device did not update to the latest version perf...

Страница 60: ...of these devices nightly Wi Fi network connection capability Audits may be reviewed by either the ENGAGE Web or Mobile Applications however audit data may easily be filtered and exported for review an...

Страница 61: ...d All Audits sort and filter options 4 Select the button after each sort and filter action to view the updated fields and to view the latest Audits Note Audit data can be sorted or filtered by Individ...

Страница 62: ...tenance Management of the property may be accomplished from virtually anywhere using a web browser The web application provides the easiest way to enter data and view your property information via a s...

Страница 63: ...63 Schlage ENGAGE Managed Property User s Guide Interface Reference Web Application Interface Reference Site name Help Settings...

Страница 64: ...or symbol No 2 repeating entries c Confirm Password reenter your password d First Name enter your first name e Last Name enter your last name 4 Read the Terms and Conditions and check the box to ackn...

Страница 65: ...ged Property User s Guide Log In Web Application Log In 1 Navigate to https portal allegionengage com signin 2 Enter the email address you used to set up your account and your password 3 Select Sign I...

Страница 66: ...reen enter the following information Select ENGAGE from the Site Software drop down Enter a descriptive Site Name Oak Tree Property in this example Select the Site Type Select the appropriate Time Zon...

Страница 67: ...e Last Name enter the last name of the user yes none Email enter user email address no none Activation Date of activation yes current date Expiration Date user profile expires yes five 5 years from cu...

Страница 68: ...n the Users Tab 2 Select Add User Fig 8 12 Add User Button 3 From the Add New User screen complete the fields Note See Table 8 1 Users Properties for details 4 Select Save Fig 8 13 Add New User 5 The...

Страница 69: ...lect this setting when the resident requires additional time to access doors This enables ADA American Disabilities Act e Activation Expiration required 5 Select Save Fig 8 17 Add New User 6 The User...

Страница 70: ...ab 2 Select a current user Fig 8 19 Select a User 3 Select the edit user button Fig 8 20 Edit User Button 4 Select Delete User Fig 8 21 Delete User Button 5 Type DELETE into the Confirm box Then selec...

Страница 71: ...play by default Select an existing credential from the list Note If there are no existing credentials available see Enroll a Smart Credential Individually on page 181 5 Select the Credential Function...

Страница 72: ...onal instructions Fig 8 30 Add Mobile Credential 6 The Credential added Text message sent to the user banner is displayed and the credential displays under the user information Fig 8 31 Credential add...

Страница 73: ...e credential needs to be edited Fig 8 32 Select a User 3 Select the credential you want to edit Fig 8 33 Select Credential 4 Select the desired Credential Function from the drop down list 5 Select Sav...

Страница 74: ...u want to delete Fig 8 36 Select Credential 4 Select Delete this credential Fig 8 37 Edit Credential 5 Type DELETE into the Confirm box 6 Select Delete Fig 8 38 Delete Credential 7 The confirmation me...

Страница 75: ...then click the check box next to each group to which the user should have access 6 For each device or group choose an Expiration and a Schedule from the drop down lists 7 Select the Save button Fig 8...

Страница 76: ...dule Button 3 Enter the name Select or enter the start and end times Select the days during which the schedule should be active 4 Select the Save button Fig 8 45 Add New User Schedule 5 The User Sched...

Страница 77: ...Schedule Button 4 Edit the name Select or enter the start and end times Select the days during which the schedule should be active 5 Select the Save button Fig 8 49 Edit User Schedule 6 The User Sche...

Страница 78: ...Button 4 A warning message will be displayed 5 Select the I Understand button Fig 8 53 Edit User Schedule 6 The User Schedule deactivated successfully confirmation message will be displayed Fig 8 54...

Страница 79: ...feature To make individual setting changes follow these steps for a particular device Add Device Devices are added using the Devices Edit Device 1 Log In 2 Select the Devices menu and the Devices pul...

Страница 80: ...le Credential Tab Mobile Credential OFF Mobile Credential use is disabled ON lock will accept Mobile Credential access Communication Range Enables the Schlage Mobile Credential application to find loc...

Страница 81: ...e will change the settings for the currently selected device ONLY Reader Sensitivity is set to Normal by default and is recommended for most properties Use a Reader Sensitivity of High or Max to enabl...

Страница 82: ...rapidly Requires a DPS sensor and Privacy or Apartment lock functions ON increases how often the Inside LED is flashing for better visibility OFF default Reader Tab Credential Reader Prox in Use Choos...

Страница 83: ...tion NDE80 and NDEB Adjust as needed and Save to apply changes Fig 8 60 NDEB Individual Settings These are the individual default Settings for the selected NDE product family Adjusting the settings he...

Страница 84: ...tial Reader Prox in Use Choose the technology used by readers in your site Schlage HID AWID GE CASI GE4001 GE4002 Credential Reader Smart in Use Choose the technology used by readers in your site 1444...

Страница 85: ...pplication CTE Adjust as needed and Save to apply changes Fig 8 61 CTE Individual Settings These are the individual default Settings for the selected CTE product family Adjusting the settings here wil...

Страница 86: ...F no special action is taken the device relocks on the normal relock schedule ON the CTE will use the DPS sensor to immediately relock when the door closes and terminate the relocking period upon clos...

Страница 87: ...e 1 Log In 2 Select the Devices menu and the Devices pull down 3 Select device from the device list Fig 8 62 Devices Devices 4 Select the Delete button 5 Type delete into the Confirm box Select the De...

Страница 88: ...rs should define any Device Groups as a Best Practice prior to making any individual user access assignments Note Devices must be commissioned before they are available for inclusion into a Device Gro...

Страница 89: ...up to which you want to assign remove devices Note If you have not yet created a device group you will need to do that first See Add Device Group Fig 8 68 Select Device Group 4 Select the plus sign Fi...

Страница 90: ...Devices in Device Group Schedules There are two types of Schedules Add Schedule Users pg 76 Add Device Schedule pg 91 Only the Administrator can create edit and assign Access and Device schedules User...

Страница 91: ...Figure 8 72 Devices Schedules 3 Select Add New Event Schedule Figure 8 73 Add New Schedule Button 4 From the Add New Schedule screen complete required fields 5 Select the Save button 6 You will now ne...

Страница 92: ...d Devices list Select to move device into the Assigned Devices column Select to move a device into the Unassigned Devices column Select or to assign or un assign all devices 6 When finished select Sav...

Страница 93: ...d 4 Select the Edit button Figure 8 79 Schedules 5 From the Edit Schedule screen complete required fields 6 Select the Save button Note Editing the schedule does not change which devices are assigned...

Страница 94: ...gure 8 81 Devices Schedules 3 Select the schedule you want to delete The schedule will be displayed 4 Select the Delete button Figure 8 82 Schedules 5 Select the OK button CAUTION Devices that use the...

Страница 95: ...locked or unlocked User access during Holidays can be also specified CAUTION Control Mobile Enabled Smart Locks DO NOT support Holiday Schedules 1 Log In 2 Select Devices Holidays Fig 8 84 Devices Ho...

Страница 96: ...n Devices screen Select a device from the Unassigned Devices list Select to move device into the Assigned Devices column Select to move a device into the Unassigned Devices column Select or to assign...

Страница 97: ...the Edit button Fig 8 91 Edit Holiday Button 5 From the Edit Holiday screen complete the required fields Name Enter a descriptive name for the holiday Holiday Start Select the desired start date and...

Страница 98: ...lidays Web Application Delete Holiday Schedule 1 Log In 2 Select Devices Holidays Fig 8 93 Devices Holidays 3 Select the holiday you want to edit 4 Select the Delete button Fig 8 94 Delete Holiday But...

Страница 99: ...lect the Add Team Member button on the My Team tab Fig 8 96 Advanced My Team 4 In the Invite New Team Members screen complete all fields 5 Select the Send Invitation button Fig 8 97 Invite New Team Me...

Страница 100: ...terms and conditions Fig 8 99 Accept Terms Conditions 3 Enter the Account details Click to check the box to accept the terms and conditions 4 Select the Submit button 5 The new team member will receiv...

Страница 101: ...s Time On or Off depending on the location of site Wi Fi Alerts Enable devices to send Wi Fi alerts This feature only affects NDE LE and CTE devices and can be disabled to extend battery life Master C...

Страница 102: ...any devices provides for a consistent and less error prone installation and setup Individual devices that need settings other than the property wide defaults may be individually adjusted when commissi...

Страница 103: ...g and unlocking Delayed relocks are from 1 30 seconds Mobile Credential ON Lock will accept Mobile Credential access and the following options are available OFF Mobile Credential use is disabled Commu...

Страница 104: ...to devices that support Door Position Sensor DPS for Propped Door Audits Propped Door Delay seconds ON reports and records a Propped Door Audit after a specified time Delayed relocks are from 1 255 s...

Страница 105: ...k should do when entering Critical Battery Mode Secure Locked Passage Unlocked AS IS no change Blink Interior LED ON the Interior LED will blink while in Privacy Mode to inform the occupant of the sec...

Страница 106: ...ecords a Propped Door Audit after a specified time Delayed relocks are from 1 255 seconds Power Fail Mode Defines what the lock should do when entering Critical Battery Mode Secure Locked Passage Unlo...

Страница 107: ...our PACS providers for their property management will be able to manage RU RM products however the Allegion ENGAGE system does not support the RU RM product Fig 8 107 RU RM Default Settings Table 8 14...

Страница 108: ...nrollment readers will read any compatible credential and therefore do not have Reader Default settings 1 Log In 2 Select Advanced menu then Reader Defaults tab 3 Adjust as needed and click Save Notic...

Страница 109: ...ings Set and Edit Not available Grant User Access Yes Yes Invite Team Members to Manage Property Yes Yes Schedules Create Edit and Assign Schedules Assign Schedules CAUTION Screen shots in this sectio...

Страница 110: ...nnot remember your password tap Forgot Password and follow the on screen instructions Main Menu iOS devices will display a menu along the bottom of the screen Tap any icon to display that screen Andro...

Страница 111: ...structions Note See Installation and Commissioning for information about specific devices Delete Device 1 Open the Devices screen 2 Find the device you want to delete in the list 3 iOS Swipe left on t...

Страница 112: ...ick the Update Firmware button and follow the on screen instructions Retrieve Audits 1 While near the device you want to update open the Devices screen Then select the IN RANGE tab 2 Select the device...

Страница 113: ...the new user Delete User 1 Open the Users tab 2 Find the User you want to delete 3 iOS Swipe left on the user name to show the Delete button Then tap the Delete button Android Tap and hold on the name...

Страница 114: ...am Member 1 Open the My Team tab 2 Click the name of the team member you want to edit 3 Choose from the Team member roles for the team member Note You can only edit the role in the mobile app For othe...

Страница 115: ...ttings Fig 9 1 Sites Site Settings Table 9 3 Site Settings Name Options Description Edit in Mobile Role Manager Operator Administrator Role of the Team Member who is currently logged in No Site Name N...

Страница 116: ...pdate device settings Prox Credentials may not be used as No Tour Credentials Table 10 1 No Tour Feature Capabilities and Limitations Credential Type Max Doors or Door Groups Updates to Access Rights...

Страница 117: ...rogrammed Free Space Unused available for new access assignment Note Physical Credentials that have assigned door access deleted remain as Blocked assignments in the credential sector and will consume...

Страница 118: ...med with changes 3 Ensure the MT20W credential reader is powered up ready for use with the Blue LED illuminated on solid 4 From the appropriate user s account click the Update button Fig 10 1 Update B...

Страница 119: ...credential to gain normal access When the User credential is not available the Administrator can always use the Schlage Mobile Application to Sync and make changes without using No Tour Mobile Credent...

Страница 120: ...a Temporary Maintenance Access setup 1 Define a USER Maintenance Shift schedule in the ENGAGE Web Application that limits a sub contractor to first shift hours for access In the example below we chose...

Страница 121: ...r Feature Fig 10 7 Set Expiration for Today to Limit Access 4 When a Maintenance Contractor access expires per its Expiration setting The credential can be reused as if new again Reprogram expired cre...

Страница 122: ...age control wireless html Schlage LE and LEB Wireless Mortise Lock LE Standalone Wireless Mortise https us allegion com en home products categories electronic locks schlage le wireless lock standalone...

Страница 123: ...number and the intended location This information is required for the Administrator to commission the device and entry into the ENGAGE account Prepare to Install the Device Interconnect Verify the Doo...

Страница 124: ...acted during installation If the deadbolt is not retracted when power is applied the handing of the door and the electronic operation of the bolt is reversed 2 The through door cable is routed from th...

Страница 125: ...t orientation to allow proper lever installation Handing as shown 6 Once the Control Mobile Enabled Smart Lock is properly installed The thumb turn should physically move the bolt in and out of the cl...

Страница 126: ...Interconnect Fig 11 8 Deadbolt Verify Success of the FDR The Control Mobile Enabled Smart Lock will advertise its presence via Bluetooth communication after FDR When properly reset the Control Mobile...

Страница 127: ...bile Enabled Smart Lock All construction credentials are no longer valid once the lock is commissioned and exits construction mode Construction mode can be cancelled by Commissioning or by performing...

Страница 128: ...e account will be displayed A blank Devices Screen is displayed here because no devices have been commissioned yet Note Depending on the model of your Mobile device Android or iOS one of the following...

Страница 129: ...lage Control Mobile Enabled Smart lock to be commissioned from the list of new or recently Factory Default Reset FDR devices displayed 10 Select the desired Schlage Control Mobile Enabled Smart lock f...

Страница 130: ...inish to complete the commission process or select Add another Control device to continue enrolling additional Schlage Control devices 17 The newly commissioned Schlage Control Mobile Enabled Smart Lo...

Страница 131: ...g the device review the Installation Instructions for the Schlage LE or LEB lock contained in the box BEST PRACTICE Before installing record the serial number and the intended location This informatio...

Страница 132: ...DPS LE products with a deadbolt will require additional DPS door preparation needs Carefully connect the DPS sensor to the chassis as shown Pay special attention to the small connector while insertin...

Страница 133: ...ould be verified Ensure the latch is in the correct direction with the latch bevel towards the door opening The Spring Cage Arrow direction is mounted properly with the arrows pointing in the lever do...

Страница 134: ...age 25 for more information Perform an FDR 1 Remove the LE or LEB battery cover 2 Press and HOLD the FDR button for 5 seconds a The lock beeps and blinks 2 times 3 Turn the inside lever 3 times within...

Страница 135: ...s Mode again a new Master programming Credential must be created and additional user access credentials will need to be enrolled Create a Master Construction Credential Start with a new LE or LEB new...

Страница 136: ...en will display the name of the commissioned devices 4 Select the sign to select the nearby LE or LEB lock being commissioned a iOS Mobile device sign in the upper right hand corner b Android Mobile d...

Страница 137: ...is blinking it s LED RED 11 Select Yes After verifying the LED is blinking 12 Enter a descriptive name for your device under Device Name Storage is used here If no device information is displayed ensu...

Страница 138: ...adbolt thumbturn to be available for proper operation 14 Select Next 15 Enable the Wi Fi network connection capabilities of the LE LEB device To enable or edit a Wi Fi network later OR if the Wi Fi is...

Страница 139: ...Select Finish to complete the commission process Add Another LE Device to continue enrolling LE or LEB locks 18 When Finish is selected the newly commissioned device is shown in the ENGAGE Mobile Appl...

Страница 140: ...The Schlage NDE80 NDEB and the mechanical ND locks use the SAME basic door preparation template which comes in the box with the product Mechanical cylindrical lock ND updates to NDE80 or NDEB are eas...

Страница 141: ...lled latch and chassis are properly aligned and fully engaged WARNING For non standard door thickness carefully follow the door thickness adjustment steps outlined in the Door Thickness Adjustment sec...

Страница 142: ...al door prep is required to install the magnet into the frame WARNING The Door Position Sensor magnet tray or T Strike magnet MUST be installed for proper Door Position sensing and proper calibration...

Страница 143: ...eeps and blinks 2 times 3 Turn the inside lever 3 times within 20 seconds a The lock blinks RED and beeps on each lever turn then provides 2 GREEN flashes and beeps to indicate success Verify Success...

Страница 144: ...ode ENGAGE Mobile Application setting not selected 1 Turn and HOLD the inside lever Request to Exit RTE and present a new credential to become the property Master Construction Credential 2 The lock ac...

Страница 145: ...2 While near the device to be commissioned log in to the ENGAGE Mobile Application 3 The blank Devices Menu will appear Note The figures above show that no devices are commissioned into the property a...

Страница 146: ...side lever This will cause the lock to advertise its presence with its Bluetooth BLE radio 9 Select Next 10 Select the NDEB device to be commissioned Either NDE80 or NDEB devices are selectable here O...

Страница 147: ...locks are ALWAYS 80 Function Storeroom and this menu Selecting a Lock Function is not presented for NDE80 devices 15 Select NEXT Note The NEXT step in the commissioning process can enable the Wi Fi n...

Страница 148: ...are no local Wi Fi network connections available Note See Enabling Wi Fi Network Connection Settings for setup requirements when a Wi Fi network is available and the Administrator would like to take a...

Страница 149: ...ation excerpts from the installation instructions Install the CTE indoors with a temperature range of 35 C to 66 C 31 F to 151 F Install in a secure location that is not accessible by the public Deter...

Страница 150: ...d Credential Reader at a time The original MT11 485 mullion reader and MT15 485 single gang readers initially available have been updated to provide Mobile Credential compatibility MTB11 RS485 and MTB...

Страница 151: ...ruction for the device they intend to install and follow its installation requirements Verify Success of the Installation Once all components have been installed test each to ensure a successful insta...

Страница 152: ...Master Construction Credential must be programmed before programming construction access mode with user credentials The Master Construction Credential is ONLY used to add additional User Construction...

Страница 153: ...n created User Access Construction Credentials can be added to the installed CTE User Access Construction Credentials allow momentary Normal access before the CTE is commissioned 1 Present the Master...

Страница 154: ...evice is used in this example Fig 11 63 iOS Device Menu Fig 11 64 Android Device Menu Note The iOS and Android devices have slightly different screens however the functions are the same The figures ab...

Страница 155: ...e currently defined default ENGAGE settings for this device or elect to modify the Property Wide settings now Administrators may modify individual device settings at any time using the Customize Setti...

Страница 156: ...ayed ensure the following The CTE is Out Of The Box or recently had a Factory Default Reset The Mobile device has Bluetooth turned ON The Mobile device is in Bluetooth communication BLE range of the C...

Страница 157: ...ase Wait Fig 11 72 Name Device 1 Provide a descriptive name under Device Name 2 Select Next Fig 11 73 Strike Type 3 Select the strike type installed on the door If your strike type is not listed selec...

Страница 158: ...select Nothing Connected Fig 11 75 Horn WARNING The NEXT step in the commissioning process can enable the Wi Fi network connection capabilities of the CTE Administrators may also elect to skip setup o...

Страница 159: ...nections available Note See Enabling Wi Fi Network Connection Settings for setup requirements when a Wi Fi network is available and the Administrator would like to take advantage of the Schlage NDE Ni...

Страница 160: ...le the credential reader WARNING The reader will boot up after power is applied Be sure to wait until the reader beeps three times before presenting the Configuration Card or it will not perform as in...

Страница 161: ...ble with Schlage smart credentials Mobile credentials PIV credentials and most proximity credentials up to 37 bits Initial Power Up When an MT20 is plugged into a USB port it uses the computer power a...

Страница 162: ...Hexadecimal Configuration card CE 401 061 required for Schlage Express Octal Configuration card CE 401 060 required for FC BID Output Configuration card CE 401 069 required for BID Only Each of these...

Страница 163: ...p No special hardware installation is required just plug the MT20W into the computers USB connector The MT20W will use the USB port for its power Wait a moment while the MT20W boots up There will be a...

Страница 164: ...1 Connect the MT20W to the computer USB port 2 While near the MT20W to be commissioned log in to the ENGAGE Mobile Application 3 The initial blank Devices Screen will appear Depending on your Mobile d...

Страница 165: ...m the list of nearby devices provided More than one device may be available for commissioning We chose Schlage Reader serial number C20000000000010B by tapping on that specific Schlage Reader in the s...

Страница 166: ...creen displays WARNING When using USB communication you must also INSTALL and RUN the ENGAGE PC Desktop Application The MT20W LED will be BLUE when ready for communication The MT20W will take a few se...

Страница 167: ...de MT20W ENGAGE Device Installation and Commissioning 13 Select Send Link 14 Acknowledge the Notice and Select Ok 15 Then Select Exit in the top right hand corner to continue The All Devices screen di...

Страница 168: ...g the ENGAGE PC Desktop Application After the Desktop Application Send Link button is selected the ENGAGE system sends a link to the Administrators email with instructions Go to the email and follow t...

Страница 169: ...GAGE Desktop Application on the computer The Xs in the installation application name is the software version 7 Observe the installation process where the next screens are shown 8 When the installation...

Страница 170: ...ion on your desktop 2 Navigate to the ADVANCED tab 3 Select Firmware 4 Locate the MT20W device in the Device List 5 View the MT20W Current Firmware Version versus the Latest Firmware Version Note In t...

Страница 171: ...ty User s Guide MT20W ENGAGE Device Installation and Commissioning 10 The firmware is downloaded to the MT20W 11 The Installing firmware screen displays 12 Select Finish 13 The In Range Mobile device...

Страница 172: ...y take a few minutes Wait for all LED flashing to stop The boot up process is complete and the MT20W is communicating when a solid BLUE LED displays 15 Swipe the In Range Mobile device screen to refre...

Страница 173: ...steps to change from a local Wi Fi network to USB communication mode 1 Open the ENGAGE Mobile Application on your Mobile device 2 Select the already commissioned and nearby MT20W 3 Navigate to the Se...

Страница 174: ...started Fig 11 89 MT20W Direct 9 Plug the MT20W into the USB port on the PC the ENGAGE Desktop Application detects the reader and begins communication After power up the MT20W must go through a boot...

Страница 175: ...cted When a credential programming error occurs an error message along with the error code displays on the screen along with a notification Fig 11 92 Error Detected When the USB enabled MT20W reader i...

Страница 176: ...nd communicating with the MT20W follow these steps to change from USB to Wi Fi communication mode 1 Ensure the Schlage MT20W is in signal range of the desired local Wi Fi network access point 2 Select...

Страница 177: ...using the entered network settings Wait a few moments until the MT20W provides a solid Blue LED indicating it has successfully connected with the local wireless area network CAUTION MT20W reader canno...

Страница 178: ...and Commissioning 10 Select the Blue Press here on solid blue bar to continue 11 Acknowledge the Setup Complete message Select Exit 12 The MT20W device is now shown in the ENGAGE Mobile Application A...

Страница 179: ...physical card or fob that is contactless Enrolled individually or In bulk DOES NOT support No Tour functionality Mobile A digital credential that is issued to a user s smart phone Added individually...

Страница 180: ...plication and Log In to your account 3 Ensure the ENGAGE Desktop Application is running on the computer Note See Installing the ENGAGE PC Desktop Application for more information 4 Plug the MT20W into...

Страница 181: ...ode 2 Log In 3 Hover over the Users menu and then select Users from the pull down 4 Select the appropriate user 5 From the user s card select Add Credential 6 Select the Select Existing Credential tab...

Страница 182: ...s an enrollment reader 3 Select the USERS menu and the specific user to be assigned a new credential 4 Select the Credentials Menu When using multi technology credentials and ENGAGE locks with multi t...

Страница 183: ...al to the nearby Storage device If no credential is presented the process Times Out after 20 seconds so the device can return to its normal use securing an opening When the device reads the credential...

Страница 184: ...on 1 Log In and open the Users Tab 2 Select the appropriate user Fig 12 10 Select a User 3 Select the mobile credential Fig 12 11 Select Mobile Credential 4 Select Resend Text Message Fig 12 12 Resend...

Страница 185: ...l holder for normal access Note See No Tour Feature on page 116 for more information Search for Credentials in ENGAGE A badge ID search can be performed to identify the owner of a found credential usi...

Страница 186: ...credential This allows for the credential to have access to as many doors as necessary exceeding the 11 individual door assignment limit Individual door access and Door Group assignments that are Dele...

Страница 187: ...ude Mobile Access Credential support The original wall mounted MT readers used with CTE cannot be upgraded for Mobile Enabled MTB compatibility Assigning Mobile Credentials See Add a Mobile Credential...

Страница 188: ...5 Approach an assigned door to within a few feet 6 View the available Mobile Enable devices that are nearby Apt 12 A screen Refresh may be needed 7 Select the desired device by its Friendly Name Apt1...

Страница 189: ...riginal damaged broken or lost credential This feature is most useful when credentials are damaged broken or when the original credential is lost WARNING A LOST credential is still valid at previously...

Страница 190: ...o credentials are available for replacement you must enroll a credential now 6 Select a Replacement Credential from stock list In this case we chose the only available Credential 1802 WARNING Physical...

Страница 191: ...iew the momentary Credential Replaced Successfully message 9 The new Credential 1802 is now listed under the Existing User Credentials and the old Replaced credential 1171 has been removed from the li...

Страница 192: ...ion at a door Sync or commissioning is required 6 No Tour programming can ADD Master Credentials However to DELETE a Master Credential the credential must be deleted in the ENGAGE database and every l...

Страница 193: ...ster Update each lock on the property by Device Firmware Updates 1 Log In 2 Select the ADVANCED menu and Global Settings tab 3 Slide the Master Credentials button to ON to enable the generation of Mas...

Страница 194: ...he Master Credential ICON next to the credential indicating it is programmed as a MASTER CREDENTIAL with the PASS THROUGH function assignment on every lock Select Update in the Credentials screen Any...

Страница 195: ...the Device Update ICON displayed to inform the Administrator that door updates are needed The Master Credential itself and all devices are required to be updated before these changes are honored The A...

Страница 196: ...redentials button 5 Select the checkbox for each Master Credential to be deleted 6 Select Delete 7 Select OK to accept the Delete the Master Credential WARNING message 8 Verify that the selected Maste...

Страница 197: ...tions Inviting Team Members If an email invitation never arrives in the team members email account Check the team members SPAM and TRASH folders for misplaced email Verify the entered email address is...

Страница 198: ...Start is the only method for emergency access when the batteries are completely depleted Control devices with depleted batteries may lose the correct time when Jump Start is used or anytime batteries...

Страница 199: ...cating the device is Connected View the Mobile device screen and ensure the device is connected View the Device Date and Time settings have been set into the device Device Firmware Updates Overnight N...

Страница 200: ...ooth communication is generally available up to 30 feet for a Line Of Sight connection Walls and obstacles will reduce communication range Bluetooth communication through walls and doors significantly...

Страница 201: ...at maintenance is needed When the Nuisance delay is ignored devices will enter Critical Battery mode and stop operating Devices in critical battery mode do not operate normally or allow access A Pass...

Страница 202: ...and system functionality with features not available with ENGAGE When considering a PACS to manage Access Control please consult with Allegion Sales and the PACS provider before registering for a Par...

Страница 203: ...edential is not deleted from the lock memory Mobile Credentials Mobile Credentials do not have a limit on door assignments What concerns are there with Control devices and Schedules When assigning Use...

Страница 204: ...rformed Verify the Mobile credential is enabled within the lock settings Verify that access has been given to the correct door Mobile credentials are given access to doors the same method as physical...

Страница 205: ...Administrators X 11 Assign Users as Managers X 12 Assign Users as Operators X X 13 Manage Users as Administrators X 14 Manage Users as Managers X 15 Manage Users as Operators X X 16 Delete Users as Ad...

Страница 206: ...For best viewing results use Chrome Schlage YouTube Channel View how to videos product datasheets and install sheets on your iPhone or iPad iOS Schlage Electronics How To App View how to videos produc...

Страница 207: ...al used to unfreeze a lock can be the same credential or a different Freeze credential One Time Use Allows only one attempt with Normal Access granted Schlage Control does not support One Time Use cre...

Страница 208: ...and businesses Allegion employs more than 7 800 people and sells products in more than 120 countries across the world Allegion comprises 23 global brands including strategic brands CISA Interflex LCN...

Отзывы: