background image

Steps
1. 
Turn off the computer and disconnect the power cable from the computer.
2. Remove the 

left-side cover

.

3. Lay the computer on its right side.
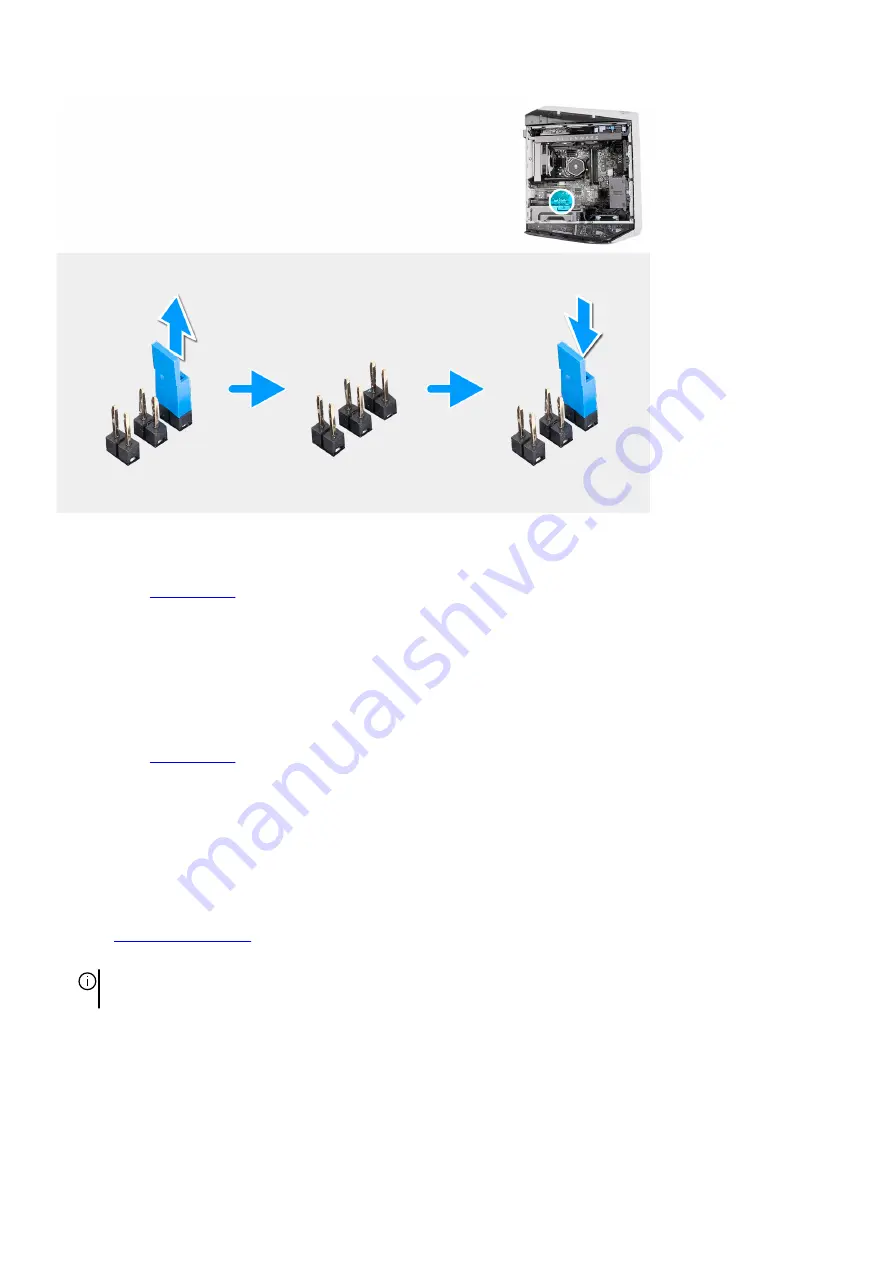
4. Locate the 2-pin password reset jumper on the system board.
5. Ensure that the jumper is on the pair of password pins (JM34) and remove the jumper.
6. Plug the power cable to the computer and turn on the computer to clear the password.
7. Wait for until the desktop is loaded and then shut down the computer.
8. Disconnect the power cable from the computer.
9. Replace the jumper on the pair of password pins (JM34).
10. Replace the 

left-side cover

.

Updating the BIOS

Updating the BIOS in Windows

Steps
1. 
Go to 

www.dell.com/support

.

2. Click Product support. In the Search support box, enter the Service Tag of your computer, and then click Search.

NOTE: If you do not have the Service Tag, use the SupportAssist feature to automatically identify your computer. You can
also use the product ID or manually browse for your computer model.

3. Click Drivers & Downloads. Expand Find drivers.
4. Select the operating system installed on your computer.
5. In the Category drop-down list, select BIOS.
6. Select the latest version of BIOS, and click Download to download the BIOS file for your computer.
7. After the download is complete, browse the folder where you saved the BIOS update file.
8. Double-click the BIOS update file icon and follow the on-screen instructions.

100

Содержание Aurora R13

Страница 1: ...Alienware Aurora R13 Service Manual Regulatory Model D30M Regulatory Type D30M002 October 2021 Rev A00 ...

Страница 2: ...ential damage to hardware or loss of data and tells you how to avoid the problem WARNING A WARNING indicates a potential for property damage personal injury or death 2021 Dell Inc or its subsidiaries All rights reserved Dell EMC and other trademarks are trademarks of Dell Inc or its subsidiaries Other trademarks may be trademarks of their respective owners ...

Страница 3: ...de cover 16 Top cover 17 Removing the top cover 17 Installing the top cover 19 Right side cover 19 Removing the right side cover 19 Installing the right side cover 20 Front bezel 21 Removing the front bezel 21 Installing the front bezel 22 Side light 24 Removing the Side light 24 Installing the Side light 25 2 5 inch hard drive 26 Removing the 2 5 inch hard drive 26 Installing the 2 5 inch hard dr...

Страница 4: ...ssor fan and heat sink assembly 54 Removing the processor fan and heat sink assembly 54 Installing the processor fan and heat sink assembly 55 Processor liquid cooling assembly 56 Removing the processor liquid cooling assembly 56 Installing the processor liquid cooling assembly 57 Processor 59 Removing the processor 59 Installing the processor 60 Wireless card 62 Removing the wireless card 62 Inst...

Страница 5: ...tup 91 System setup 91 Entering BIOS setup program 91 Navigation keys 91 Boot Sequence 91 System setup options 92 System and setup password 97 Assigning a system setup password 97 Deleting or changing an existing system setup password 98 Clearing CMOS settings 98 Clearing BIOS System Setup and System passwords 99 Updating the BIOS 100 Updating the BIOS in Windows 100 Updating the BIOS using the US...

Страница 6: ...liance WARNING Disconnect your computer from all power sources before opening the computer cover or panels After you finish working inside the computer replace all covers panels and screws before connecting your computer to an electrical outlet CAUTION To avoid damaging the computer ensure that the work surface is flat dry and clean CAUTION To avoid damaging the components and cards handle them by...

Страница 7: ...hould be secure and in full contact with your skin and ensure that you remove all jewelry such as watches bracelets or rings prior to bonding yourself and the equipment Electrostatic discharge ESD protection ESD is a major concern when you handle electronic components especially sensitive components such as expansion cards processors memory DIMMs and system boards Very slight charges can damage ci...

Страница 8: ... a minimum test once per week A wrist strap tester is the best method for doing this test If you do not have your own wrist strap tester check with your regional office to find out if they have one To perform the test plug the wrist strap s bonding wire into the tester while it is strapped to your wrist and push the button to test A green LED is lit if the test is successful a red LED is lit and a...

Страница 9: ...t your back 4 Keep the load close The closer it is to your spine the less force it exerts on your back 5 Keep your back upright whether lifting or setting down the load Do not add the weight of your body to the load Avoid twisting your body and back 6 Follow the same techniques in reverse to set the load down After working inside your computer About this task CAUTION Leaving stray or loose screws ...

Страница 10: ...ide view of your computer 1 Side light 2 Top chassis fan 3 3 5 inch hard drive 4 Front chassis fan 5 Memory module 6 PCIe fan 7 Graphics card end holder 8 2 5 inch hard drive 9 Coin cell battery 10 Graphics card 11 Power supply unit 12 Graphics card bracket holder 13 Power supply unit bracket 14 Processor cooler 15 Radiator and fan assembly 10 ...

Страница 11: ...AN_SYS2 LED connector 6 Front chassis fan connector FAN_SYS2 7 Solid state drive slot M 2 PCIe SSD1 8 SATA 6 Gbps drive connector SATA0 9 SATA 6 Gbps drive connector SATA1 10 SATA 6 Gbps drive connector SATA2 11 Power supply connector ATX SYS 12 Coin cell battery 13 PCI Express x4 slot SLOT4 14 PCI Express x16 mechanical x16 electrical slot PCIe Gen5 SLOT2 11 ...

Страница 12: ...g screws from a component it is recommended to note the screw type the quantity of screws and then place them in a screw storage box This is to ensure that the correct number of screws and correct screw type is restored when the component is replaced NOTE Some computers have magnetic surfaces Ensure that the screws are not left attached to such surfaces when replacing a component NOTE Screw color ...

Страница 13: ...3 1 Front AlienFX LED board M3x8 4 Power button board M2x3 1 System board 6 32x1 4 10 Cable cover Removing the cable cover Prerequisites 1 Follow the procedure in Before working inside your computer About this task The following image indicates the location of the cable cover and provides a visual representation of the removal procedure NOTE The cable cover is an optional accessory 13 ...

Страница 14: ...requisites If you are replacing a component remove the existing component before performing the installation procedure About this task The following image indicates the location of the cable cover and provides a visual representation of the installation procedure NOTE The cable cover is an optional accessory 14 ...

Страница 15: ...edure in After working inside your computer Left side cover Removing the left side cover Prerequisites 1 Follow the procedure in Before working inside your computer About this task The following images indicate the location of the left side cover and provide a visual representation of the removal procedure NOTE The clear left side cover is shipped with some computers 15 ...

Страница 16: ...eft side panel from the chassis Installing the left side cover Prerequisites If you are replacing a component remove the existing component before performing the installation procedure About this task The following images indicate the location of the left side cover and provide a visual representation of the installation procedure NOTE The clear left side cover is shipped with some computers 16 ...

Страница 17: ... the side cover release latch to the chassis Next steps 1 Follow the procedure in After working inside your computer Top cover Removing the top cover Prerequisites 1 Follow the procedure in Before working inside your computer 2 Remove the left side cover About this task The following images indicate the location of the top cover and provide a visual representation of the removal procedure 17 ...

Страница 18: ... its rear NOTE The top cover is secured tight to the chassis by four latches 2 Press your thumbs down at the front of the top cover and use your fingers to pull the two front latches out to loosen the top cover at its front 3 Press your thumbs down at the middle of the top cover to release the remaining two latches and lift the top cover 18 ...

Страница 19: ...abs on the top cover with the slots on the chassis and snap the top cover into place Next steps 1 Install the left side cover 2 Follow the procedure in After working inside your computer Right side cover Removing the right side cover Prerequisites 1 Follow the procedure in Before working inside your computer 2 Remove the left side cover 3 Remove the top cover About this task The following images i...

Страница 20: ...nock the bottom rear tab of the right side cover until the bottom of the right side cover is detached from the chassis 3 Remove the right side cover from the chassis Installing the right side cover Prerequisites If you are replacing a component remove the existing component before performing the installation procedure 20 ...

Страница 21: ...e left side cover 3 Follow the procedure in After working inside your computer Front bezel Removing the front bezel Prerequisites 1 Follow the procedure in Before working inside your computer 2 Remove the left side cover 3 Remove the top cover 4 Remove the right side cover About this task The following images indicate the location of the front bezel and provide a visual representation of the remov...

Страница 22: ...nel NOTE Start with tab on top proceed to the tabs on the left of the front bezel and then to the tabs on the right of the front bezel 4 Pull the front bezel together with the front I O panel cable away from the chassis slowly Installing the front bezel Prerequisites If you are replacing a component remove the existing component before performing the installation procedure 22 ...

Страница 23: ...te the front I O panel cable through the slot on the front panel 3 Push the front bezel towards the front panel and ensure the tabs clip onto the slots of the front panel NOTE Start with tab on top proceed to the tabs on the left of the front bezel and then to the tabs on the right of the front bezel 4 Connect the front I O panel cable to the system board Next steps 1 Install the right side cover ...

Страница 24: ...ters that are shipped with clear left side covers The following images indicate the location of the Side light and provide a visual representation of the removal procedure Steps 1 Lay the computer on its right side 2 Disconnect the Side light cable from the system board 3 Remove the two screws M3x5 that secure the Side light to the chassis 4 Lift the left side of the Side light bar slightly from t...

Страница 25: ...Steps 1 Lay the computer on its right side 2 Align the left screw hole of the Side light with the screw on the rear of the chassis 3 Lift the right side of the Side light slowly until the right screw of the Side light is aligned with the screw hole on the front of the chassis 4 Replace the two screws M3x5 that secure the Side light to the chassis 5 Connect the side light cable to the system board ...

Страница 26: ...resentation of the removal procedure Steps 1 Disconnect the hard drive data and hard drive power cables from the hard drive 2 Press the release tabs on the hard drive carrier and slide the hard drive assembly out of the hard drive cage 3 Pry the hard drive carrier to release the tabs on the assembly from the slots on the hard drive 4 Lift the hard drive out of the hard drive assembly NOTE Note the...

Страница 27: ...he 2 5 inch hard drive Prerequisites If you are replacing a component remove the existing component before performing the installation procedure About this task The following images indicate the location of the 2 5 inch hard drive and provide a visual representation of the installation procedure 27 ...

Страница 28: ...eft side cover 2 Follow the procedure in After working inside your computer 3 Verify if the storage device is installed correctly optional a If you are replacing a storage device which does not have the operating system installed follow the steps in Identifying storage device in device manager b If you are replacing a storage device which does not have the operating system installed follow the ste...

Страница 29: ...computer 2 Press F2 when the Dell logo is displayed on the screen to enter the BIOS setup program A list of hard drives are displayed under the System Information in the General group 3 5 inch hard drive Removing the 3 5 inch hard drive Prerequisites 1 Follow the procedure in Before working inside your computer 2 Remove the left side cover About this task The following images indicate the location...

Страница 30: ...ard drive data cable as close as possible to the data cable plug and pull the hard drive data cable to disconnect the cable 4 Push the side light bar down 5 Press the release tabs on the hard drive carrier and slide the hard drive carrier out of the hard drive cage 6 Pry the hard drive carrier to release the tabs on the carrier from the slots on the hard drive 7 Lift the hard drive out of the hard...

Страница 31: ... are replacing a component remove the existing component before performing the installation procedure About this task The following images indicate the location of the 3 5 inch hard drive and provide a visual representation of the installation procedure 31 ...

Страница 32: ...flex open the carrier to insert the pins on the other side 3 Slide the hard drive assembly into the hard drive cage until it snaps into place 4 Lift the side light bar 5 Connect the hard drive data cable and hard drive power cable to the hard drive 6 Push the side light bar down Next steps 1 Install the left side cover 2 Follow the procedure in After working inside your computer 32 ...

Страница 33: ...on to your storage device see Reinstall Windows to the Dell factory image using recovery media in the knowledge base article 000176966 Power supply unit Removing the power supply unit Prerequisites 1 Follow the procedure in Before working inside your computer 2 Remove the left side cover 3 Remove the top cover 4 Remove the right side cover NOTE Note the routing of all cables as you remove them so ...

Страница 34: ... from the power supply unit extension cables on the right side of the computer 2 Slide the power supply unit cables out from the routing guide 3 Lay the computer on the right side 4 Release the power supply unit cables from the plastic cable clip 34 ...

Страница 35: ...t 11 Slide and lift the power supply unit bracket from the power supply unit 12 Remove the four screws 6 32x1 4 that secure the power supply unit to the chassis 13 Slide and lift the power supply unit along with the cables off the chassis Installing the power supply unit Prerequisites If you are replacing a component remove the existing component before performing the installation procedure WARNIN...

Страница 36: ... supply unit on the chassis 3 Align the screw holes on the power supply unit with the screw holes on the chassis 4 Replace the four screws 6 32x1 4 that secure the power supply unit to the chassis 5 Place the power supply unit bracket on the power supply unit 36 ...

Страница 37: ...tall the right side cover 2 Install the top cover 3 Install the left side cover 4 Follow the procedure in After working inside your computer Coin cell battery Removing the coin cell battery Prerequisites 1 Follow the procedure in Before working inside your computer WARNING Before working inside your computer read the safety information that is shipped with your computer For more safety best practi...

Страница 38: ...edure About this task The following images indicate the location of the coin cell battery and provide a visual representation of the installation procedure Steps Insert the new coin cell battery CR2032 into the battery socket with the positive side facing up and snap the battery into place Next steps 1 Install the left side cover 2 Follow the procedure in After working inside your computer Memory ...

Страница 39: ... 2 to step 3 to remove any other memory modules installed in your computer CAUTION To prevent damage to the memory module hold the memory module by the edges Do not touch the components on the memory module Installing the memory modules Prerequisites If you are replacing a component remove the existing component before performing the installation procedure About this task The following images indi...

Страница 40: ... memory module by the edges Do not touch the components on the memory module NOTE Repeat step 1 to step 3 to replace any other memory modules installed in your computer Next steps 1 Install the left side cover 2 Follow the procedure in After working inside your computer Graphics card Removing the single graphics card Prerequisites 1 Follow the procedure in Before working inside your computer 2 Rem...

Страница 41: ...41 ...

Страница 42: ... Slide the release latch to its unlock position and lift the graphics card bracket away from the graphics card 6 Push the securing tab on the PCIe x16 slot down grasp the graphics card by its top edge and ease it out of the slot Installing the single graphics card Prerequisites If you are replacing a component remove the existing component before performing the installation procedure About this ta...

Страница 43: ...ace the graphics card bracket onto the graphics card bracket holder and slide the latch into its lock position 4 Replace the graphics card end holder over the PCIe fan and slide the latch into its lock position 5 Close the expansion card door and snap the latch back into position Next steps 1 Install the left side cover 2 Follow the procedure in After working inside your computer 43 ...

Страница 44: ...ide a visual representation of the removal procedure Steps 1 Remove the screw M2x3 that secures the 2230 solid state drive to the system board 2 Slide and lift the 2230 solid state drive off SSD slot one on the system board Installing the 2230 solid state drive in SSD slot one Prerequisites If you are replacing a component remove the existing component before performing the installation procedure ...

Страница 45: ...and replace the screw M2x3 that secures the 2230 solid state drive to the system board Next steps 1 Install the left side cover 2 Follow the procedure in After working inside your computer 3 Verify if the storage device is installed correctly optional a If you are replacing a storage device which does not have the operating system installed follow the steps in Identifying storage device in device ...

Страница 46: ...omponent remove the existing component before performing the installation procedure CAUTION Solid state drives are fragile Exercise care when handling the solid state drive About this task NOTE This procedure applies only to computers shipped with a 2280 solid state drive installed in SSD slot one NOTE Depending on the configuration ordered your computer may support either a 2280 solid state drive...

Страница 47: ...torage device in device manager b If you are replacing a storage device which does not have the operating system installed follow the steps in Identifying your storage device in system setup BIOS NOTE To install the operating system on to your storage device see Reinstall Windows to the Dell factory image using recovery media in the knowledge base article 000176966 Removing the 2230 solid state dr...

Страница 48: ...dling the solid state drive About this task NOTE This procedure applies only to computers shipped with a 2230 solid state drive installed in SSD slot two NOTE Depending on the configuration ordered your computer may support either 2230 solid state drive or 2280 solid state drive in SSD slot two If you want to replace your 2230 solid state drive with a 2280 solid state drive see Installing the 2280...

Страница 49: ...e which does not have the operating system installed follow the steps in Identifying storage device in device manager b If you are replacing a storage device which does not have the operating system installed follow the steps in Identifying your storage device in system setup BIOS Removing the 2280 solid state drive in SSD slot two Prerequisites 1 Follow the procedure in Before working inside your...

Страница 50: ...dling the solid state drive About this task NOTE This procedure applies only to computers shipped with a 2280 solid state drive installed in SSD slot two NOTE Depending on the configuration ordered your computer may support either 2230 solid state drive or 2280 solid state drive in SSD slot two If you want to replace your 2280 solid state drive with a 2230 solid state drive see Installing the 2230...

Страница 51: ...led correctly optional a If you are replacing a storage device which does not have the operating system installed follow the steps in Identifying storage device in device manager b If you are replacing a storage device which does not have the operating system installed follow the steps in Identifying your storage device in system setup BIOS Top bezel Removing the top bezel Prerequisites 1 Follow t...

Страница 52: ...cure the top bezel to the chassis 4 Lift the top bezel off the chassis Installing the top bezel Prerequisites If you are replacing a component remove the existing component before performing the installation procedure About this task The following images indicate the location of the top bezel and provide a visual representation of the installation procedure 52 ...

Страница 53: ...op bezel on the chassis 4 Replace the four screws M3x7 that secure the top bezel to the chassis 5 Replace the two screws 6 32x1 4 that secure the top bezel to the chassis Next steps 1 Install the right side cover 2 Install the top cover 3 Install the left side cover 4 Follow the procedure in After working inside your computer 53 ...

Страница 54: ...nk The oils in your skin can reduce the heat transfer capability of the thermal grease 2 Remove the left side cover About this task The following images indicate the location of the processor fan and heat sink assembly and provide a visual representation of the removal procedure Steps 1 Lay the computer on the right side 2 Disconnect the processor fan cable from the system board 3 In reverse seque...

Страница 55: ... location of the processor fan and heat sink assembly and provide a visual representation of the installation procedure Steps 1 Place the processor fan and heat sink assembly on the processor 2 Align the captive screws on the processor fan heat sink assembly with the screw holes on the system board 3 In sequential order tighten the four captive screws that secure the processor fan and heat sink as...

Страница 56: ...g normal operation Ensure that it had sufficient time to cool before you touch it CAUTION For maximum cooling of the processor do not touch the heat transfer areas on the heat sink The oils in your skin can reduce the heat transfer capability of the thermal grease 2 Remove the left side cover About this task The following images indicate the location of the processor liquid cooling assembly and pr...

Страница 57: ... cables from the system board 4 Loosen the four captive screws that secure the processor cooler to the system board 5 Lift the processor cooling assembly along with the cables off the system board Installing the processor liquid cooling assembly Prerequisites If you are replacing a component remove the existing component before performing the installation procedure 57 ...

Страница 58: ...ermal conductivity is achieved About this task The following images indicate the location of the processor liquid cooling assembly and provide a visual representation of the installation procedure Steps 1 Align the screw hole of the radiator and fan assembly to the screw hole on the chassis NOTE Ensure that the hoses are facing the front of the computer 2 Replace the screw M3x5 that secures the ra...

Страница 59: ...all the left side cover 2 Follow the procedure in After working inside your computer Processor Removing the processor Prerequisites 1 Follow the procedure in Before working inside your computer 2 Remove the left side cover 3 Remove the processor liquid cooling assembly or processor fan and heat sink assembly as applicable About this task The following images indicate the location of the processor ...

Страница 60: ...e processor cover 3 Lift the processor off the processor socket Installing the processor Prerequisites If you are replacing a component remove the existing component before performing the installation procedure About this task The following images indicate the location of the processor and provide a visual representation of the installation procedure 60 ...

Страница 61: ...cket and then place the processor in the processor socket CAUTION Ensure that the processor cover notch is positioned underneath the alignment post 3 When the processor is fully seated in the socket close the processor cover 4 Push the release lever down and place it under the tab on the processor cover Next steps 1 Install the processor liquid cooling assembly or processor fan and heat sink assem...

Страница 62: ...eps 1 Remove the screw M2x3 that secures the wireless card to the system board 2 Lift the wireless card bracket off the wireless card 3 Disconnect the antenna cables from the wireless card 4 Slide and remove the wireless card from the wireless card slot Installing the wireless card Prerequisites If you are replacing a component remove the existing component before performing the installation proce...

Страница 63: ... 2 Antenna cable color scheme Connectors on the wireless card Antenna cable color Main white triangle White Auxiliary black triangle Black 2 Place the wireless card bracket on the wireless card 3 Align the notch on the wireless card with the tab on the wireless card slot 4 Slide the wireless card at an angle into the wireless card slot 5 Replace the screw M2x3 that secures the wireless card to the...

Страница 64: ...cation of the antennas and provide a visual representation of the removal procedure Steps 1 Remove the two screws M3x3 that secure the antennas to the chassis 2 Peel the two antennas and remove them from the slots of the chassis 3 Remove the antenna cables from the routing guides on the chassis 4 Remove the antenna cables from the routing clip inside the chassis 5 Pull the antenna cables carefully...

Страница 65: ...he chassis 2 Align the screw holes and replace the two screws M3x3 that secures the antennas to the chassis 3 Route the antenna cables through the routing guides on the chassis 4 Push the end of the antenna cables with the connectors to the wireless card through the hole of the chassis 5 Route the antenna cables through the routing clip inside the chassis Next steps 1 Install the front bezel 2 Ins...

Страница 66: ...e front chassis fan and provide a visual representation of the removal procedure Steps 1 Lay the computer on its right side 2 Disconnect the front chassis fan cable from the system board 3 Press the releasing clip slide and lift the front chassis off the chassis Installing the front chassis fan Prerequisites If you are replacing a component remove the existing component before performing the insta...

Страница 67: ...ntil the releasing clip snaps into position 3 Connect the front chassis fan cable to the system board Next steps 1 Install the left side cover 2 Follow the procedure in After working inside your computer PCIe fan Removing the PCIe fan Prerequisites 1 Follow the procedure in Before working inside your computer 2 Remove the left side cover About this task The following images indicate the location o...

Страница 68: ...m board 4 Push the tab to release the PCIe fan from the chassis 5 Slide and lift the PCIe fan off the chassis Installing the PCIe fan Prerequisites If you are replacing a component remove the existing component before performing the installation procedure About this task The following images indicate the location of the PCIe fan and provide a visual representation of the installation procedure 68 ...

Страница 69: ... card end holder and slide the release latch to the lock position Next steps 1 Install the left side cover 2 Follow the procedure in After working inside your computer Top chassis fan Removing the top chassis fan Prerequisites 1 Follow the procedure in Before working inside your computer 2 Remove the left side cover About this task The following images indicate the location of the top chassis fan ...

Страница 70: ...4 Slide and lift the top chassis fan from the chassis Installing the top chassis fan Prerequisites If you are replacing a component remove the existing component before performing the installation procedure About this task The following images indicate the location of the top chassis fan and provide a visual representation of the installation procedure 70 ...

Страница 71: ... Connect the top chassis fan cable to the system board Next steps 1 Install the left side cover 2 Follow the procedure in After working inside your computer Front AlienFX LED boards Removing the Front AlienFX LED board Prerequisites 1 Follow the procedure in Before working inside your computer 2 Remove the left side cover 3 Remove the top cover 4 Remove the right side cover 5 Remove the front beze...

Страница 72: ... 3 Lift the AlienFX LED board slightly off the front bezel and disconnect the power button board cable from the power button board 4 Lift the AlienFX LED board with its cables off the front bezel Installing the Front AlienFX LED board Prerequisites If you are replacing a component remove the existing component before performing the installation procedure About this task The following images indica...

Страница 73: ...tall the front bezel 2 Install the right side cover 3 Install the top cover 4 Install the left side cover 5 Follow the procedure in After working inside your computer Power button board Removing the power button board Prerequisites 1 Follow the procedure in Before working inside your computer 2 Remove the left side cover 3 Remove the top cover 4 Remove the right side cover 5 Remove the front bezel...

Страница 74: ...e front bezel Installing the power button board Prerequisites If you are replacing a component remove the existing component before performing the installation procedure About this task The following images indicate the location of the power button board and provide a visual representation of the installation procedure 74 ...

Страница 75: ...e working inside your computer NOTE The heat sink may become hot during normal operation Allow sufficient time for the heat sink to cool before you touch it CAUTION If either the processor or the heat sink is replaced use the thermal grease that is provided in the kit to ensure that thermal conductivity is achieved NOTE Do not touch the heat transfer areas on the heat sink The oils in your skin ca...

Страница 76: ...nd provide a visual representation of the removal procedure Steps 1 Lay the computer on the right side 2 Loosen the captive screws that secure the VR heat sink to the system board 3 Repeat the same process for the other VR heat sink 4 Lift the VR heat sinks off the system board 76 ...

Страница 77: ... VR heat sinks are shipped as separate units and they do not ship along with the new system board Remove the VR heat sinks from old system board for transfer to the new system board About this task The following images indicate the location of the VR heat sink and provide a visual representation of the installation procedure Steps 1 Align the captive screws of the VR heat sink with the screw holes...

Страница 78: ...cation of the connectors so that you can reconnect the cables correctly after you replace the system board 2 Remove the left side cover 3 Remove the top cover 4 Remove the right side cover 5 Remove the front bezel 6 Remove the memory module 7 Remove the single graphics card 8 Remove the 2230 solid state drive or the 2280 solid state drive in SSD slot one as applicable 9 Remove the 2230 solid state...

Страница 79: ...tor FAN_SYS3 4 Wireless card slot M 2 WLAN 5 FAN_SYS2 LED connector 6 Front chassis fan connector FAN_SYS2 7 Solid state drive slot M 2 PCIe SSD1 8 SATA 6 Gbps drive connector SATA0 9 SATA 6 Gbps drive connector SATA1 10 SATA 6 Gbps drive connector SATA2 11 Power supply connector ATX SYS 79 ...

Страница 80: ...tor FAN PUMP 20 Pump LED connector FAN PUMP LED 21 CPU fan connector 22 Top chassis fan connector FAN_SYS4 23 CPU socket 24 Power supply connector ATX2 25 Power supply connector ATX3 26 Memory module slot DIMM3 27 Memory module slot DIMM1 28 Memory module slot DIMM4 29 Memory module slot DIMM2 30 SATA power connector 31 Side light connector The following images indicate the location of the system ...

Страница 81: ...81 ...

Страница 82: ...cables as you remove them so that you can route them correctly after you replace the system board For information about system board connectors see system board components NOTE Note the routing of all cables as you remove them so that you can route them correctly after you replace the system board 9 Remove the nine screws 6 32x1 4 that secure the system board to standoffs on the chassis 10 Remove ...

Страница 83: ... are replacing a component remove the existing component before performing the installation procedure About this task The following images indicate the location of the system board and provide a visual representation of the installation procedure 83 ...

Страница 84: ...sis 6 Route and connect all the cables that were disconnected from the system board 7 Connect the SATA power cable from the system board 8 Connect the side light power cable from the system board 9 Connect the front chassis fan power cable from the system board 10 Connect the top chassis fan power cable from the system board 11 Connect the system board power cables from the system board 12 Connect...

Страница 85: ... the right side cover 11 Install the top cover 12 Install the left side cover 13 Follow the procedure in After working inside your computer Entering the Service Tag in the BIOS setup program Steps 1 Turn on or restart your computer 2 Press F2 when the Dell logo is displayed to enter the BIOS setup program 3 Navigate to the Main tab and enter the Service Tag in the Service Tag Input field Next step...

Страница 86: ...lick Download and Install to download and install all driver updates detected for your computer 10 Select a location to save the files 11 If prompted approve requests from User Account Control to make changes on the system 12 The application installs all drivers and updates identified NOTE Not all files can be installed automatically Review the installation summary to identify if manual installati...

Страница 87: ...iver Steps 1 Turn on your computer 2 Go to www dell com support 3 Enter the Service Tag of your computer and then click Submit NOTE If you do not have the Service Tag use the auto detect feature or manually browse for your computer model 4 Click Drivers downloads 5 Click the Detect Drivers button 6 Review and agree to the Terms and Conditions to use SupportAssist then click Continue 7 If necessary...

Страница 88: ...load and installation click Category 14 Click Network in the drop down list 15 Click Download to download the WiFi driver for your computer 16 After the download is complete navigate to the folder where you saved the WiFi driver file 17 Double click the WiFi driver icon and follow the instructions on the screen to install the driver Downloading the media card reader driver Steps 1 Turn on your com...

Страница 89: ...w Drivers for My System 9 Click Download and Install to download and install all driver updates detected for your computer 10 Select a location to save the files 11 If prompted approve requests from User Account Control to make changes on the computer 12 The application installs all drivers and updates identified NOTE Not all files can be installed automatically Review the installation summary to ...

Страница 90: ...ion installs all drivers and updates identified NOTE Not all files can be installed automatically Review the installation summary to identify if manual installation is necessary 13 For manual download and installation click Category 14 Click Network in the drop down list 15 Click Download to download the network driver for your computer 16 After the download is complete navigate to the folder wher...

Страница 91: ...t of the System Setup options changes that you make are recorded but do not take effect until you restart the system Keys Navigation Up arrow Moves to the previous field Down arrow Moves to the next field Enter Selects a value in the selected field if applicable or follow the link in the field Spacebar Expands or collapses a drop down list if applicable Tab Moves to the next focus area Esc Moves t...

Страница 92: ...peed Displays the speed of the processor CPU ID Displays the processor identification code CPU Cache L1 Cache Displays the processor L1 cache size L2 Cache Displays the processor L2 cache size L3 Cache Displays the processor L3 cache size First HDD Allows you to configure the first HDD M 2 PCIe SSD 0 1 Enables or disables the M 2 PCIe SSD 0 1 System Memory Displays the total computer memory instal...

Страница 93: ...upport IPv4 HTTP Support Allows you to enable or disable IPv4 HTTP Support Default Disabled IPv6 HTTP Support IPv6 HTTP Support Allows you to enable or disable IPv6 HTTP Support Default Disabled USB Configuration Front USB Ports Allows you to enable or disable the Front USB ports Default Enabled Rear USB Ports Allows you to enable or disable the Rear USB ports Default Enabled Power Options Wake Up...

Страница 94: ...red only if the Auto Power On mode is set to Enabled hh mm ss Default 12 30 30 Numlock Key Allows you to set the status of the Num Lock key during boot to On or Off Default Enabled Performance Options Overclocking Feature Allows you to enable or disable the Overclocking Feature Default Disabled Overclocking Feature Core Over Clocking Level Allows you to configure the Core Over Clocking Level Defau...

Страница 95: ... Dell operating system Recovery tool Default 2 Auto OS Recovery Threshold Allows you to configure the Auto OS Recovery Threshold Default 2 SupportAssist OS Recovery Allows you to enable or disable the SupportAssist OS Recovery Default Enabled Table 5 System setup options Security menu Security Unlock Setup Status Displays the unlock setup status Admin Password Status Displays whether the admin pas...

Страница 96: ...s SMM Security Mitigation protections Default Disabled Secure Boot Secure Boot Enables secure boot using only validated boot software Default Disabled Secure Boot Mode Modifies the behavior of Secure Boot to allow evaluation or enforcement of UEFI driver signatures Deployed Mode should be selected for normal operation of Secure Boot Default Deployed Mode Expert Key Management Custom Mode Allows yo...

Страница 97: ...o load default values for all system setup options Discard Changes Allows you to exit your changes Save Changes Allows you to save your changes System and setup password Table 8 System and setup password Password type Description System password Password that you must enter to log in to your system Setup password Password that you must enter to access and make changes to the BIOS settings of your ...

Страница 98: ...etup password if the Password Status is Locked About this task To enter the System Setup press F12 immediately after a power on or reboot Steps 1 In the System BIOS or System Setup screen select System Security and press Enter The System Security screen is displayed 2 In the System Security screen verify that Password Status is Unlocked 3 Select System Password update or delete the existing system...

Страница 99: ...r to the pair of CMOS pins JM12 7 Plug the power cable to the computer 8 Wait for 10 seconds for the CMOS to clear 9 Disconnect the power cable from the computer 10 Move the jumper to the pair of password pins JM34 11 Replace the left side cover Clearing BIOS System Setup and System passwords About this task The following images indicate the location of the password reset jumper on the system boar...

Страница 100: ...g the BIOS Updating the BIOS in Windows Steps 1 Go to www dell com support 2 Click Product support In the Search support box enter the Service Tag of your computer and then click Search NOTE If you do not have the Service Tag use the SupportAssist feature to automatically identify your computer You can also use the product ID or manually browse for your computer model 3 Click Drivers Downloads Exp...

Страница 101: ...uter to the F12 One Time Boot Menu to see if BIOS FLASH UPDATE is listed as a boot option for your computer If the option is listed then the BIOS supports this BIOS update option NOTE Only computers with BIOS Flash Update option in the F12 One Time boot menu can use this function Updating from the One Time boot menu To update your BIOS from the F12 One Time boot menu you need the following USB dri...

Страница 102: ...iencing a boot failure including the power supply unit Blinking amber Computer is experiencing a boot failure but the power supply unit is functioning correctly Off Computer is in hibernation mode or turned off The power status light may also blink amber or white according to predefined beep codes indicating various failures For example the power and battery status light blinks amber two times fol...

Страница 103: ... restore your computer to its factory state You can also download it from the Dell Support website to troubleshoot and fix your computer when it fails to boot into their primary operating system due to software or hardware failures For more information about the Dell SupportAssist OS Recovery see Dell SupportAssist OS Recovery User s Guide at www dell com serviceabilitytools Click SupportAssist an...

Страница 104: ... off your computer 2 Disconnect the power adapter from your computer 3 Press and hold the power button for 15 seconds to drain the flea power 4 Connect the power adapter to your computer 5 Turn on your computer 104 ...

Страница 105: ...uniquely identified by a Service Tag or Express Service Code To view relevant support resources for your Dell computer enter the Service Tag or Express Service Code at www dell com support For more information on how to find the Service Tag for your computer see Locate the Service Tag on your computer VR Support www dell com VRsupport Videos providing step by step instructions to service your comp...

Отзывы: