background image

32

5.6   Camera Input Adjustment – Camera settings

In order to set the camera and background light levels to provide the best
video images you need to set the video parameters such as brightness,
saturation, contrast and hue. If you select the Camera menu and then Colour
Setup you can set the brightness, saturation, contrast and hue settings. Press
the Confirm button to save the settings or press the Cancel button to abort.

5.7   Camera Input Adjustment - Mask Area Setup

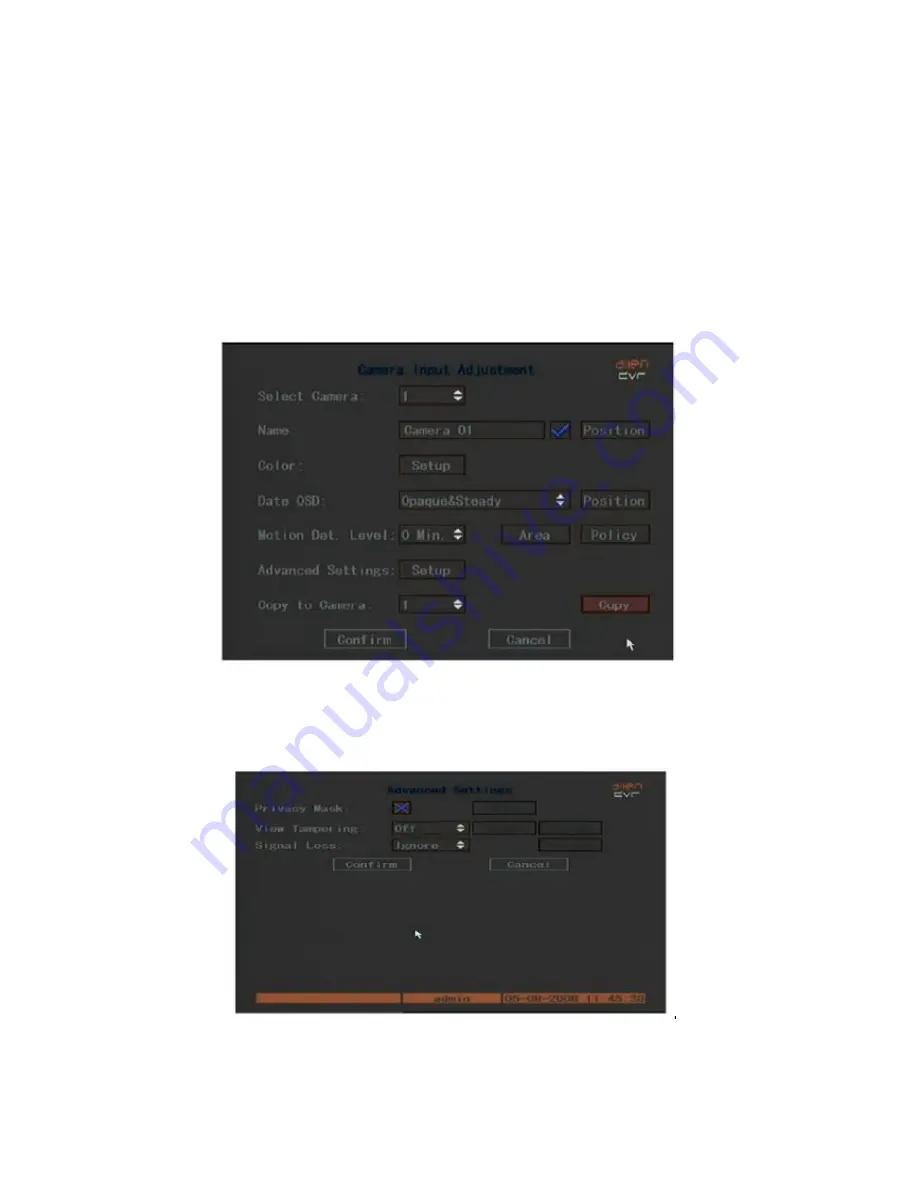
In order to set the mask area setup, select the Camera menu and then
Advanced Settings. Privacy masking allows a camera view to be edited so that
unwanted video areas captured are ignored.

The following menu is displayed:

If you select the Privacy Mask option marked X it will be activated and you
can then select the Area setting.

Содержание DSD106

Страница 1: ...The new Alien Pod Digital Video Recorder Operations Manual Model DSD106 Version 3 0 4 Channel Real Time DVR Networkable Mobile Phone Monitoring ...

Страница 2: ...u Operation 14 4 Basic Operation Guide 15 4 1 Username and Password 15 4 2 PTZ Control 17 4 3 Manual Record 19 4 4 Playback 20 4 5 Backup Recorded Files 22 4 6 Shutdown DVR 24 5 Parameter Setup Guide 25 5 1 Administrator and Password 25 5 2 Add and Delete User 26 5 3 Device ID 29 5 4 Video Output Standard 30 5 5 OSD Setup 30 5 6 Camera Input Adjustment Camera Settings 32 5 7 Camera Input Adjustmen...

Страница 3: ... Beginners 61 9 2 1 How do I set my PC to obtain an IP address automatically 62 9 2 2 How do I set my PC s IP address Manually 62 9 2 3 How do I find out my PC s IP address 62 9 2 4 How do I use Ping to test a Connection to my DVR 62 9 2 5 How do I configure a Router for Remote Access 63 9 2 6 How do I find the On Line Support 63 9 3 Option 1 Connect a DVR directly to a single PC 64 9 4 Option 2 C...

Страница 4: ... strong vibration or water during transportation storage and installation 3 Installation Always install the unit in an upright position Handle with due care Do not apply power to the DVR before completing the installation Do not place objects on the DVR or restrict air flow to this DVR 4 Qualified Engineers Needed Only entrust examination and repair work by qualified service engineers We are not l...

Страница 5: ...larm motion alarm motion alarm Allows selection of CIF mode at 25FPS 2CIF at 12FPS and 4CIF at 6FPS Supports 1 SATA Hard Drive FAT32 file system HDD SMART technology cycle or non cycle record backup of recorded files and clips Supports USB memory USB HDD USB CD R W and USB DVD R W Preview and Playback Supports internal composite monitor or VGA output and composite spot monitor Internal or VGA moni...

Страница 6: ...f the Hard Drive can be calculated according to the total capacity required A table is supplied at the end of this manual This DVR uses one SATA Hard Drive up to a maximum of 1 Tb First remove DVR case top Fit hard drive to base plate with screws Connect SATA data cable correctly and then power cable Ensure cables are fitted tightly Refit DVR case top and power up unit Ensure HDD is formatted befo...

Страница 7: ...4 Channels standard BNC 3 Video Outputs No 1 Main Video BNC Out No 2 Spot Video BNC Out 4 Audio Input 1 Channel RCA 1 0v p p 75 ohm 5 Audio Output 1 Channel RCA 1 0v p p 75 ohm 6 LAN Interface Network Connection 7 VGA Interface VGA Display 8 Alarm RS485 RS485 connections for PTZ 4 input alarms and 1 output alarm See below for more detail 9 12vDC Input Connection for Power Supply Unit 12vDC 10 Powe...

Страница 8: ...rm Output Connection Please note the usage of jumper JJ1 If you use DC either connection is okay It is suggested that you use 12vDC at less than 1 Amp If you use AC ensure the jumper is opened There is a jumper on the mainboard corresponding with the alarm output The default is closed WARNING IF YOU USE AC FOR RELAY OUTPUT ENSURE THE JUMPER IS OPENED 1 2 3 4 G G 4 x Alarm Inputs G GND RS485 Connec...

Страница 9: ...9 3 Operational Instructions 2 TFT Screen 1 4 5 3 2 6 3 1 Front Panel ...

Страница 10: ...10 NOTE SHIFT button is used to switch between numeric keys and function keys 6 POWER HDD TxRx ...

Страница 11: ...11 ...

Страница 12: ...the IR Controller The status lamp will now switch off and the IR Controller will not operate the DVR Switching the DVR off When the IR Controller status is on press the POWER key for several seconds and the DVR will power off Troubleshooting the IR Controller If the IR Controller does not operate the DVR then check the following items 1 Check battery connections 2 Check battery charge 3 Check ther...

Страница 13: ...13 ...

Страница 14: ...nter PTZ control interface Special Note You must input username and password The default username is admin and the password is 12345 Main Menu Description The small rectangular frame allows the user to move to the required menu option To move use the or keys on the Control Key Direction Unit CKDU When you have selected the required icon press Enter this is the center key on the CKDU ...

Страница 15: ...o enter password box To enter default password select 12345 and then press the Enter button Note that you can select a different password using numerics or alpha by pressing the A key For alpha you will need to select the correct letter similar to a mobile phone text message If there is an alarm sounded the username and password are not matched After three error attempts the DVR will enter Preview...

Страница 16: ...Add button and enter username Now enter the Password and verify by re entering password SPECIAL NOTE Please refer to section 5 regarding the setting of access rights If these rights are not set then new users will not be able to operate this DVR ...

Страница 17: ...you can press the numeric keys to select a channel If DVR has less than 10 channels press one numeric key to select For example to select camera 2 press the 2 key If the DVR has 10 or more channels you must press two numeric keys to select channel number For example for camera 2 you must select keys 0 and 2 simultaneously and for camera 12 select numeric keys 1 and 2 PTZ Control Keys Direction key...

Страница 18: ...umber is set already Please refer to PTZ menu for preset setup instructions Firmware version 1 4 upwards can support up to 28 presets Start Stop auto in PTZ control mode In PTZ control mode press PLAY AUTO key to start PTZ auto function Press PLAY AUTO key again to stop When PTZ is in auto mode and you exit this mode the PTZ will continue to auto function You must enter the PTZ control mode again ...

Страница 19: ...hannel status has four modes X idle Green channel recording schedule motion or alarm Red network transmission Orange recording and network transmission Start Stop ü start corresponding channel recording X stop corresponding channel recording Start All Press this button to start all channels recording Stop All Press this button to stop all channels recording Exit Manual Record Press ESC key to ente...

Страница 20: ...d files Time Enter the From and To date and time selected Search Search the matched recorded files and display them in list box If no files are found a corresponding dialogue box is displayed Play by Time Playback the recorded channel based on time section Select Page In the file list box only 8 files are displayed per page If the selection covers more than 8 files these can be seen by selecting f...

Страница 21: ...or that period will be listed in the matched files list If you click on one file and then press the PLAY key the recorded file will play back If the DVR cannot find matched files a failure dialogue will be displayed 1 Adjust play progress backwards or forwards 2 Adjust play speed Normal 1x Decrease to 1 2x 1 4x 1 8x and single frame Increase to 2x 4x 8x and MAX 3 Pause continue If setting single f...

Страница 22: ...all recorded files for all channels for one day Just select Backup Today and press the Enter key A dialogue device will display the backup status If backup device is not connected correctly or the DVR does not detect the unit the following dialogue box will be displayed Backup Process 1 In playback mode select one channel and record type and then input the time selection Now press the Search key a...

Страница 23: ...l facility is available to backup parts of an incident This may be useful when there is a part of the recording not required The following steps need to be followed 1 Start playback or select playback by time 2 Press the Edit key to start selecting the current playback image and press Edit again to stop selecting the segment required 3 Repeat step 2 to select up to 30 segments maximum 4 On complet...

Страница 24: ...play power off dialogue box Now press confirm to shutdown DVR If you enter incorrect password three times the DVR will return to preview mode In menu mode if the user has the Utilities rights you can enter into power off dialogue and press confirm to shutdown DVR Otherwise the user cannot shutdown the DVR If the DVR is shutdown correctly the power light is illuminated red NOTE When the Shutdown me...

Страница 25: ...he factory there is one default administrator The username is admin and the password is 12345 Password Modification Press the Menu key and login selecting the username admin Use the right arrow key and move cursor to password edit box Input 12345 and press confirm to enter the administrator menu Select the User menu and press Enter key to enter the User Management menu In the username list box you...

Страница 26: ...ss Enter to return to password edit box and re input new password again 5 2 Add and Delete user Add user 1 Enter the User Management menu Refer to 5 1 2 Add new username In the User Management menu press Add button and press Enter and in the dialogue box displayed input the new username and then press Enter Up to fifteen usernames can be input ...

Страница 27: ...e the right arrow key to enter the password edit box Press Edit key to enter edit box and use the numeric keys to input the new password 4 Setup the new user privileges A new user has no operational rights The rights or privileges must be setup using the Set Rights menu In the list box in the User Management menu select the new username using the up and down arrow keys and using the right arrow ke...

Страница 28: ... remote and RS485 keyboard PTZ Control Local control of PTZ Record Manual stop start recording Playback Local playback and backup of recorded files Parameter Setup Local setup of DVR parameters Log Locally view the DVR log Utilities Locally upgrade firmware format HDD reboot DVR and shutdown DVR etc Remote Rights PTZ Control Remote control of PTZ Record Remote manual start stop recording Playback ...

Страница 29: ...ect the display menu When you use the IR controller to operate the DVR you must use the device ID to select the DVR The default device ID is 255 If you are using more than one of these DVRs then ensure each unit is allocated a different ID In Display menu move to the Device ID box and enter a device range 01 255 Press the Confirm button to save or press Cancel to abort Whatever ID you set you will...

Страница 30: ...to select option and then press Confirm button to save or press the Cancel button to abort 5 5 OSD Setup OSD On Screen Display allows the system time and camera name to be displayed OSD settings include system time time format time display position camera name camera name display position etc System Time In the Display menu you can setup the DVR system date and time Display System Time You can als...

Страница 31: ...ve to Name box and press Edit button and then input digital numbers uppercase or lowercase characters as detailed earlier The camera name can be 32 characters long maximum 3 Press Edit key to exit edit status Select Confirm and press Enter to save the change and you will now see the new camera name Press Cancel button or ESC key to abort NOTE To change to Upper case lower case numerics or symbol p...

Страница 32: ...ness saturation contrast and hue settings Press the Confirm button to save the settings or press the Cancel button to abort 5 7 Camera Input Adjustment Mask Area Setup In order to set the mask area setup select the Camera menu and then Advanced Settings Privacy masking allows a camera view to be edited so that unwanted video areas captured are ignored The following menu is displayed If you select ...

Страница 33: ...sed to produce an alarm warning if the camera video is blocked Select Camera menu and Advanced settings and then select View Tampering by clicking on up or down arrow buttons to the right of this This will change the Off display to either Low Normal or High sensitivity and setup the Area and Policy Boxes The Area allows one box to be set similar to the Privacy Masking option Press Enter to return ...

Страница 34: ...can be set to detect this Enter the Camera menu and select Advanced Settings Now click on the Ignore button to the right of Signal Loss By clicking the up or down arrow in the box the Ignore will change to Handle This then displays the Policy box If Policy is clicked on then the Video Signal Loss Handle is displayed The DVR will react to the Policy set You can select one or more options from the f...

Страница 35: ...n The screen is divided into 22 x 18 squares with a yellow square where the cursor from the mouse is placed This menu allows the whole area to be detected by pressing the PTZ key If you press the A button you will clear all motion areas You can setup multi areas by using the right or down direction keys to set an area and then pressing the Edit key will allow the next area to be set Press Enter to...

Страница 36: ...ct to the Policy set You can select one or more options from the following On Screen Warning Audible warning Upload to Center and Trigger Alarm Output Use the mouse to change the cross to a tick Ensure the Confirm button is pressed to save the settings Pressing ESC will abort the setting Any changes made to the parameters must be followed by a reboot If On Screen Warning is enabled and DVR is in p...

Страница 37: ...d enter the Preview menu shown below Preview Mode If you click on Preview Mode you can switch between a single channel display and four eight sixteen channel display Dependent on model Preview Switch Time This is the Image Preview switch time You can select between 5 seconds 10 20 30 60 120 300 and Never If Never is selected the preview image is not switched automatically ...

Страница 38: ...box and changing it to camera 2 automatically moves camera 1 to the second camera position A small display beneath the boxes shows the new display order Note that if you leave the Preview Mode in 1 Screen mode you can still change the order If you press 0 the corresponding window will not display live video Ensure the Confirm button is pressed to save your changes 5 12 Recording Setup If you selec...

Страница 39: ... frame rate you can select low bit rate size The bit rate is automatically set according to the frame rate selected Bit Rate If you select bit rate the maximum bit rate must be limited when there are data recording peaks The bit rate is therefore associated to the frame rate selected The following options can be selected 32K 64K 128K 192K 256K 320K 384K 512K 640K 768K 896K 1Mbps 1 25Mbps 1 5Mbps 1...

Страница 40: ...e periods available for each day For each time period you can select one of the record type options Note Do not overlap time periods The time periods must run consecutively between 00 00 and 24 00 Copy to Allows the current page to be copied to Monday through Sunday or All Copy Click on this function to start the copy Confirm Cancel Click on confirm to save the changes and cancel to abort NOTE If ...

Страница 41: ...d by clicking on the camera numbers changing the X disable to enabled ticked AlarmIn Schedule Day Select the day Monday through Sunday Periods You can setup up to 4 periods within each day Note Do not overlap time periods The time periods must run consecutively between 00 00 and 24 00 Copy to Allows the current page to be copied to Monday through Sunday or All Copy Click on this function to start ...

Страница 42: ...llows the alarm to trigger PTZ links If PTZ Linkage is clicked on the following menu is displayed The user must ensure that the PTZ used has the following functionality to enable these options to be used Select Camera First select the PTZ camera number Use the up and down keys to select the channel required Enable Preset Click on the Enable Preset box to switch the disable X to enable ticked Prese...

Страница 43: ...y Alarm Out This DVR provides one alarm output for the DSD105 and four for the DSD108 and DSD116 Time Select Delay Time This is the time the relay will continue to be set after the alarm finishes triggering Select from 5seconds 10sec 30sec 1 minute 2 mins 5mins 10minutes and Manual If you set Manual the alarm will not stop until you confirm Alarm Stop in the Utilities menu Alarm Out Time If you se...

Страница 44: ...ct other days you want to set the alarm out or all Copy This allows the copy to be started Confirm When you finish the setup press the Confirm button to save all parameters NOTE If any schedule is modified you must reboot the DVR to make it effective Copy to Alarm Out This DVR only provides one output alarm Therefore this and the Copy options are not changeable Exceptions Select the Exceptions men...

Страница 45: ...iewed on the Log The following are triggered Audible Warning DVR will beep Upload to Center Send exception information to center host P C Trigger Alarm Out Trigger local relay output AlarmOut1 Select to enable the alarm out 5 14 Network Parameters If you want to access the DVR via a network you must set up the network parameters Select the Network menu as the following will be displayed ...

Страница 46: ...s for the DVR as 0 0 0 0 then the DHCP server has not been found and the IP address Mask and Gateway will have to be set manually Port The port address for the Client software Mask The subnet mask used This must be common in all equipment used on this network This defines the size of the network and is generally 255 255 255 0 Gateway The modem router local address HTTP Port This is set as 80 for a...

Страница 47: ...to a range of addresses 224 0 0 0 239 255 255 255 If you are not using multicast then do not set this option Remote Host IP Remote Host Port If you set this IP and port when there is an alarm and an exception event occurs the DVR will send information to that host IP The site with this IP can receive alarm and exception event information from the DVR 5 15 PTZ If you click on the PTZ menu the follo...

Страница 48: ...nsure this address is set in the PTZ camera This is normally set by dipswitches in the camera Preset Select the preset setup button and the following menu will be displayed Preset This allows the setting of preset numbers Enter the preset number and press the Adjust button Using the PTZ adjustment control set the preset position and Save then press the Return button This will take you back to the ...

Страница 49: ...enu allows you to delete presets After completing setup press Return to go back to PTZ menu then press Confirm to save all changes NOTE This option will only work on PTZ units that have the features available Returning to the PTZ menu the following menu is displayed when clicking on Cruise Setup This function is used to setup a pattern RecCru Press the RecCru button and you will enter the PTZ cont...

Страница 50: ...display the following Ensure you have the rights to access this menu 6 1 Default Parameters This option allows you to restore the manufacturers settings Note that the IP address Gateway and Port number will not be restored Click Confirm to proceed ...

Страница 51: ...network and download the firmware file If you select the USB mode make sure you connect a USB memory stick containing the firmware file in the root directory before selecting this option After the firmware upgrade completed reboot the DVR to start using the new firmware SPECIAL WARNING Applying the wrong firmware or not correctly completing a firmware upgrade can leave the unit in an unusable stat...

Страница 52: ... This includes capacity free space standby or not and whether the status is normal or not Format You must stop all recording before formatting the drives After formatting you must reboot the DVR otherwise it will not perform correctly Enter Confirm to complete the format ...

Страница 53: ...o proceed 6 5 Reboot This menu option allows you to reboot the DVR 6 6 Power Off This menu option allows you to power off the DVR 6 7 View Log This menu option allows you to view the Log menu If you wish to view the log based on default option just press the Enter key and all information will be ...

Страница 54: ...Start Voice Talk Net Upgrade Net File Play Net Time Play Net PTZ Alarm This includes the following minor types External Alarm In External Alarm Out Motion Detect Start Motion Detect Stop View Tamper Start View Tamper Stop Exception This includes the following minor types Video Signal Loss Illegal Access Hard Disk Error Hard Disk Full IP Conflict DCD Lost Example Viewing the Alarm Log 1 At Query se...

Страница 55: ... the Utilities menu By Type Time To view one kind of log in an assigned time period 1 Select By Type Time in the Query box 2 Select Operation for the Major Type 3 Input Start and Stop time 4 Press SearchLog button and then press Enter to start searching 5 DVR will display matched log information 6 Press Return to return to the Utilities menu 6 8 System Information If you select the System Informat...

Страница 56: ...update old firmware and the other is to reload code in the DVR due to corruption 7 1 FTP Server Setup You can download FTP server software via the Internet As an example we are using wftpd32 exe 1 Run wftpd32 exe FTP server software 2 Select Logging in the menu and then choose Log Options in the sub menu 3 Now select User Rights in the Security option in the main menu The following display will be...

Страница 57: ...e Verify Password filed Click OK to save and exit this box You will now return to the User Rights Security Dialog box see 3 above In the User Name box enter target and in the Home Directory box enter the path where the firmware file is placed Then press the Done button to exit 7 Next time you will not need to run the setup procedure again just double click and open the wftpd32 exe to upgrade the f...

Страница 58: ...ormation 2 Use the FTP function of Upgrade sub menu in the Utilities menu You need one host PC to run FTP server software and read firmware file digicap hex Make sure that the PC and DVR are in the same subnet 3 Use the USB function of Upgrade sub menu in the Utilities menu Make sure the firmware file digicap hex is placed under the root directory of the USB memory stick For example if the memory ...

Страница 59: ...twork setup in DVR l Use ping DVR IP address to check connection is OK or not Usually the return TTL value should be less than 255 8 1 1 Login and logout Open IE and input DVR address in the address column For example if your DVR IP is 10 1 27 200 then please input http 10 1 27 200 in IE address column System may display warning information to ask you whether to install webrec cab control or not P...

Страница 60: ...match your local network When configuring the DVR s IP address information the version of firmware within the units may display the IP addresses differently For simplicity 192 168 0 20 may have to be configured as 192 168 000 020 1 Enter the DVR Menu Go to Network Settings 2 Enter Network menu 3 SET IP ADDRESS see above Subnet Mask 255 255 255 000 example GATEWAY 192 168 0 1 example Router local a...

Страница 61: ...load the following tips from the website Online Support section Tip 117 Describing how to set a PCs IP Address TIP 36 Describing how to perform ping test Tip 58 Describing how to configure a router for Internet access The diagrams that follow suggest settings that if used will result in a successful connection Bear in mind that when it comes to Option 3 for Internet use different router manufactur...

Страница 62: ...9 2 2 How do I set my PC s IP Address Manually Control Panel Network Connections Local Area Connection Properties Internet Protocol TCP IP Properties Select Use following IP Address Enter IP Address Subnet mask Default gateway 9 2 3 How do I find out my PC s IP Address Start Run Cmd ipconfig 9 2 4 How do I use Ping to test a Connection to my DVR Start Run Cmd Ping IP Address Enter eg ping 192 168 ...

Страница 63: ... commerce exe display user2 Detailed descriptions are available there for all these questions plus more besides including How to find a device s MAC address Tip 3 How to implement Dynamic DNS Tip 56 Setting Internet Explorer Security Settings to install an Active X Tip 94 How to control a PTZ from a DVR How to play back recordings from various DVRs Links for downloading client software packages ...

Страница 64: ...etwork settings in DVR manually Configure network settings in PC manually Connect DVR PC together using an RJ45 cross over cable Install and configure the DVR client software Reboot both DVR PC Test the PCs connection to the DVR using Ping Connect using the client software ...

Страница 65: ...ork settings in DVR manually Configure network settings in PC manually Connect DVR PC together using an RJ45 cross over cable Install and configure the DVR client software Reboot both DVR PC Test the PCs connection to the DVR using Ping Connect using the client software ...

Страница 66: ...iate cable router Be aware that when connected to the internet the router has two IP addresses internal and external The internal address is seen by devices connecting to it s Ethernet ports the external address represents it s connection to the local exchange via the telephone line You can only test an external Internet connection from a PC not connected locally to the modem router ...

Страница 67: ...t Forwarding or DMZ Ask a colleague offsite to test Internet access by connecting to the router s external IP address 9 6 Network Cable Connections If you are connecting the Alien to a modem router network hub or switch then you must use a patch or LAN cable If you are connecting direct between the DVR and a PC then you must use a crossover cable The patch cable connections are the same at both en...

Страница 68: ...68 ...

Страница 69: ...5 1 164 2 197 1 492 6 659 55 QCIF This DVR is capable of recording in QCIF QCIF is approximately one quarter of CIF so resolution is very low The storage space provided however is increased by four times and an estimate of record time in days can be calculated by multiplying the above CIF recording time by four SPECIAL NOTE The recording times stated above are only an estimated calculation based o...

Страница 70: ... 35 38 CAMERA RECORDING AREA DESELECT ALL DAY SET MOTION DET LEVEL 0 LOW 5 HIGH PRESS CONFIRM PRESS PTZ TO SELECT ALL OR PRESS A TO CLEAR ALL PRESS EDIT TO SETUP AREAS USE ARROW KEYS PRESS SAVE THEN CONFIRM AREA CONFIRM CAMERA CONFIRM PREVIEW SEQUENCING 37 DISPLAY SELECT PREVIEW SETUP PREVIEW SWITCH 1 4 CHANNEL SELECT SEQUENCING CONFIRM PREVIEW CONFIRM DISPLAY RECORDING SETUP 38 39 RECORDING RECOR...

Страница 71: ...UENCE STARTSEQ STOP RETURN ENTER PTZ CONTROL USE KEYS TO CREATE PATTERN THEN PRESS ENTER TO SAVE PATTERN RETURN CONFIRM PTZ RETURN UTILITIES 50 UTILITIES DEFAULT HARD DISK MANAGE REBOOT POWER OFF VIEW LOG SYSTEM INFO PRESS RESTORE HDD INFO FORMAT REBOOT POWER OFF VIEW LOG SYSTEM INFO USERNAME PASSWORD RIGHTS 25 29 PRESS MENU PASSWORD CHANGES LOCAL RIGHTS REMOTE RIGHTS VGA VIDEO MODE 29 DISPLAY VID...

Страница 72: ... Audio Output 1 ch RCA 600 ohms Audio Compression Ogg Vorbis Comms Interface 1 RJ45 10M 100M Ethernet Interface Talkback Function 2 way Talkback 2 way audio USB Interface USB1 1 supports memory stick USB HDD USB CD RW USB DVD RW VGA Interface Supports 800 600 60Hz 800 600 75Hz 1024 768 60Hz External Alarms In 4 alarm inputs Relay Output 1 alarm output HDD specs Internal SATA HDD Maximum 1 Tb Power...

Отзывы: