2
www.observint.com
Cover (captive)
screw (4)
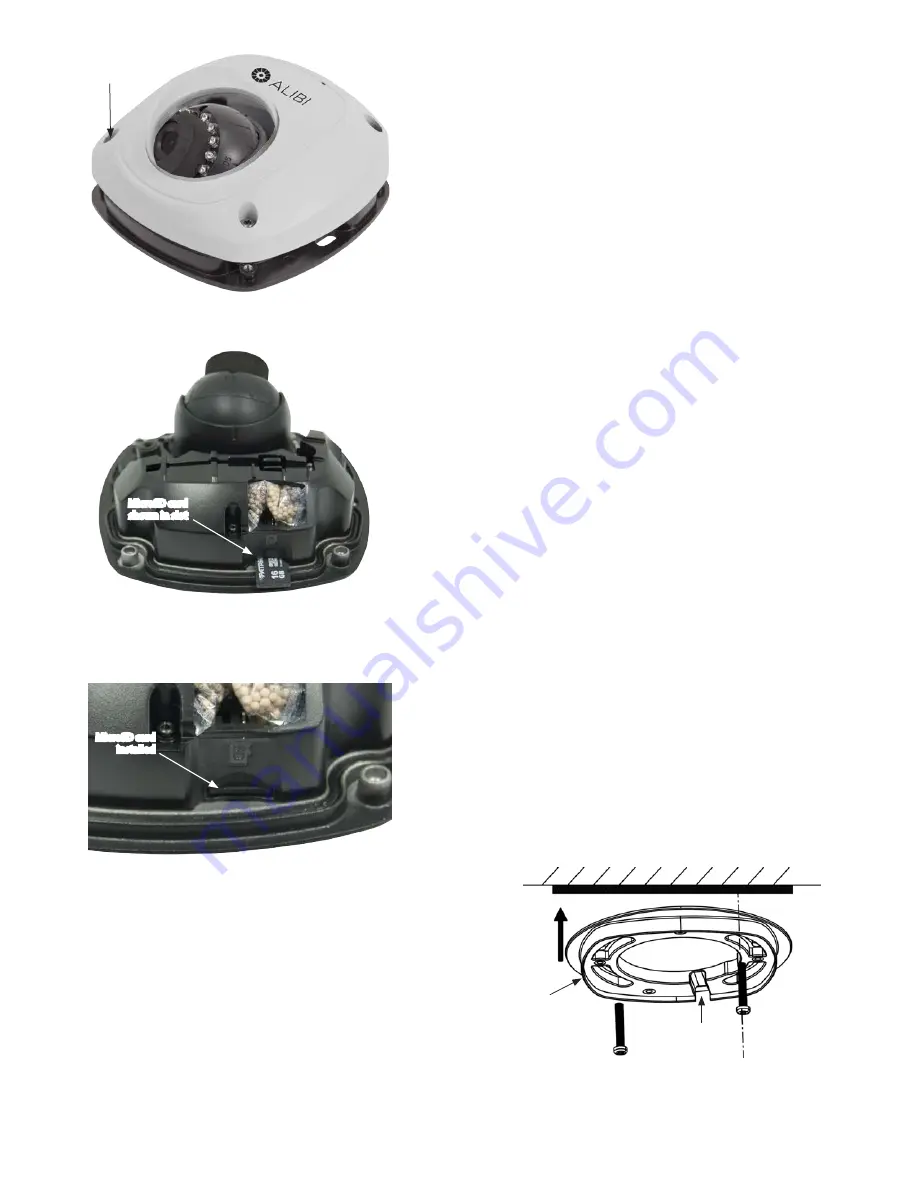
2. Insert a microSD card into the card slot as shown in the photo below. The label on the card should face
away from the mounting surface.
MicroSD card
shown in slot
Back of camera assembly
3. Push the MicroSD card into the slot as far as possible, and then release it. It should click into place
when fully inserted.
MicroSD card
installed
To remove the microSD card, push the card all the way in to release it from the connector, then lift it
out of the slot.
Step 2. Install the camera
Before installation:
•
Do not remove the plastic film that protects the clear plastic dome.
•
Make sure that the device is in good condition and all the assembly parts are included.
•
Check the specification of the products for the installation environment.
•
Make sure that the mounting surface is strong enough to hold 3 times the weight of the camera.
•
To avoid fire or shock hazard, use only UL listed power supplies. Verify that the power supply will
provide the rated voltage and wattage for the camera. See the
Specifications
section.
During installation:
•
Camera Lens
: Handle the camera carefully to prevent scratching or soiling the lens. If the lens or IR
array shield becomes soiled, clean it only with approved products. See the
Cleaning
section.
•
Camera drop cable
: The camera drop cable splits into three separate cables.
—
Ethernet RJ-45 connector cable
: For transmission of the video signal across a coax (75 Ω)
BNC extension cable.
—
Power connector cable:
When applying Vdc power, observe the power polarity. See the
picture above for connector polarity configuration. The camera can be powered using Power
over Ethernet (PoE)
—
Alarm I/O and audio out connectors cable
: Screw-down terminals are provided for alarm
input, alarm output, ground, and audio output.
1. Determine the method for mounting the camera considering:
—
The camera can be mounted in the following ways:
»
Directly to a ceiling, with the drop cable passing through the ceiling
»
To a ceiling using the adapter plate, with the drop cable passing through the side of the
plate.
»
To a 3-gang electrical box using the adapter plate. With this method, the camera drop cable
can attach to extension cables inside the box.
—
The camera lens adjustments allow a pan of ± 30
˚
, tilt of 0
˚
~ 75
˚
, and rotation of 0
˚
~ 360
˚
.
When mounting the camera, point it at your surveillance target.
—
The camera drop cable is 18" long.
2. Determine the best mounting hardware (screws, wall inserts) for the surface on which you will mount
the camera. The screws and wall inserts are adequate for many types of surfaces.
3. Mark the locations on the mounting surface for mounting screws and cable(s):
—
If mounting the camera directly to the surface (without the adapter plate):
i. Attach the drill template to the surface with the “Front” arrow pointing at your surveillance
target.
ii. Mark the location of the two mounting screw holes, and the hole for the drop cable.
—
If mounting the camera directly to the surface with the adapter plate:
i. Inspect the camera and the mounting plate to understand how they will attach to each other.
ii. Hold the adapter plate on the mounting surface, oriented so that the camera, when attached,
will point at its surveillance target.
iii. Mark the location of the mounting screw holes, and the hole for the drop cable where routing
the drop cable through the surface. Note that the drop cable can be routed through the cable
trough and out the side of the plate.
—
If mounting the camera, with the adapter plate, to a 3-gang box:
i. Inspect the camera the mounting plate and the gang box to understand how they will attach
to each other.
ii. Hold the gang box on the mounting surface, oriented so that the camera, when attached, will
point at its surveillance target.
iii. Mark the location of the mounting screw holes, and the hole for the extension cables into
the box.
4. Drill holes for the mounting screws and extension cables, as needed.
5. If installing the camera to the mounting surface with the adapter plate, attach the adapter plate to the
surface at this time.
Mounting
surface
Adapter plate
Cable channel
6. If installing the camera with an adapter plate and gang box, attach the gang box to the surface, and
then attach the adapter plate to the gang box.
© 2015 Observint Technologies. All rights reserved.


