

2
www.observint.com
6.
Anchor the mounting base to the ceiling with appropriate fasteners. If the camera drop cable will be
routed through a cable channel, make sure it is in place before securing the mounting plate to the
surface.
Cable channel (2)
7.
Connect the camera drop cable to video and power extension cables.
NOTE
: The ALI-CD1080P
camera includes a HD-TVI and CVBS BNC connectors.
8.
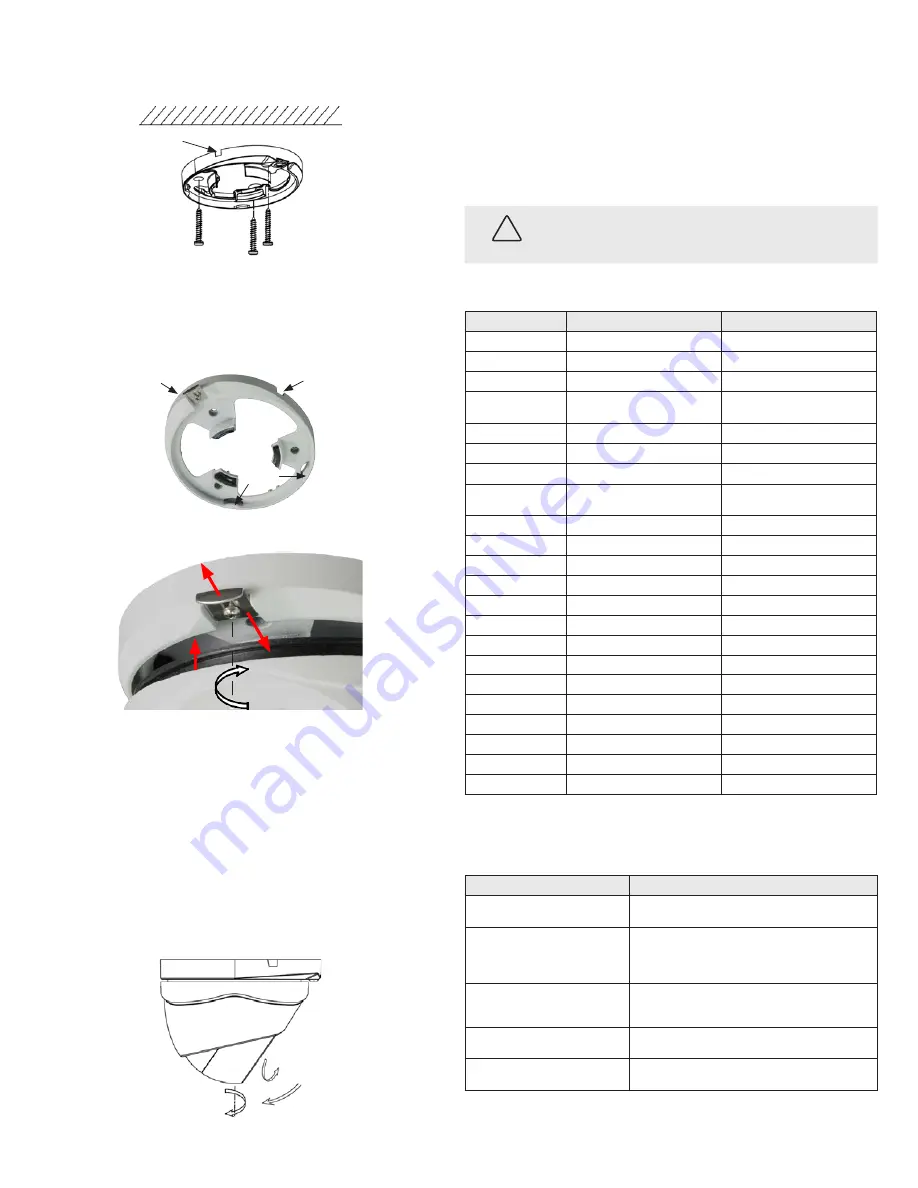
Reattach the camera to the mounting plate.
u
Position the camera assembly onto the mounting plate such that the lip on the black ring
attached to the enclosure slips under the tabs on the mounting plate.
Mounting plate
u
Tabs
Cable channel
v
Slide the clip plate out.
v
y
x
Clip Plate
Mounting plate
Enclosure
Push the enclosure into the mounting plate until it is fully seated.
x
Slide the clip plate in so that it catches the lip of the black ring on the encloser.
y
Tighten the clip plate screw until it is just snug.
9.
Connect the far end of the video extension cable to a monitoring device, such as a surveillance
monitor or digital video recorder (DVR).
10. Connect the far end of the power extension cable to a power supply, then apply power to the
camera through the power extension cable.
11. While observing video from the camera on a monitor, aim the camera at your surveillance target.
See the figure below for adjustment ranges.
Pan: 0 ~ 3600
Tilt: 0 ~ 900
Rotation: 0 ~ 750
Cleaning
Clean the camera dome with an approved glass cleaning solution and a lint free cloth.
•
Dust can be removed from the unit by wiping it with a soft damp cloth. To remove stains, gently rub
the surface with a soft cloth moistened with a mild detergent solution, then rinse and dry it with a
soft cloth.
•
Remove all foreign particles, such as plastic or rubber materials, attached to the camera housing.
These may cause damage to the surface over time.
CAUTION
Do not use benzene, thinner or other chemical products on the camera assembly; these may
dissolve the paint and promote damage of the surfaces. Before using any chemical product,
carefully follow the accompanying instructions.
Specifications
Model
ALI-CD1720P
ALI-CD1080P
Image Sensor:
1/3” CMOS
1/3” CMOS
Signal System:
NTSC
NTSC
Effective Pixels:
1280(H) × 720(V), 1.3 mega pixel
1920(H) × 1080(V), 2.1 mega pixel
Min. Illumination:
0.01 lux @ (F1.2, AGC on),
0 lux with IR
0.01 lux @ (F1.2, AGC on),
0 lux with IR
Shutter Time:
1/30 sec to 1/50,000 sec
1/30 sec to 1/50,000 sec
Digital Output:
HD-TVI (BNC)
HD-TVI (BNC)
Analog Output:
--
CVBS (BNC)
Lens:
3.6 mm
Viewing angle: 77°
3.6 mm
Viewing angle: 80°
Adjustment Range:
Pan: 0 ~ 360°, Tilt: 0 ~90°; Rotation 0 ~75°
Pan: 0 ~ 360°, Tilt: 0 ~90°; Rotation 0 ~75°
Day & Night:
True Day/Night (ICR)
True Day/Night (ICR)
Noise Reduction:
Yes, IR Smart
Yes, 3D-DNR (IR Smart)
Synchronization:
Internal synchronization
Internal synchronization
Video Output:
1 Vp-p composite output (75 Ω/BNC)
1 Vp-p composite output (75 Ω/BNC)
Dynamic Range:
> 52 dB
> 52 dB
Operating Conditions:
-40 °F ~ 140 °F (-40 °C ~ 60 °C)
-4 °F ~ 140 °F (-20 °C ~ 60 °C)
Humidity:
90% or less (non-condensing)
90% or less (non-condensing)
Power Supply:
12 Vdc ± 10%
12 Vdc ± 10%
Power Consumption:
3.5 W max.
4 W max.
Weather Proof:
IP66
IP66
IR Range:
up to 65 ft (20 m) approx.
up to 65 ft (20 m) approx.
Dimension:
Φ3.53" × 2.33" (Φ89.7 × 59.2 mm)
Φ3.53” × 2.33” (Φ89.7 × 59.2 mm)
Weight:
0.88 lbs (399 g)
0.88 lbs (399 g)
Troubleshooting
Problem
Possible Cause
Nothing appears on the screen
- Check the power connection.
- Check the video signal cable connection to the monitor.
The video image is dim or not clear.
- If the camera lens is dirty, clean it with a soft, clean cloth.
- Adjust the monitor controls, if necessary.
- If the camera is facing a very strong light, change the camera position.
- Adjust the lens focus.
The screen is dark.
- Adjust the contrast control of the monitor.
- If you have an intermediate device, set the impedance (75 Ω /Hi-Z)
properly, and check the cable connections.
The camera is not working properly and the
surface of the camera is hot.
- Verify that the camera is correctly connected to an appropriate regulated
power source.
The image on the monitor flickers
- Make sure that the camera isn’t facing direct sunlight or fluorescent light.
If necessary,change the camera position.
© 2014 Observint Technologies. All rights reserved.


