ALI GSDM002LP Скачать руководство пользователя страница 4

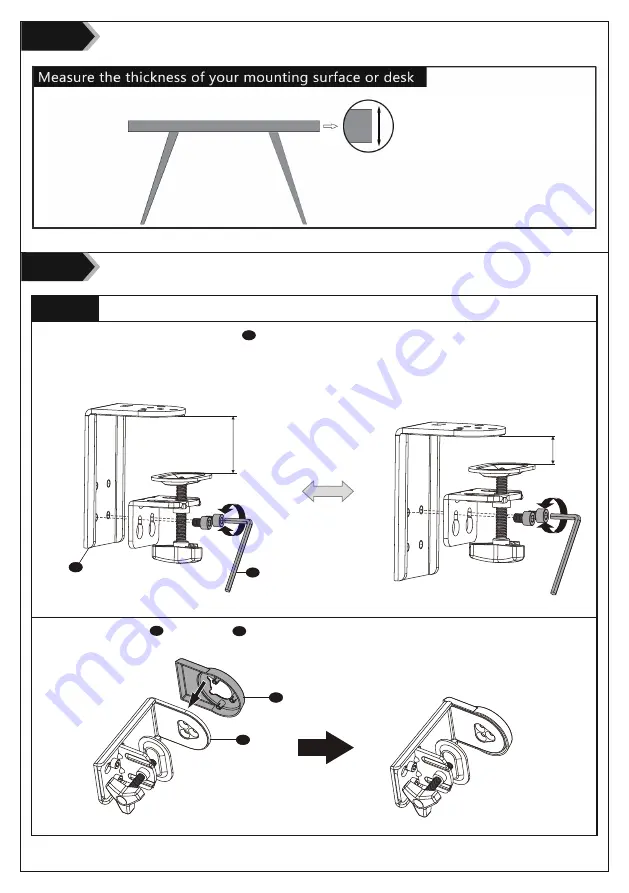
1. Loosen the screws using Allen Key 6mm      to adjust the preferred height range option and tighten the screws back.  

 2. Fix the Décor Cover      onto C-Clamp      .    

4

Step 1

Step 2

Q

F

G

C-clamp: Up to 3.1”

Grommet: Up to 1.6”

Option A

Clamp Installation

or

1.

4"

-3

.1

"

0.

4"

-1

.8

"

G

G

F

Q

Содержание GSDM002LP

Страница 1: ...TALLATION MANUAL support walielectric com 75x75 100x100 32 MAX 1 8kg 2 2 17 6lbs RATE D GSDM002LP 10 15 6 MAX 4 5kg 9 9lbs Laptop 1 8kg 2 2 17 6lbs RATE D 1 8kg 2 2 17 6lbs Monitor Dual Monitor Desk Mount ...

Страница 2: ...2 ...

Страница 3: ...K x3 Top Screw J x2 Tool Holder I x1 Allen Key 3mm P x1 Bottom Grommet Plate L x1 Top Grommet Plate O 1 Décor Cover N x1 Screw M x4 Laptop Tray holder C x1 Arm D x2 Cover E x2 Allen Key 6mm Q x1 X2 M4x12 Bolt M A x4 M4x16 Bolt M B x4 M5x12 Bolt M C x4 M5x16 Bolt M D x4 D5 Washer M E x4 Spacer M F x4 ...

Страница 4: ...en Key 6mm to adjust the preferred height range option and tighten the screws back 2 Fix the Décor Cover onto C Clamp 4 Step 1 Step 2 Q F G C clamp Up to 3 1 Grommet Up to 1 6 Option A Clamp Installation or 1 4 3 1 0 4 1 8 G G F Q ...

Страница 5: ...3 Place the Pole onto the top of C Clamp connect Pole and C Clamp from the bottom using Pole Screw and tighten with Allen Key 3mm 5 Step 2 Option A Clamp Installation H G H G H G K P K P ...

Страница 6: ... Pole Screw and tighten with Allen Key 3mm 1 Loosen the screws on C Clamp using Allen Key 6mm firstly then loosen the screw to release the hand knob using Screwdriver as shown in second image Screwdriver needed but not included Q G Hand knob G Q 6 Step 2 Option B Grommet Base Installation F H H O K P P O K F H ...

Страница 7: ...e knob clockwise to fasten for stability If the existing grommet hole comes with a plastic protector remove it to ensure a flat surface before installing the desk mount Place the assembled Pole onto the desk hole guide the Bottom Grommet Plate I through the hand knob Rotate the knob clockwise to fasten for stability L L 3a Existing Grommet Hole Installation Max 1 6 H Hand knob 7 Step 2 Step 3 A A ...

Страница 8: ... not included Select M4x16 Bolt M B or M5x16 Bolt M D according to your TV Monitor connect VESA Plate B together with D5 Washer M E M F the mounting holes on the back of TV Monitor tighten with screwdriver Screwdriver needed but not included Step 4 1 Select TV Screws Step 4 2 Select Spacers if needed B M E M E M C M A Hand thread screws into the threaded inserts on the back of your TV to determine...

Страница 9: ...ed with the square holes on the Arm d Option A Monitor mount with a laptop tray holder 9 Step 5 C D I E D D D D C C B J M 2 Put the assembled TV Monitor onto the Arm A and ensure the stability tighten the VESA plate using Top Screw G A J Attach the assembled Loptop Tray Holder C to the VESA plate B and tighten using Screws M B E E C ...

Страница 10: ...hrough the cable slot and slide the cover back to arm Pull the bottom cable slot cover to the VESA direction to detach it off the arm A J B Put the assembled TV Monitor onto the Arm d and ensure the stability tighten the VESA Plate B using Top Screw J A B J ...

Страница 11: ...lly swivel tilt or rotate the angle for the best operating environment Press the Arm A on horizontal level as image shown adjust gas spring tension to your personal preference using Allen Key 6mm adjust the tilt tension using Allen Key 6mm P 135 180 90 180 Q A Q Q Q ...

Страница 12: ...8537 support walielectric com If you have any questions please contact us We support the technology that brings your home to life We offer high quality products professional customer service and extensive technical support ...

Отзывы: