8
The automatic air-bleeding valve is installed on the pressure line, behind the frame of the cooktop. Its role is to remove air
from the boiler and lines.
The valve cap must be slightly unscrewed so that the air flows freely from the boiler and the lines.
10.6.
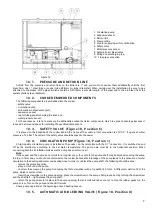
EXPANSION VESSEL (Figure 18, Position 2)
The cooker has an 8 liter expansion vessel installed. Its function is the stabilization of water pressure in the boiler and the
heating installation. The factory preset pressure in the vessel is 1 bar.
10.7.
TAP FOR FILLING AND DISCHARGING (Figure 18, Position 9)
The tap for filling and discharging is located in the lower part of the back side.
The inlet connector is R1/2’’ and the outlet connector has the hose extension joint.
10.8.
WATER PRESSURE SENSOR (Figure 18, Position 7)
This sensor measures the water pressure in the installation and this value can be read from the dashboard.
11.
FILLING THE INSTALLATIONS AND COMMISSIONING
Before starting fire in the boiler, the entire central heating system must be filled with water and well air-bleeded, and the
cooker must be properly connected to the chimney. We recommend operating water pressure from 1 to 1.9 bar, and it is best to
be within the limits of 1.2 to 1.6 bar. The installation test pressure can be up to 1.9 bar.
NOTE: The cooker should not be used without water. It must be connected to the installation to which consumers (radiators)
with a minimum power of 8 KW are connected.
12.
TIPS FOR THE USE OF THE HEATING SYSTEM
- All connections must be well sealed and tightened. There must be no leak of water.
- Before putting into operation, the complete installation should be tested with water at a maximum pressure of 1.9 bar.
- It is desirable to drain the water out of the system at least once due to the dirt that is in the system.
- Make sure all valves between the cooker and the installation are open.
- Make sure that all the air from the boiler and the installation is bleed before the boiler is put into operation. For these
reasons, the installation should be filled with water slowly so that all air can get out of the installation.
- During the ignition and cooling stage, parts of the cooker may expand and shrink, and a slight cracking sound may occur. It
is absolutely normal phenomenon and cannot be regarded as a deficiency.
Basic programming performed at the factory guarantees proper functioning of the cooker, while observing the advices given
in these instructions.
12.1.
COOKING, BAKING/ROASTING AND FRYING
During the heating season, the cooker is mainly used for heating, but also for cooking, baking/roasting and frying. Cooking
and frying on the cooktop can be done at any temperature and with any mode of operation.
For baking/roasting, the following must be done:
- set the temperature of water in the lines to 75°C. If the system cannot reach it, close some of the radiators to achieve it,
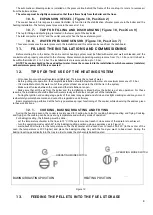
- turn the operating mode switch 90° to the baking/roasting position using a special key, as in Figure 19,
- wait about 30 minutes for the temperature on the thermometer at the oven door to reach 200-220
˚
(in the center of the
oven, the temperature is 20
˚
C higher) and place the baking/roasting tray with the food you want to bake/roast. During the
baking/roasting, periodically turn the tray in order to make the dish evenly baked/roasted.
Figure 19
13.
FEEDING THE PELLETS INTO THE FUEL STORAGE
OPERATING MODE SWITCH
OPERATING MODE SWITCH
BAKING/ROASTING POSITION
HEATING POSITION


