Alfano TYRECONTROL Скачать руководство пользователя страница 5


Copyright (2005 Alfano, S.A. All rights reserved). 

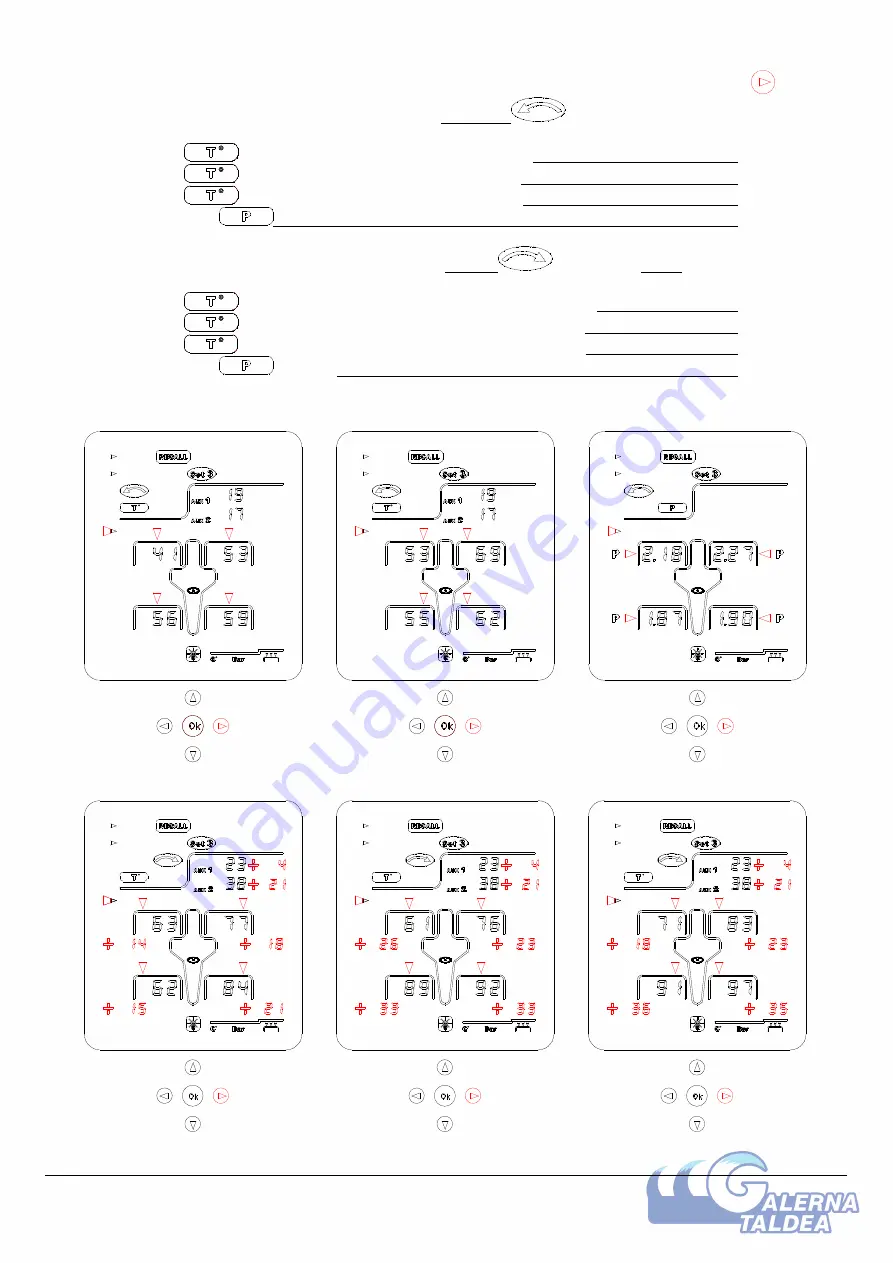
In  order  to  see  the  information  recorded  in  « SET3 », successively press the button 


First, the TYRECONTROL displays the data recorded BEFORE  

 the race, that is: 


1)  The 

 on the outside of the tyres + 2 AUX T° 


Figure 3 

2)  The 

 in the centre of the tyres + 2 AUX T° 


Figure 4 

3)  The 

 on the inside of the tyres + 2 AUX T° 


Figure 5 

4)  The tyre 


Figure 6 


Then, the TYRECONTROL displays the data recorded AFTER 

 the race + GAPS, that is: 

 
5)  The 

 on the outside of the tyres + 2 AUX T° + GAPS 


Figure 7 

6)  The 

 in the centre of the tyres + 2 AUX T° + GAPS 


Figure 8 

7)  The 

 on the inside of the tyres + 2 AUX T° + GAPS 


Figure 9 

8)  The tyre 

 + GAPS   


Figure 10 


Figure 4                                   Figure 5                                     Figure 6 


Figure 7                                   Figure 8                                     Figure 9 


Содержание TYRECONTROL

Страница 1: ...TYRECONTROL A 186 User Manual EN ...

Страница 2: ...recorded to the PC Replacing the batteries First switch off the device in order to avoid loss of data recorded Insert the two new batteries into the device properly and make sure the terminals and are aligned correctly Battery type 2 x AA Important It is imperative to use quality batteries manufactured by reputed brands in order to prevent battery leakage into the device A failure caused by the ba...

Страница 3: ...device is placed in the DIRECT mode when you activate the Tyrecontrol This option consists in quickly measuring the Pressure or the Temperature First the TYRECONTROL displays the Pressure Apply the pipette of the device in the valve of the tyre the TYRECONTROL will display its pressure NOTE You can reduce the tyre pressure by activating the TYRECONTROL valve To measure the temperature press the bu...

Страница 4: ...ecorded AFTER the race Each part may contain o 1 or 3 temperatures for each tyre or o 1 pressure for each tyre o 2 auxiliary temperatures found for instance on the asphalt air etc Finally the TYRECONTROL displays the gap difference between the values BEFORE and AFTER the race Example I would like to view the data recorded in Set 3 Using the 4 buttons select the following icons 1 RECALL Figure 1 2 ...

Страница 5: ...ure 3 2 The in the centre of the tyres 2 AUX T Figure 4 3 The on the inside of the tyres 2 AUX T Figure 5 4 The tyre Figure 6 Then the TYRECONTROL displays the data recorded AFTER the race GAPS that is 5 The on the outside of the tyres 2 AUX T GAPS Figure 7 6 The in the centre of the tyres 2 AUX T GAPS Figure 8 7 The on the inside of the tyres 2 AUX T GAPS Figure 9 8 The tyre GAPS Figure 10 Figure...

Страница 6: ...o To go backwards press the button o To choose another Set press the button and then the buttons This option consists in deleting the data of each Set Using the 4 buttons select the icon RESET and the icon Set desired Next press the button OK during 2 seconds ...

Страница 7: ...res before the race Step 3 Record the Temperatures after the race Step 4 Record the Pressures after the race The order of the steps may be different Example I would like to record on Set5 the Temperatures BEFORE the race Step NOTE in this example the data were previously deleted Using the 4 buttons select 1 REC Figure 13 2 Set5 Figure 14 3 PREVIOUS Figure 15 4 TEMPERATURE Figure 16 5 CAR Figure 17...

Страница 8: ...rear tyre of the car as indicated on the TYRECONTROL display 2 Wait until the temperature becomes stable 3 Press the button OK to confirm the recording Figure 18 After each capture the TYRECONTROL automatically moves to the next position Just follow the TYRECONTROL display In this case it moves to the centre of the tyre Figure 18 Figure 18 ...

Страница 9: ...o or do the capture again with the button It is possible to record 2 auxiliary temperatures in order to do it move the arrow on AUX1 or AUX2 and confirm the capture by pressing the button OK To exit recording move the arrow on EXIT and press the button OK Figure 19 Figure 19 Next the arrow is placed in front of the icons in order to quickly choose the next step Figure 20 Figure 20 ...

Страница 10: ...This option consists in transferring the 5 SET recorded to the PC 1 Select the icon 2 The download command must be done from the VISUALDATA This option consists in switching off the TYRECONTROL 1 Select the icon 2 Press the button OK or wait 3 seconds ...

Страница 11: ... placed on the temperature unit C F Using the buttons and select the desired unit Confirm the selected unit with the button Next the TYRECONTROL is placed on the pressure unit BAR PSI Using the buttons and select the desired unit Confirm the selected unit with the button Finally the TYRECONTROL is placed on the icon that represents a tyre in order to select the number of temperature captures for e...

Страница 12: ...progressively increasing or decreasing degree by degree the displayed temperature First place about 1 hour the Tyrecontrol and the sensor in a place where the temperature is steady Then compare the temperature displayed in the Tyrecontrol with a thermometer of quality placed close by Finally if necessary modify the temperature displayed on the Tyrecontrol with the help of the buttons Confirm the c...

Страница 13: ...r warranty extension Intervention under warranty is carried out at one of our approved after sales service centres or at our head office In the latter case the item must reach our establishment postage paid that is transport costs shall be paid by the user The manufacturer undertakes no responsibility for any damage to persons or goods caused by poor installation or incorrect use of the device Alf...

Страница 14: ...Copyright 2005 Alfano S A All rights reserved 14 ALFANO S A Rue de l Industrie 3b 1400 NIVELLES BELGIUM www alfano com ...

Отзывы: