Alfa Network AIP-W525H Скачать руководство пользователя страница 33


AIP-W525H 


- 28 - 

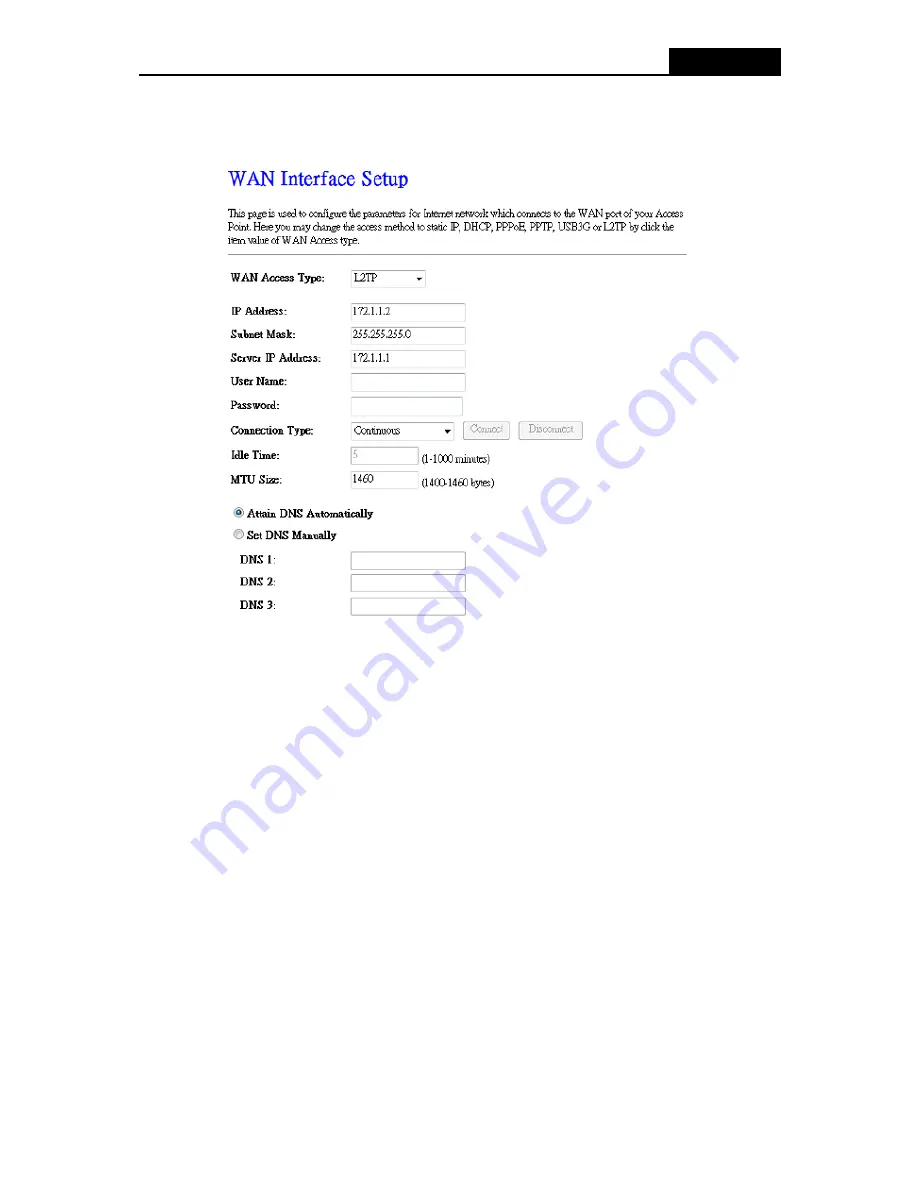
5.  If  your  ISP  provides  L2TP  connection,  please  select 

L2TP

  option.  Enter  the  following 

parameters (Figure 4-12): 


Figure 4-12 L2TP Settings 


User Name/Password  -

 Enter  the User  Name  and  Password  provided by  your  ISP.  These 

fields are case-sensitive. 


Dynamic IP/ Static IP -

 Choose either as you are given by your ISP. Click the 

Connect

 button 

to connect immediately. Click the 

Disconnect

 button to disconnect immediately. 


Connection Type 

– 


Connect on Demand -

 You can configure the Router to disconnect from your Internet 

connection  after  a  specified  period  of  inactivity  (

Max  Idle  Time

).  If  your  Internet 

connection  has  been  terminated  due  to  inactivity, 

Connect  on  Demand

  enables  the 

Router to automatically re-establish your connection as soon as you attempt to access 

the Internet again. If you wish to activate 

Connect on Demand

, check the radio button. 

If you want your Internet connection to remain active at all times, enter 0 in the 

Max Idle 

Time

  field.  Otherwise,  enter  the  number  of  minutes  you  want  to  have  elapsed  before 

your Internet connection terminates. 


Continuous -

 Connect automatically after the Router is disconnected. To use this option, 

check the radio button. 

Содержание AIP-W525H

Страница 1: ...AIP W525H Rev 1 0 0...

Страница 2: ...radio TV technician for help This device complies with part 15 of the FCC Rules Operation is subject to the following two conditions 1 This device may not cause harmful interference 2 This device mus...

Страница 3: ...tdoor use and public service France Outdoor use limited to 10 mW e i r p within the band 2454 2483 5 MHz Military Radiolocation use Refarming of the 2 4 GHz band has been ongoing in recent years to al...

Страница 4: ...rements 6 2 3 Connecting the Router 6 Chapter 3 Quick Installation Guide 8 3 1 TCP IP Configuration 8 3 2 Quick Installation Guide 10 Chapter 4 Configuring the Router 16 4 1 Login 16 4 2 Status 16 4 3...

Страница 5: ...47 4 7 6 DMZ 47 4 7 7 VLAN 48 4 8 QoS 49 4 9 Management 49 4 9 1 Status 50 4 9 2 Statistics 50 4 9 3 DDNS 51 4 9 4 Time Zone Setting 52 4 9 5 Denial of Service 53 4 9 6 Log 54 4 9 7 Upgrade Firmware 5...

Страница 6: ...ollowing items should be found in your package AIP W525H Power Adapter Quick Installation Guide Note Make sure that the package contains the above items If any of the listed items are damaged or missi...

Страница 7: ...encryption Wi Fi protected Access WPA2 PSK WPA PSK as well as advanced Firewall protections The AIP W525H provides complete data privacy AIP W525H Router provides flexible access control for parents a...

Страница 8: ...upports Virtual Server Special Application and DMZ host Supports UPnP Dynamic DNS Static Routing Provides Automatic connection and Scheduled Connection to the Internet on specified times Connects Inte...

Страница 9: ...ut there is no activity Flashing There is an active device linked to the corresponding port WPS Slow Flash A wireless device is connected to the network by WPS function This process will last for abou...

Страница 10: ...ght POWER The Power socket is where you will connect the power adapter Please use the power adapter provided with the AIP W525H WAN The WAN port is where you will connect the DSL cable Modem or Ethern...

Страница 11: ...e installing the Router make sure your PC is connected to the Internet through the broadband service successfully If there is any problem please contact your ISP Install the Router according to the fo...

Страница 12: ...AIP W525H 7 7 Turn the power on for your PC and Cable DSL Modem Figure 2 1 Hardware Installation of the AIP W525H...

Страница 13: ...2 Configure the network parameters The IP address is 192 168 2 xxx xxx represents any number from 2 to 254 Subnet Mask is 255 255 255 0 and Gateway is 192 168 2 1 The Router s default IP address Obtai...

Страница 14: ...of Ping command To check the connection follow these steps 1 Is the connection between your PC and the Router correct Note The 1 2 3 4 LEDs of LAN ports which you link to on the Router and LEDs on yo...

Страница 15: ...net Explorer Mozilla Firefox or Apple Safari 1 To access the configuration utility open a web browser and type in the default address http 192 168 2 1 in the address field of the browser Figure 3 3 Lo...

Страница 16: ...o connect to the Internet It s recommended that you make use of the Gateway function If you are sure of what kind of connection type your ISP provides you can select the very type and click Next to go...

Страница 17: ...e the cable is securely plugged into the WAN port before continuing a If the connection type is PPPoE then select it from drop down menu as shown below Enter the User Name and Password provided by you...

Страница 18: ...the next screen will appear as shown in Figure 3 10 Figure 3 10 Quick Setup Static IP IP Address This is the WAN IP address as seen by external users on the Internet including your ISP Enter the IP ad...

Страница 19: ...the drop down menu to select it SSID Create a unique and easy way to remember the name of your wireless network You can also keep default settings without the device being affected Channel Width Selec...

Страница 20: ...ared passphrase PSK Password You can enter ASCII or Hexadecimal characters For ASCII the key can be made up of any numbers from 0 to 9 and any letters from A to Z the length should be between 8 and 63...

Страница 21: ...u will see the seven main menus on the left hand side of the Web based utility On the right there are corresponding explanations and instructions Figure 4 1 the main menu The detailed explanations for...

Страница 22: ...r to Section 3 2 Quick Installation Guide 4 4 WPS This section will help guide you into adding a new wireless device to an existing network quickly with the WPS Wi Fi Protect Setup function a Choose W...

Страница 23: ...ice If the wireless adapter supports Wi Fi Protected Setup WPS you can establish a wireless connection between the wireless adapter and Router using either Push Button Configuration PBC method or PIN...

Страница 24: ...AIP W525H 19 Step 2 Press Start PBC button on your Router for authentication Step 3 Wait for a minute then you ll discover your AWUS036NHR is connected to AIP W525 automatically...

Страница 25: ...to configure the corresponding function 4 5 1 LAN Choose menu TCP IP Settings LAN to configure the IP parameters of the LAN on the screen as shown below Figure 4 6 LAN Interface IP Address Enter the I...

Страница 26: ...ent Range Fill in the start IP address and end IP address to allocate a range of IP addresses client with DHCP function set will be assigned an IP address automatically Show Client Press open to activ...

Страница 27: ...IGMP Proxy Click the checkbox to enable IGMP proxy Enable Ping Access on WAN Click the checkbox to enable WAN IGMP response Enable Web server Access on WAN Click the checkbox to enable web configurati...

Страница 28: ...Enter one or two DNS addresses in dotted decimal notation provided by your ISP Click the Apply Changes button to save your settings 2 If your ISP provides the DHCP service please choose DHCP Client t...

Страница 29: ...configured unless you are sure it is necessary for your ISP In most cases leaving these fields blank Connection Type Continuous Continuous connection type means to setup the connection through PPPoE p...

Страница 30: ...ss disconnects MTU Size The default MTU size is 1480 bytes It is not recommended that you change the default MTU Size unless required by your ISP Attain DNS Automatically Receives DNS address automati...

Страница 31: ...your ISP Click the Save button Click the Connect button to connect immediately Click the Disconnect button to disconnect immediately Connection Type Connect on Demand You can configure the Router to...

Страница 32: ...net connection You will not be able to re establish your connection automatically when attempting to access the Internet again To use this option click the radio button If you want your Internet conne...

Страница 33: ...to disconnect from your Internet connection after a specified period of inactivity Max Idle Time If your Internet connection has been terminated due to inactivity Connect on Demand enables the Router...

Страница 34: ...nternet again To use this option check the radio button If you want your Internet connection to remain active at all times enter 0 in the Max Idle Time field Otherwise enter the number of minutes that...

Страница 35: ...ttings Advanced Settings Security Access Control WDS Setting Site Survey WPS and Schedule Click any of them and you will be able to configure the corresponding function 4 6 1 Basic Settings Choose men...

Страница 36: ...The same name of SSID Service Set Identification must be assigned to all wireless devices in your network Considering your wireless network security Channel width Select the channel width from the pu...

Страница 37: ...ID for Extended Interface Assign a SSID when Universal Repeater Mode is enabled 4 6 2 Advanced Settings Choose menu Wireless Security you can configure the security settings of your wireless network F...

Страница 38: ...tings of your wireless network There are four wireless security modes supported by the Router WEP Wired Equivalent Privacy WPA Wi Fi Protected Access WPA2 Wi Fi Protected Access 2 WPA Mixed Pre Shared...

Страница 39: ...y function will still be disabled even if you have selected Shared Key as Authentication Type Key Format Hexadecimal and ASCII formats are provided here Hexadecimal format stands for any combination o...

Страница 40: ...UTO if both encryptions are checked Pre Shared Key Format You can enter chose either Passphrase 8 63 characters or HEX 64 Characters Pre Shared Key Enter the matching WEP key you created Make sure the...

Страница 41: ...f both encryption is checked Pre Shared Key Format You can enter either Passphrase 8 63 characters or HEX 64 Characters Pre Shared Key Enter the matching WEP key that you ve create Make sure these val...

Страница 42: ...t as the Authentication Type you can select either TKIP or AES as Encryption Pre Shared Key Format You can enter either Passphrase 8 63 characters or HEX 64 Characters Pre Shared Key Enter the matchin...

Страница 43: ...MAC Address click Allow Listed or prohibited wireless users by MAC Address by click Deny Listed The default setting is Disable MAC Address The wireless station s MAC address that you want to filter Co...

Страница 44: ...wireless station s MAC address that you want to add Data Rate Select transmission data rate from the drop down menu Data rate can be auto selected 1Mbps to 54Mbps or MCS Set Security There are two wi...

Страница 45: ...ted or 13 ASCII characters Encryption Key Select which of the four keys will be used and enter the matching WEP key that you create Make sure these values are identical on all wireless stations in you...

Страница 46: ...SID of the AP your Router is going to connect to as a client You can also use the search function to select the BSSID to join Channel This field displayed operating frequency of the AP your Router is...

Страница 47: ...ration utility or on the adapter itself Press the Start PIN button on the router and on the adapter Note You will have two minutes to push the PIN button on the router and device s you want to connect...

Страница 48: ...AIP W525H 43 4 6 8 Schedule Choose menu Wireless Schedule time period allowed for the PC controlled to access the Internet Figure 4 25 Schedule...

Страница 49: ...ring Choose menu Firewall Port Filtering you can control the wireless access by configuring the Port Filtering function as shown in Figure 4 27 Figure 4 27 Port Filtering Enable Port Filtering Check t...

Страница 50: ...IP address that you wish to put restriction and mark your comment to remind you why you have restriction on this IP address You can restrict the traffic from TCP UDP or both protocol Be sure to click...

Страница 51: ...4 30 Figure 4 30 MAC Filtering Enable Port Forwarding Check to Enable port forwarding feature IP Address Forward data packets to specific IP address in your local area network Protocol The protocol u...

Страница 52: ...ings on this page 4 7 6 DMZ Choose menu Firewall DMZ you can view and configure DMZ host in the screen as shown in Figure 4 32 The DMZ host feature allows one local host to be exposed to the Internet...

Страница 53: ...not work 4 7 7 VLAN Choose menu Firewall VLAN if you want to configure the Guest and Internal networks on VLAN the switch you are using must support VLAN As a prerequisite step configure a port on the...

Страница 54: ...anagement menu There are nine submenus under the Management menu as shown in Figure 4 35 Status Statists DDNS Time Zone Setting Denial of Service Log Upgrade Firmware Save Reload Setting and Password...

Страница 55: ...ent Status display the current status of AIP W525H as shown in Figure 4 39 Figure 4 35 Status 4 9 2 Statistics Choose menu Management Statistics you can view the network traffic on the Router as shown...

Страница 56: ...ess is Before using this feature you need to sign up for DDNS service providers such as www dyndns org or TZO The Dynamic DNS client service provider will give you a password or key If the dynamic DNS...

Страница 57: ...omputer Time Zone Select select the time zone Enable NTP client update click to enable the NTP client update Note 1 This setting will be used for some time based functions such as firewall You must sp...

Страница 58: ...when the Enable DoS Preventation in Management DoS is enabled as shown in Figure 4 43 Figure 4 43 DoS Denial of Service protection Check the Enable or Disable button to enable or disable the DoS prot...

Страница 59: ...stem all Display all the log file on the Router Wireless Display just the wireless log on the Router DoS Display just Denial of Service log on the Router Enable Remote Log Click to enable remote log s...

Страница 60: ...Upgrade button Note 1 New firmware versions are posted at our website and can be downloaded for free There is no need to upgrade the firmware unless the new firmware has a new feature you want to use...

Страница 61: ...e 4 46 Backup Restore Configuration Click the Save button to save all configuration settings as a backup file in your local computer To upgrade the Router s configuration follow these instructions Cli...

Страница 62: ...gure 4 47 Figure 4 47 Password It is strongly recommended that you should change the factory default user name and password of the Router because all users who try to access the Router s Web based uti...

Страница 63: ...d field finish by clicking Connect Figure A 1 PPPoE Connection Type 2 How do I configure the Router to access the Internet by Ethernet users 1 Log in to the Router click the TCP CP Settings menu on th...

Страница 64: ...necessary 1 Configure TCP IP component 1 On the Windows taskbar click the Start button and then click Control Panel 2 Click the Network and Internet Connections icon and then click on the Network Con...

Страница 65: ...e the PC and Router may need to be restarted Setting IP address manually 1 Select Use the following IP address radio button And the following items available 2 If the Router s LAN IP address is 192 16...

Страница 66: ...AIP W525H 61 Figure B 4 Now click OK to keep your settings...

Страница 67: ...EDs PWR SYS WLAN WAN LAN 1 4 WPS Safety Emissions FCC CE Wireless Frequency Band 2 4 2 4835GHz Radio Data Rate 11n up to 300Mbps Automatic 11g 54 48 36 24 18 12 9 6M Automatic 11b 11 5 5 2 1M Automati...

Страница 68: ...or videoconferencing DNS Domain Name System An Internet Service that translates the names of websites into IP addresses Domain Name A descriptive name for an address or group of addresses on the Inte...

Страница 69: ...name for the 802 11b wireless networking standard given by the Wireless Ethernet Compatibility Alliance WECA see http www wi fi net an industry standards group promoting interoperability among 802 11...

Отзывы: