background image


 TOP PANEL OVERVIEW 

 
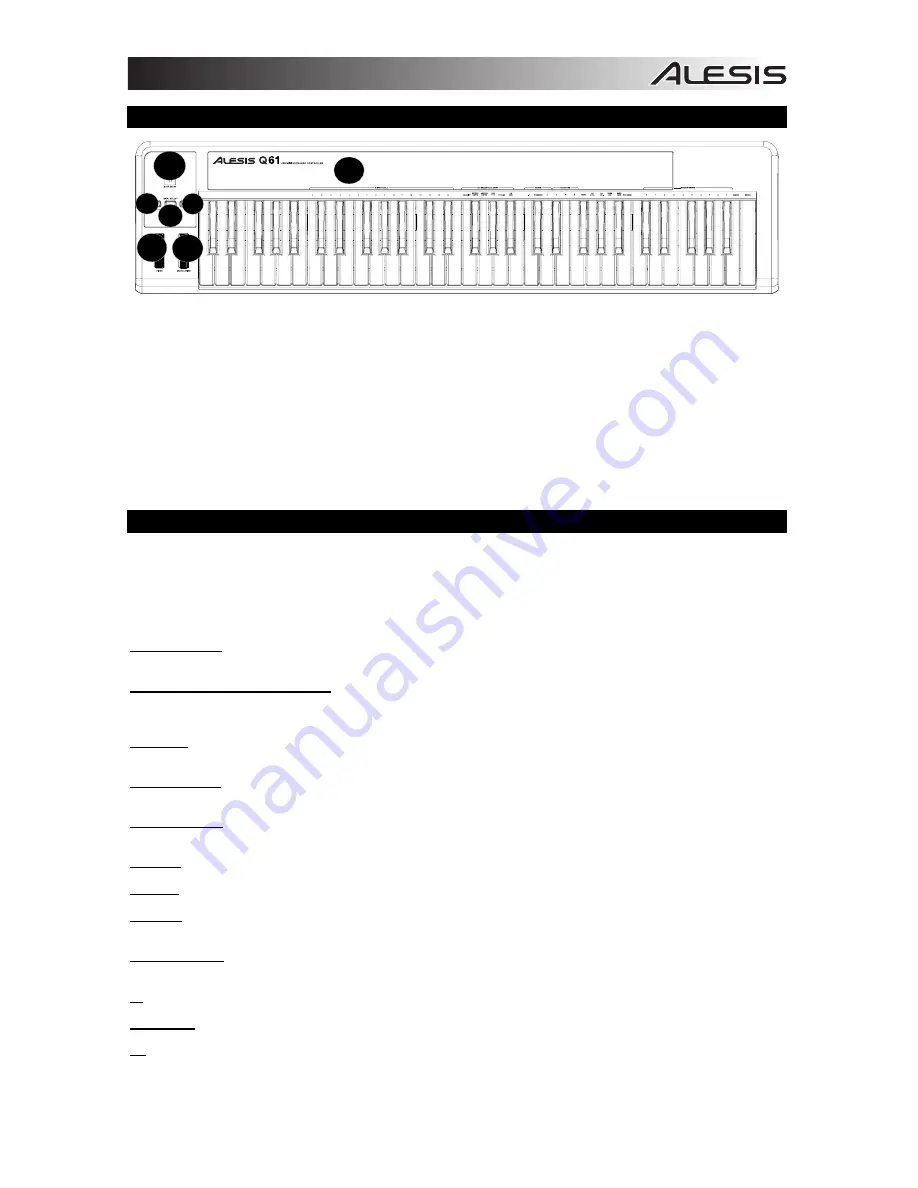
1. 

KEYBOARD –

 The KEYBOARD functions as a normal electronic piano keyboard during performance but can also be 

used to adjust MIDI settings and send MIDI messages. The labels above the keys indicate their functions. The 
numbered keys allow you to enter values for settings.  Press the Cancel or Enter key to cancel or confirm your selection, 
respectively.  See SELECTING & EDITING MIDI COMMANDS for more information. 

2. 

     PITCH BEND WHEEL – 

Transmits MIDI Pitch Bend information to raise or lower the pitch of a note temporarily.  


3. 

     MODULATION WHEEL – 

This wheel can be used to transmit continuous controller data (CC #1 – Modulation). 


4. 

DATA ENTRY SLIDER

 – This slider lets you send MIDI messages for the currently selected parameter from the 

KEYBOARD (e.g., REVERB DEPTH, VOLUME, etc.).  You can select a parameter by pressing MIDI / SELECT then the 
corresponding key on the KEYBOARD. 

5. 

MIDI / SELECT –

 Pressing this button allows you to adjust MIDI settings and send MIDI messages by pressing labeled 

keys on the KEYBOARD.  See SELECTING & EDITING MIDI COMMANDS for more information. 

6. 

     OCTAVE UP / DOWN – 

These buttons can be used to shift the keyboard's range up and down

.  


 SELECTING & EDITING MIDI COMMANDS 


The MIDI / SELECT button and the keys on the KEYBOARD allow you to adjust MIDI parameters and send precise MIDI 
messages and information quickly and easily: 
1. 

Press MIDI / SELECT. 

2. 

Press the key on the KEYBOARD whose MIDI setting (printed above the key) you want to adjust or send. 

3. 

Enter a value with the numbered keys on the KEYBOARD. 

4. 

Press the Enter or Cancel key on the KEYBOARD to confirm or cancel your choice, respectively. 

 
MIDI CHANNELS – 

Selects the MIDI channel (1-16) over which the Q61 will transmit MIDI messages.  The default is Channel 

1. 
 

ASSIGNMENT DATA ENTRY GROUP 

These parameters change the MIDI command sent by the Data Entry Slider. To change the Values, press the 
MIDI/SELECT button, then press the corresponding Key. Press the MIDI/Select Button to exit. 

 
VELOCITY – 

Press this key to set the DATA ENTRY SLIDER to adjust the note velocity.  Increasing this value increases the 

MIDI velocity value generated by a light key press.   

 
REVERB DEPTH – 

Press this key to set the DATA ENTRY SLIDER to CC #91 (Reverb Send Level).  The default value for this 

setting is 64.


CHORUS DEPTH – 

Press this key to set the DATA ENTRY SLIDER to CC #93 (Chorus Send Level).  The default value for this 

setting is 64.


PAN POT 

– Press this key to set the DATA ENTRY SLIDER to CC #10 (Pan).  The default value is 64 (center).  

 
VOLUME – 

Press this key to set the DATA ENTRY SLIDER to CC #7 (Channel Volume). 


CC DATA – 

Press this key to set the DATA ENTRY SLIDER to the CC# designated by the CC NO. control. 


OCTAVE GROUP -  

These parameters change the octave range of the keyboard.  

 
-1 – 

Lowers the octave range of the keyboard by one octave. 


STANDARD- 

Sets the octave range to the default value with the first key being C0.


+1 – 

Raises the octave range of the keyboard by one octave. 


1

2

3

4

5

6

6

Содержание Q61

Страница 1: ...Q61 QUICKSTART GUIDE ENGLISH 2 5 GU A DE INICIO R PIDO ESPA OL 6 9 GUIDE D UTILISATION RAPIDE FRAN AIS 10 13 GUIDA RAPIDA ITALIANO 14 17 KURZANLEITUNG DEUTSCH 18 21...

Страница 2: ...Plug in a 9V DC 500mA power adapter center positive 5 46mm barrel diameter sold separately if you do not wish to power the Q61 through the USB connection 2 USB CONNECTION Plug a standard USB cable in...

Страница 3: ...CT 2 Press the key on the KEYBOARD whose MIDI setting printed above the key you want to adjust or send 3 Enter a value with the numbered keys on the KEYBOARD 4 Press the Enter or Cancel key on the KEY...

Страница 4: ...s USB connection to confirm that the Q61 is recognized If necessary replug the connection and restart your computer No sound from target device Q61 not properly connected If controlling an external h...

Страница 5: ...OWER USB 9V DC 500mA center positive 5 46mm barrel diameter sold separately KEYBOARD 61 keys ACCESSORIES Quickstart Guide USB cable MIDI OUTPUTS 1 5 pin jack USB 1 slave connector MIDI over USB http w...

Страница 6: ...TRASERO 1 ENTRADA DEL ADAPTADOR DE ALIMENTACI N DE CC Para enchufar un adaptador de alimentaci n de 9 V CC 500 mA centro postigo di metro 5 46mm vendido por separado si no desea alimentar el Q61 a tra...

Страница 7: ...r pida y f cilmente 1 Pulse MIDI SELECT 2 Pulse la tecla del TECLADO cuyo par metro MIDI impreso arriba de la tecla desea ajustar o enviar 3 Introduzca un valor con las teclas numeradas del TECLADO 4...

Страница 8: ...necesario enchufe nuevamente la conexi n y reinicie la computadora Q61 conectado incorrectamente Si est controlando un m dulo de hardware externo aseg rese de que el cable MIDI est conectado del Q61 a...

Страница 9: ...MENTACI N USB 9 V CC 500 mA centro positive di metro 5 46mm vendido por separado TECLADO 61 teclas ACCESORIOS Gu a de inicio r pido cable USB SALIDAS MIDI 1 jack a 5 pines USB 1 conector esclavo MIDI...

Страница 10: ...ARRI RE 1 ENTR E D ALIMENTATION Branchez un adaptateur 9 V c c 500 mA centre positif diam tre 5 46mm vendu s par ment si vous ne d sirez pas alimenter le Q61 via la connexion USB 2 CONNEXION USB Branc...

Страница 11: ...param tre MIDI identifi e au dessus de la touche que vous d sirez modifier ou envoyer 3 Entrez la valeur l aide des touches num riques du clavier 4 Appuyez sur la touche Enter ou Cancel du clavier af...

Страница 12: ...IDE DE D PANNAGE PROBL ME CAUSE SOLUTION V rifiez les connexions USB de votre ordinateur pour vous assurer que le Q61 est reconnu par votre ordinateur Il peut s av rer n cessaire de d brancher puis re...

Страница 13: ...QUE USB 9 V c c 500 mA centre positif diam tre 5 46mm vendu s par ment CLAVIER 61 touches ACCESSOIRES Guide d utilisation simplifi c ble USB SORTIES MIDI 1 entr e cinq broches USB 1 connecteur esclave...

Страница 14: ...C Inserire un adattatore di alimentazione CC da 9V 500mA positivo centrale diametro 5 46mm venduto separatamente nel caso in cui non si desideri alimentare il Q61 tramite il collegamento USB 2 PORTA U...

Страница 15: ...di regolare i parametri MIDI e di inviare messaggi MIDI precisi e informazioni in maniera semplice e rapida 1 Premere MIDI SELECT 2 Premere il tasto della TASTIERA la cui impostazione MIDI stampata su...

Страница 16: ...nge Data Invia un messaggio CC al numero di CC designato dalla funzione CC NO n CC Premendo il tasto Invio verr inviato un messaggio MIDI CC NO Control Change Number Imposta il MIDI CC n CC MIDI da in...

Страница 17: ...e alle impostazioni MIDI tramite il menu Preferences dell applicazione Nessun suono dal dispositivo target Il canale MIDI del Q61 non lo stesso del canale MIDI in ingresso dell applicazione Assicurars...

Страница 18: ...OMADAPTER Zum Anschluss eines 9V Gleichstromadapters center positive mit 500mA 5 46mm Durchmesser separat erh ltlich falls das Q61 nicht ber den USB Anschluss mit Strom gespeist werden soll 2 USB ANSC...

Страница 19: ...KEYBOARDS k nnen zur Einstellung der MIDI Parameter und zum leichten und schnellen Senden von MIDI Meldungen und Informationen verwendet werden 1 MIDI SELECT Taste dr cken 2 Auf dem KEYBOARD die Tast...

Страница 20: ...er die Notenverlagerung des KEYBOARDS nicht ANDERE EINSTELLUNGEN UND BEFEHLE Diese Einstellungen und Befehle legen verschiedene Parameter fest und senden MIDI Befehle CC DATEN Control Change Data Send...

Страница 21: ...hnlich ber das Einstellungs oder Optionsmen des Programms zugegriffen werden Kein Sound vom Zielger t MIDI Kanal am Q61 und MIDI Eingangskanal des Programms stimmen nicht berein berpr fen dass das Q6...

Страница 22: ...No No No No No No Note On Velocity Yes No Note Off Velocity No No Channel Aftertouch Yes No Via data slider when assigned Poly Key Aftertouch No No Pitch Bend Yes No Active Sensing No No System Reset...

Страница 23: ......

Страница 24: ...www alesis com 7 51 0376 A...

Отзывы: