background image

switched OFF using the POWER button CLOCK will 
still remain running, however if the adaptor is 
unplugged or switched OFF you  have to reset the 
CLOCK time again.

Exit: 

Exit Clock Application.

6.Alarm Menu

Select [Alarm] icon by navigator key in the main menu and 
press                  (on the photo frame) or       (on the remote 
control) to proceed, the LCD screen will show as


below:

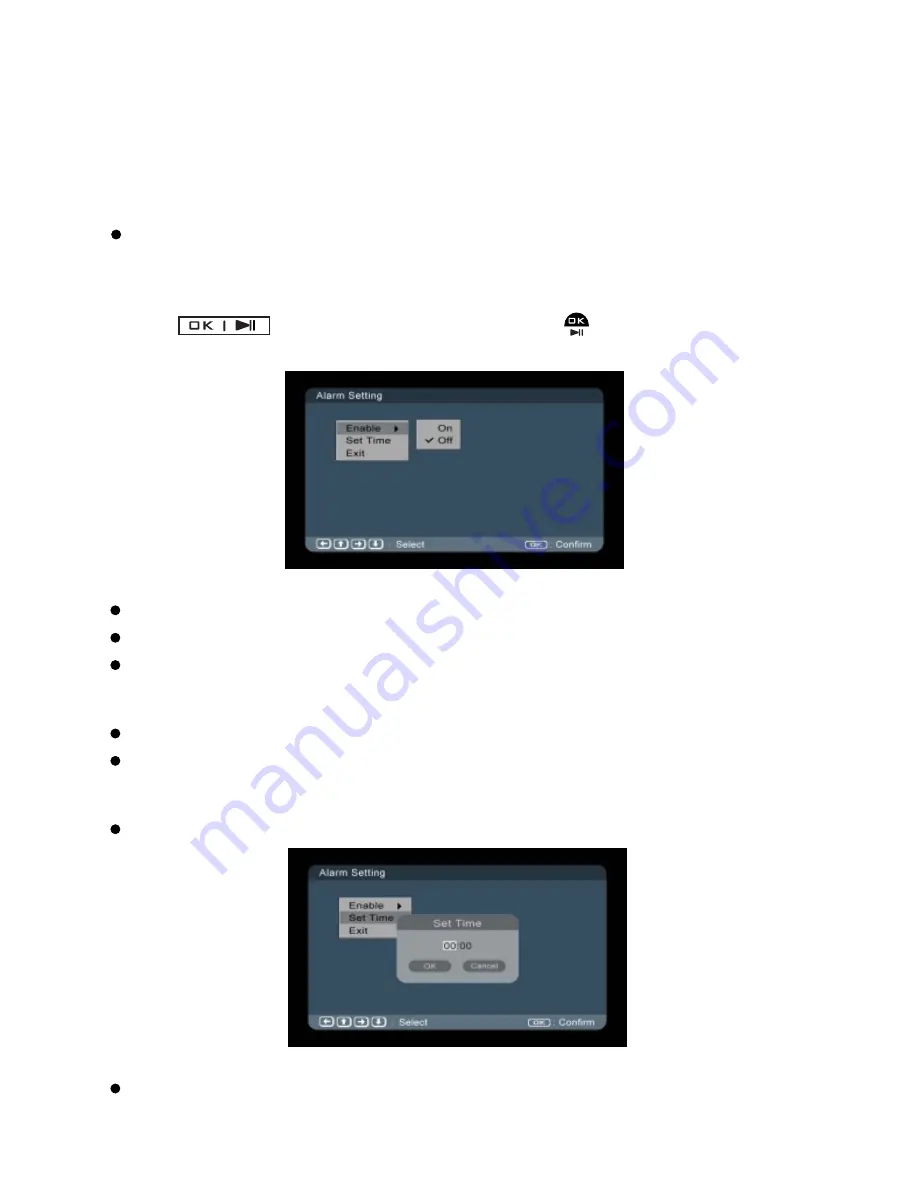
There are three selections:

Enable 
Set Time
Exit

Enable:

On: Enable alarm function
Off: Disable alarm function

Set time:

User can set the alarm time by the navigation keys:

Exit: 

Exit Alarm Application.

13

Содержание APD7100

Страница 1: ......

Страница 2: ...Part 1 Digital Photo Frame 2 ...

Страница 3: ...connect more than one appliance to a single outlet as an overheated outlet may cause fire 5 Do not use force to pull the power cord Don t place anything heavy on the power cord as this may cause electric shock or fire 6 Make sure to disconnect the power plug from the outlet before moving the product Make sure to disconnect the connection cables from other devices as well Moving the product without...

Страница 4: ...his may cause electric shock or fire Do not use the product outdoors in snowy or rainy weather or near any water When cleaning the floor with water avoid any water contact with the power adapter 4 Do not place the power adapter near a heater as this may cause fire 5 The socket outlet shall be installed near the equipment and shall be easily accessible Installation 1 When installing the product on ...

Страница 5: ...dio frequency interference the unit may generate a tone and it would resume to normal operation when the interference stops 4 Under electrostatic discharge environment the device might be malfunctioned Please power reset the device if it happens Attention 5 Correct Disposal of this product This marking indicates that this product should not be disposed with other household wastes throughout the EU...

Страница 6: ... jack Connect to USB drive external memory 2 SD Secure Digital MMC MutiMedia Card MS Memory Stick card slot Note 1 USB port is only for connection with USB drive Connection to PC will damage the unit 2 Performance is not guaranteed when connected with other USB devices like Cell phones Mp3 player 6 IR window ...

Страница 7: ... VOL key Down VOL key Left or Previous photo during photo playback Right or Next photo during photo playback Return to Menu Selection Screen Stop Return Ok Pause Shortcut key for immediate photo playback Mute Phone off Phone on or Flash the line ...

Страница 8: ...s photo during photo playback Next picture during photo playback next page Right or Next photo during photo playback Previous picture during photo playback previous page Return to Menu Selection Screen Stop Return Ok Pause Shortcut key for immediate photo playback Mute the MIC Phone off Phone on ...

Страница 9: ... DC plug on the photo frame Also can use the POWER button on the REMOTE to ON OFF the unit 2 Main Menu Screen When power is on the main menu screen will show up User can press key at any time to enter the main menu screen When the digital photo frame with Base linked Note The number 1 indicates the handset number It can be 1 to 6 When the digital photo frame is out of range 9 ...

Страница 10: ... photo application If user set Auto play to ON it will enter the slide show mode automatically if user set Auto play to OFF it will enter file manager or thumbnail mode If there are no photos it will return to main menu Photo frame buttons Return to main menu screen Confirm to play or to pause the picture Previous photo Next photo Stop to play the picture Remote control buttons Return to main menu...

Страница 11: ...t will Display Calendar or set and the LCD screen will show as below There are three selections using navigator key and press On the photo frame or on the remote control to proceed Display Display the current calendar Set Date Set the current date using the navigation keys Exit Exit Calendar Application Display screen of calendar During calendar display screen user can press or button to scroll ye...

Страница 12: ...emote control to proceed the LCD screen will show as below There are three selections Display Set Time Exit Display Clock Display clock only as shown below Clock Calendar Display clock with calendar Set time User can use navigation keys to change the time Note Time should be set in 24 Hour Format When power is 12 ...

Страница 13: ...k Application 6 Alarm Menu Select Alarm icon by navigator key in the main menu and press on the photo frame or on the remote control to proceed the LCD screen will show as below There are three selections Enable Set Time Exit Enable On Enable alarm function Off Disable alarm function Set time User can set the alarm time by the navigation keys Exit Exit Alarm Application 13 ...

Страница 14: ...rm tone or it will be off automatically after 5 minutes of continuous alert Note When the photo frame is on a call or during registration the alarm will defer response 7 Setup Menu Select Setup icon by navigator key in the main menu and press on the photo frame or on the remote control to proceed the LCD screen will show as below There are 5 selections Photo Setting Auto Play Display setup Custom ...

Страница 15: ...ffect Blind Vertical Blind Horizontal Colouration Vertical Colouration Horizontal Block 1 Block 2 Block 3 Block 4 Block 5 Block 6 Block 7 Block 8 Block 9 Fade In Fade Out Random Show Type Fit Screen Full Screen Thumbnail File Manager Browse Photo Setting 1st layer 2nd layer Interval Time 5 sec 10 sec 15 sec 30 sec 1 min 3 min Off 3rd layer ...

Страница 16: ...rightness 7 0 7 7 0 7 Custom setup Saturation Language English Francis Deutch Italiano Espanol Portugues Nederlands Style Style1 Style2 Style3 Style4 Repeat Mode Off One Folder All Confirmed Factory default Exit Auto Play Photo ON OFF ...

Страница 17: ...The display format for managing photos There are 2 selections file manager or thumbnail File Manager Mode If you set the browse method to file manager when you are playing photos press on the photo frame or on the remote control the following screen will be shown On the left side the selected photo will be shown Thumbnail If you set the browse method to thumbnail when you are playing photos press ...

Страница 18: ...trast of LCD Brightness User can set the brightness of LCD Saturation User can set the saturation of LCD 7 4 Custom setup Language User can set the language of menu Style There are 4 selections Repeat Mode For showing photos Off turn off the repeat mode One repeat playing the selected photos once Folder repeat all the photos in this file folder All Repeat all the photos Factory default All the set...

Страница 19: ...re are three selections Review review the phonebook record Add add new entry into phonebook Exit return to main menu 8 1 Phonebook Review Menu Select Review by navigator key and press on the photo frame or on the remote control to proceed the LCD screen will show as below There are four selections Edit edit the selected entry Delete delete the selected entry Delete All delete all entries Return re...

Страница 20: ...ete record Step1 Select one entry during phonebook review screen and press on the photo frame or on the remote control Step2 Select Delete by navigator key and press on the photo frame or on the remote control to proceed Step3 Select OK by navigator key and press on the photo frame or on the remote control to confirm 8 1 3 Delete All records Step1 Select one entry during phonebook review screen an...

Страница 21: ...oto frame can store up to 30 call logs Select Call Log icon by navigator key in the main menu and press on the photo frame or on the remote control to proceed The following screen will be shown There are four selections All Calls including all missed and received calls Missed calls not answered calls including Call waiting CID Received calls answered calls including Call waiting CID Exit The photo...

Страница 22: ...ress on the photo frame or on the remote control during call log review screen Step2 Select Add by navigator key and press on the photo frame or on the remote control to proceed Step3 Select digits or characters by navigator key and press on the photo frame or on the remote control to input number or name Step4 Select Save icon by navigator key and press on the photo frame or on the remote control...

Страница 23: ...log review screen and press on the photo frame or on the remote control during call log review screen Step2 Select Delete All icon by navigator key and press on the photo frame or on the remote control to proceed Step3 Select OK by navigator key and press on the photo frame or on the remote control to confirm 10 Phone Setup Menu Select Phone Setup icon by navigator key in the main menu and press o...

Страница 24: ...on the remote control to proceed the LCD screen will show Searching If the DPF registries succeed the LCD screen will show OK 10 2 Ringer Pattern Step1 Select Ringer Pattern icon by navigator key and press on the photo frame or on the remote control to proceed Step2 Select desired ring pattern by navigator key and press on the photo frame or on the remote control to confirm 10 3 Ringer Loudness St...

Страница 25: ... LCD screen will show as below NOTE for CID name Caller ID name information from the operator is network dependent and is not available in all countries Please check with your network provider for availability of this service However name will be displayed if incoming number is matched with your phone book entry if any Case 2 For an incoming call if the number does not match with the phonebook the...

Страница 26: ... the LCD will show as below Case 5 If there is an internal call the LCD will show as below 11 2 Answering call If there is an external call user can press on the photo frame or on the remote control to answer the call the LCD screen will show as below 26 ...

Страница 27: ...s on the photo frame or on the remote control to end the call 11 3 Call Transfer User can transfer an external call from a handset to the photo frame When the handset initiates the transfer the LCD screen will show as INTERCOM 1 Note The photo frame can t initiate a call transfer This function may not work when used with other base and handset 11 4 Call Waiting If there is another incoming call wh...

Страница 28: ...rvice and subscribe if necessary For the call log handling in call waiting case Unanswered the second call logged in missed call list Answered the second call logged in received call list Calls without CID will not be logged 11 5 Missed calls Display If there are missed calls the following screen will be shown User can press any key except to return the main menu if user press the unit will power ...

Страница 29: ...s or contrast to level 0 Panel too dark Is the power plug inserted properly Check the setting whether set a lower brightness or set a lower contrast The digital photo frame can t power on Nothing happens even if you operate the photo frame Nothing happens even if you operate the photo frame with the remote control Is a memory card inserted properly Does the digital photo frame support the file for...

Страница 30: ...inserted properly Is the digital photo frame outside the base station range Is the digital photo frame and base station prepare for registration Is the digital photo frame not registered Does the base station not work Register the digital photo frame Unplug and then plug the power adapter to the power outlet and the other end into the power jack on base bottom Is there no JPEG file in the memory c...

Страница 31: ...t 2 Cordless Phone 31 Rechargeable batteries are included with this DECT phone Never use non rechargeable batteries Use of improper batteries will void the warranty and risk the danger of explosion CAUTION ...

Страница 32: ...the unit annuls claims under the terms of guarantee and exposes the person to the risk of an electric shock Repairs to defective units should only be carried out by service centers recommended by the sales outlet We recommend removing the batteries if the equipment is not to be used for longer periods Only replace the batteries with types recommended by us Dispose of defective batteries according ...

Страница 33: ...ials could be released which can cause injury To reduce the risk of fire or personal injury use only the battery listed in User s Guide Keep batteries out of children Remove batteries if storing over 30 days Connecting the Base Station and Power Plug Connecting the plugs to the corresponding sockets in the base station they can not be connected incorrectly because the sockets and plugs are designe...

Страница 34: ...o the socket outlet that near the equipment and shall be easily accessible Only use the power supplies listed in the user instructions Using other power supplies may damage the unit CAUTION 34 AC power outlet Phone jack ...

Страница 35: ... only with provided batteries The handset will not work and may be damage if wrong batteries are used or inserted incorrectly Risk of explosion if battery is replaced by an incorrect type Dispose of used batteries according to the instruction Use only the batteries listed in user instruction for recycling in your country If batteries are empty handset LCD will not display and the handset will not ...

Страница 36: ...Handset can be named 12 Automatic call answering 13 Key input tone on off 14 Keypad lock 15 Teleconference 16 Internal free communication between handsets 17 Battery status icon low battery warning 18 Up to 100 hours standby 19 Up to 10 hours continuous talk time 20 Out of range warning 21 Recall Hold 22 Speakerphone 23 Tone and pulse dialing More than one handset require Subscription may be requi...

Страница 37: ...ey Handset and Base Layouts 37 Redial Up Increase volume key Caller ID Down Decrease volume key Menu OK key Cancel Mute Ring off key Flash key Phone book key Talk on Off key Asterisk INT key Hash Keypad lock key ...

Страница 38: ...LCD Display 38 Intercom call indicator Description Aerial icon Phone icon Key lock icon No ring icon Microphone mute icon Icon Paging key ...

Страница 39: ... cordless handset into the charger The talk timer will be shown for about 2 seconds before return to idle mode Pre dialling 1 When the handset is in idle mode dial the desired number 2 Press key to cancel the wrong digit dial the correct one again 3 Press the or key the number will be automatically dialled out 4 After finishing the conversation press key or place the cordless handset into the char...

Страница 40: ...inishing the conversation press key place the cordless handset into the charger Auto Answer If you set on the AUTO TALK just need to pick up the cordless handset from the charger to answer the call directly needn t press or key Handset Speaker Phone Press key to activate or deactivate the handset speaker Dialing from the Phone Book Press button when in standby mode the first entry in the phone boo...

Страница 41: ...en the two handsets 3 If you want to transfer the call to the called unit end the call at the calling unit The call will be automatically transferred to the called unit Note If the called unit doesn t answer the intercom call within 30 seconds the calling unit will return to the talk mode with the caller Call Waiting If you have subscribed to the service of CID on Call waiting the telephone will s...

Страница 42: ...le mode to activate or deactivate the handset Ringer The icon turns on or off Muting the Microphone Press key can switch the microphone on or off during a call The icon turns on or off Paging the Handset If a handset has been misplaced it is possible to call all the handsets Short press Page key on the base to station To stop the page call Short press any key on the handset or press page key brief...

Страница 43: ... saved 4 Press key to save Delete a Single Redial Record 1 When the cordless handset is in idle mode press key 2 Press or key to select the desired redial number 3 Press key to enter menu press or key to select DELETE press key CONFIRM will be shown 4 Press key to confirm Delete All Redial Records 1 When the handset is in idle mode press key 2 Press or key to select the desired redial number 3 Pre...

Страница 44: ...When the handset is in idle mode will be displayed prior to other display information If you reviewed all the missed calls from handset the display will be disappeared Note 1 If you reviewed all the missed calls from one handset the display will still show on other handsets 2 Press key to toggle the display between name and number Review Caller ID Record 1 When the handset is in idle mode press ke...

Страница 45: ...ey to enter menu 4 Press or key to select SAVE NUMBER press key The selected number will be shown press key ENTER NAME will be shown and input the desired name You must input the name otherwise the record can t be saved 5 Press key to save Delete a Single Call Record 1 When the handset is in idle mode press key 2 Press or key to select the desired record 3 Press key to enter menu 4 Press or key to...

Страница 46: ...capacity is full MEMORY FULL will display 2 Any incorrect input can be deleted by pressing key Select Entries Press key to access phone book memory 1 Press or key to scroll 2 Press key to select a desired entry and then press or to select the submenu SELECT 3 Press key to select the telephone number you may edit the number and make the call but the edited number cannot be saved in this option Edit...

Страница 47: ...e entry 4 Press key again to confirm Menu Operation Handset Setting Ring Melody You may select one of the 10 available ringer tones for your incoming calls alert tone 1 Press key 2 Press or key to select SETUP HS and press key 3 Press or key to select RING MELODY and press key 4 Press or key to select the desired ring melody the selected melody will be sounded 5 Press key to confirm the setting Ri...

Страница 48: ...NES and press key 4 Press or key to select LOW BATTERY and press key 5 Press or key to select ON or OFF 6 Press key to confirm the setting No Coverage You may set the warning beep to ON or OFF when the cordless handset is out of range 1 Press key 2 Press or key to select SETUP HS and press key 3 Press or key to select TONES and press key 4 Press or key to select NO COVERAGE and press key 5 Press o...

Страница 49: ...select ON or OFF 5 Press key to confirm the setting Alarm 1 Press key 2 Press or key to select SETUP HS and press key 3 Press or key to select ALARM and press key 4 Press or key to select ON or OFF 5 Enter HH MM in 24 hour format 6 Press key to confirm Note when Alarm time is reached ALARM ON will be blinking and alarm sound will stop after around 1 minute Handset Name You can set the cordless han...

Страница 50: ... HS and press key 3 Press or key to select RESET and press key the LCD will display RESET 4 Press key to confirm the setting Base Setting Change PIN PIN is your base s identification number this function prevents setting being changed by others The default setting is 0000 You may change the PIN Please take note of the change so as to operate the unit normally 1 Press key 2 Press or key to select S...

Страница 51: ...lert tone 1 Press key 2 Press or key to select SETUP BS and press key 3 Press or key to select RING MELODY and press key 4 Press or key to select the desired ring melody the selected melody will be sounded 5 Press key to confirm the setting Ringing Volume You may select one of the 5 available volumes for your incoming calls alert tone 1 Press key 2 Press or key to select SETUP BS and press key 3 P...

Страница 52: ...sh time 5 Press key to confirm the setting VMWI Should be supported by your telephone service provider If you have subscribed to a voice messaging service the icon will display on the handset to alert you if you have a messages waiting To turn Visual Message Waiting Indication VMWI off 1 Press key 2 Press or key to select SETUP BS and press key 3 Press or key to select VMWI and press key VMWI OFF ...

Страница 53: ...setting 5 Input the correct time the format is hour minute hour range 00 23 minute range 00 59 6 Press key to confirm the setting Note If the value you input is over the range during setting you can t enter next setting by pressing key please enter the correct setting again Registration Register Up to 6 cordless handsets can be registered to one base 1 Press key 2 Press or key to select REGISTRATI...

Страница 54: ... specific base or Auto 4 Press key to confirm the setting Remove Handset This option allows user to remove the registered cordless handset from the base 1 Press key 2 Press or key to select REGISTRATION and press key 3 Press or key to select REMOVE HS and press key the LCD will display ENTER PIN 4 Input the correct PIN code and press key 5 Press or key to select the cordless handset you want to re...

Страница 55: ...ufacturer Corun 1 2V DC 450mAh Ni MH AAA x 2 or equivalent Technical Specifications For guidance only depends on initial battery charge General Product Care Simply wipe the base station with a damp cloth or an antistatic wipe Never use a dry cloth as this can cause static discharge Periodically clean the charge contacts on the handset base and charger with a soft cloth Note Due to continuous produ...

Страница 56: ...y longer than 2 seconds Move closer to the base station Register the handset see Registering Handset Unplug and then plug the power adapter to the power outlet and the other end into the power jack on base bottom The keypad is locked The handset is outside the base station range The handset is not registered The base station does not work No reactions to keystroke No radio connection to the base s...

Страница 57: ...WASTE ELECTRICAL PRODUCTS SHOULD NOT BE DISPOSED OF WITH HOUSEHOLD WASTE PLEASE RECYCLE WHERE FACILITIES EXIST CHECK WITH YOUR LOCAL AUTHORITY FOR RECYCLING ADVICE 57 ...

Отзывы: