1. Mouthpiece
2. Mouthpiece slot
3. Status LED
4. High-Quality OLED Display
5. Power button
6. Menu button
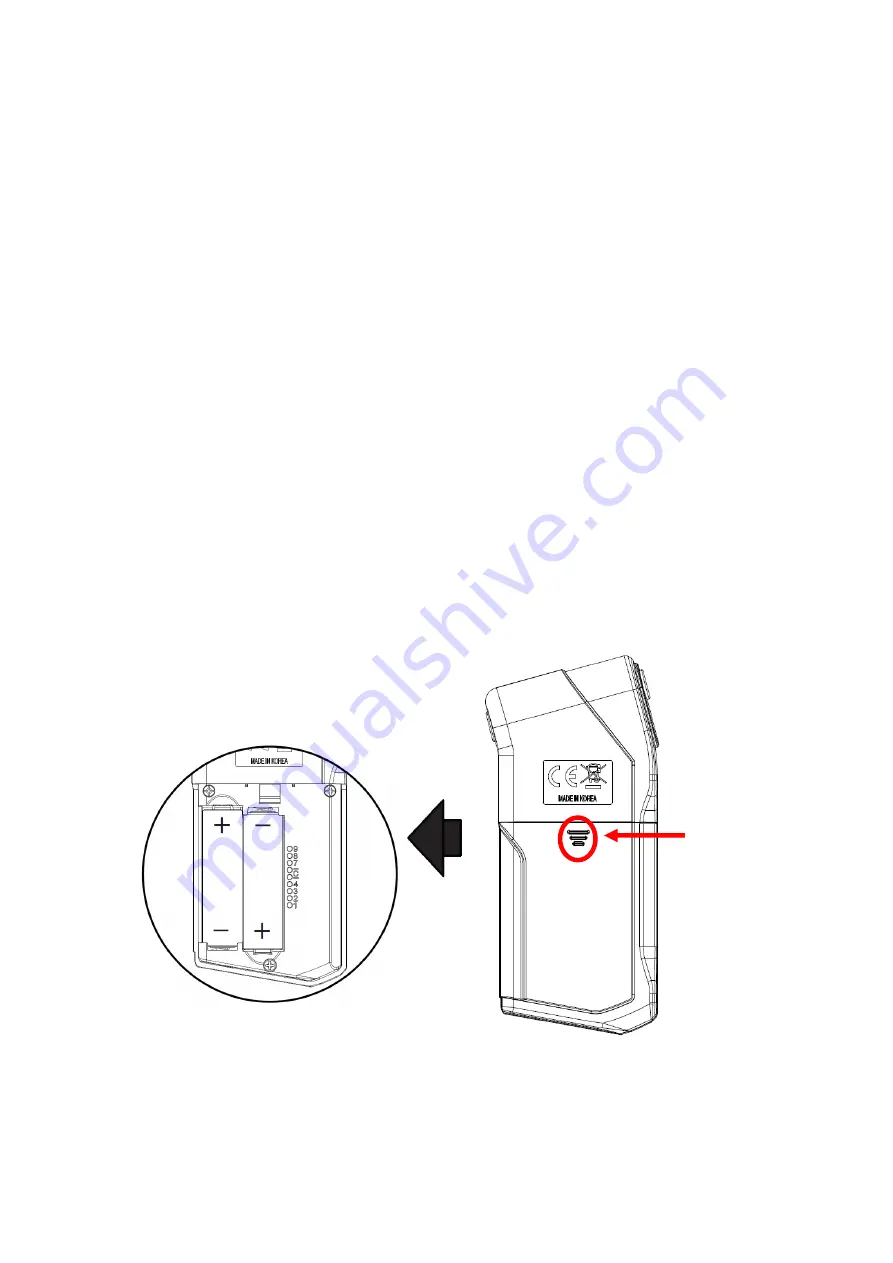
7. Battery cover
5. Basic Operation
5.1 Preparation
Press and push down the cover to open
Insert two AA
batteries
(1.5V Alkaline)
Страница 1: ...ns 100 TEST MEMORIES Saves the test result including test date and time USER FRIENDLY INTERFACE Enables to change device setting easily GRAPH MODE Allows to track all test results efficiently CALIBRATION REMINDER Helps get on time calibration by letting users know about the remaining days to the next calibration Please read the user s manual carefully before use ...
Страница 2: ...ion 5 2 Operation with app 5 3 Operation without app 5 4 Symbols Readings 6 Basic Menu Options 6 1 TEST RESULT 6 2 TEST RESULT G 6 3 ALARM LIMIT 6 4 UNIT 6 5 BRIGHTNESS 6 6 SOUND 6 7 INFORMATION 6 8 PIN CODE 7 Advanced Menu Options 7 1 TEST LIMIT 7 2 SET TIME 7 3 DATE LIMIT 7 4 CHANGE PIN 8 Specification 9 Contact Information ...
Страница 3: ...ion Do not use this device as a tool to determine drink and drive The manufacturer and the sellers will not take any legal responsibility for the test results When not used for a long time keep the device after taking out the batteries In case of testing after long term storage there might be high tolerance of test results for the first test Replace the batteries when the battery indicator icon re...
Страница 4: ...l school and many other industrial fields It measures estimated B A C Blood Alcohol Content in human breath by means of a premium fuel cell sensor which is highly durable and providing accurate breath alcohol results 3 Contents Digital Breathalyzer AF 50 Two AA alkaline batteries 6 pieces of mouthpiece Carrying case Instruction manual 4 Name of each part 1 2 4 3 5 6 7 ...
Страница 5: ... 2 Mouthpiece slot 3 Status LED 4 High Quality OLED Display 5 Power button 6 Menu button 7 Battery cover 5 Basic Operation 5 1 Preparation Press and push down the cover to open Insert two AA batteries 1 5V Alkaline ...
Страница 6: ...ould be used for other person s testing for sanitary reasons 5 2 Operation with app Step 1 Open the app Note Bluetooth must first be switched on in order to connect to the device Go to the Settings on your smartphone and turn on Bluetooth Step 2 To turn on the device press and hold Power button for 2 seconds Step 3 If pairing is successful the screen on your smartphone will show START TEST Tap STA...
Страница 7: ...uest will be displayed Input 000000 for PIN Code Note The app is set to remember and search the device that has paired last time for 30 seconds If the app is not able to find the previously paired device for 30 seconds the app will show the following message ...
Страница 8: ...p 4 Choose a user Each test result will be saved separately according to the selection of the user All history of saved test results are viewable from the Graphic Icon at the bottom of the menu Step 5 The circular bar on the app indicates the progress of warm up When warming up gage reaches 95 take a deep breath and get ready for blowing ...
Страница 9: ...ou feel the air has been pulled through the air pump in the device with a click Note If the camera feature is enabled the camera will automatically capture the image of a user once the blowing has been completed Step 7 If a sufficient breath sample is taken correctly the Analyzing data will be shown on the app ...
Страница 10: ...conds In this page the app enables you to make a memo which is viewable with test results from the Graph icon and the test results can be also shareable via Text message Facebook or Twitter Step 9 Tap either Retest or BAC level on the app or press Power Button on the device to test again without selecting a user If you want to start test again from the beginning tap the Home Test date Test result ...
Страница 11: ... the device will flicker together Press Power Button on the device to restart 5 3 Operation without app Step 1 Power On Turn on the device Press the power button for 2 seconds to turn on the device The alarm limit date and time set in the device will be displayed Step 2 Warm up The warm up process will be started automatically When the progress bar fills up the START BLOW will be displayed with do...
Страница 12: ...ccessful the analyzing process will be started automatically Step 5 Test result After a few seconds depending on the alcohol level the estimated BAC will be displayed for 4 seconds and the power button and menu button will be deactivated during this time Depending on the test result the status LED will be flashed as followings 1 Flashes red LED if the test result is higher than the alarm limit 2 F...
Страница 13: ...s test results with a bar graph which enables you to check visually whether your test results are higher than the alarm limit that you have set in the menu 3 POWER OFF Press and hold the power button for 2 seconds if you want to turn off the device manually Note The device will turn off automatically if it is not in use for 3 minutes Test result Alarm limit The most recent test result The test res...
Страница 14: ...oper recalibration service The calibration is required because the device has exceeded its recommended number of test Contact your local distributor or customer service center for proper recalibration service The excessive saliva went into the sensor during the test Wait 20 minutes and then try again Contact your seller for customer service if this error code is displayed for a long time The testi...
Страница 15: ...ss the menu button for 2 seconds How to move select exit the menu options To move the cursor up press the power button shortly To move the cursor down press the menu button shortly To enter the selected option press the power button for 2 seconds To return to warm up process press the menu button for 2 seconds How to save the selected setting Press and hold the power button and the menu button tog...
Страница 16: ...ear first To see the previous result press the power button shortly To see the next result press the menu button shortly To return to the menu list press the menu button for 2 seconds 6 2 TEST RESULT G Alarm limit Current page Total page The most recent test result The test result with an approved breath sample X The test without an approved breath sample ...
Страница 17: ...rn to the menu list press the menu button for 2 seconds 6 3 ALARM LIMIT The limit value for alarm can be set in this menu The settable value range 0 010 0 100 BAC 0 10 1 00 OFF To raise the alarm limit press the power button shortly To reduce the alarm limit press the menu button shortly To save the setting and return to the menu list press and hold the power button and the menu button together fo...
Страница 18: ... the menu button shortly To save the setting and return to the menu list press and hold the power button and the menu button together for 2 seconds To return to the menu list without saving press the menu button for 2 seconds 6 5 BRIGHTNESS The brightness of the display can be set in this menu The settable value range HIGH MID LOW To move the cursor up press the power button shortly ...
Страница 19: ...nu button for 2 seconds 6 6 SOUND The sound can be set in this menu The settable value range HIGH MID LOW OFF To move the cursor up press the power button shortly To move the cursor down press the menu button shortly To save the setting and return to the menu list press and hold the power button and the menu button together for 2 seconds To return to the menu list without saving press the menu but...
Страница 20: ...o the advanced menu option The default PIN code is 0000 and the PIN code is adjustable from 0000 to 9999 in the advanced menu option To change digits of PIN code press the power button for 2 seconds To raise the number of PIN code press the power button shortly To reduce the number of PIN code press the menu button shortly To enter the advanced menu option press and hold the power button and the m...
Страница 21: ...To reduce the test limit press the menu button shortly To save the setting and return to the advanced menu list press and hold the power button and the menu button together for 2 seconds To return to the advanced menu list without saving press the menu button for 2 seconds 7 2 SET TIME The device time can be adjusted in this menu To change digits of time and date press the power button for 2 secon...
Страница 22: ...t without saving press the menu button for 2 seconds 7 3 DATE LIMIT The date for the next calibration can be set in this menu The settable value range 1 24 month To raise the date limit press the power button shortly To reduce the date limit press the menu button shortly To save the setting and return to the advanced menu list press and hold the power button and the menu button together for 2 seco...
Страница 23: ...ress the menu button for 2 seconds 8 Specification Indication of B A C 0 000 0 500 BAC 0 00 5 00 0 00 2 50 mg L Accuracy 0 005 BAC at 0 100 BAC at 25 0 05 at 1 00 at 25 0 025 mg L at 0 50 mg L at 25 Warm up time Within 10 seconds at 0 050 BAC Warm up time may vary depending on the BAC measured Sensor type Premium Fuel Cell Power supply Two AA size alkaline batteries Connectivity Bluetooth 4 0 LE 1...
Страница 24: ... interference in a residential installation This equipment generates uses and can radiate radio frequency energy and if not installed and used in accordance with the instructions may cause harmful interference to radio communications However there is no guarantee that interference will not occur in a particular installation If this equipment does cause harmful interference to radio or television r...
Страница 25: ...1 2018 Name Title of Signatory Kwang Hee Park President DA Tech Co Ltd 39 Pyeongcheon ro 141 beon gil Bupyeong gu Incheon Korea Essential Requirement Applicable Standards Specifications Health Safety EN 60950 1 2006 A11 2009 A1 2010 A12 2011 A2 2013 EN 62479 2010 Electromagnetic Compatibility Draft ETSI EN 301 489 1 V2 2 0 03 2017 Draft ETSI EN 301 489 3 V2 1 1 03 2017 Final draft ETSI EN 301 489 ...