background image

8262 DECT Handset 


8AL90323ENAAed01 
 

7 /

60 

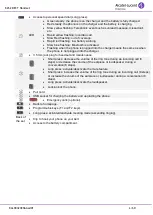
1.2   Status icons  

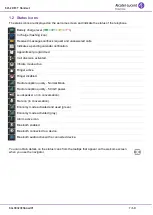
The status icons are displayed on the welcome screen and indicate the status of the telephone. 


Battery charge level (

 >

 >

 >

). 


In charge (flashing icon). 


Received messages,callback request and unanswered calls. 


Indicates a pending calendar notification. 


Appointment programmed. 


Call diversion activated. 


Vibrate mode active. 


Ringer active. 


Ringer disabled. 


Radio reception quality - Normal Mode. 


Radio reception quality - 50 mW power. 


Loudspeaker on (in conversation). 


Mute on (in conversation). 


Economy mode activated and used (green). 


Economy mode activated (gray). 


Alarm active icon. 


Bluetooth enabled. 


Bluetooth connected to a device. 


Bluetooth audio active with a connected device. 


You can obtain details on the status icons from the tooltips that appear on the welcome screen 
when you use the navigator. 


Содержание 8262

Страница 1: ...8262 DECT Handset OmniPCX Office Rich Communication Edition User Manual 8AL90323ENAAed01 1615 ...

Страница 2: ...ATION 20 4 DURING A CONVERSATION 21 4 1 MAKE A SECOND CALL 21 4 2 RECOVER THE CALL ON HOLD 22 4 3 RECEIVING A SECOND CALL 22 4 4 SWITCHING BETWEEN TWO CALLS BROKER CALL 22 4 5 TRANSFERRING A CALL 22 4 6 THREE WAY CONFERENCE WITH INTERNAL AND OR EXTERNAL CALLERS CONFERENCE 23 4 7 PLACING AN OUTSIDE CALL ON HOLD PARKING 23 4 8 ACTIVATE DEACTIVATE VOICE FREQUENCY 24 5 SHARING 25 5 1 ANSWERING THE GEN...

Страница 3: ...ING AN APPOINTMENT REMINDER 43 7 12 CONFIGURE THE F1 AND F2 KEYS 43 7 13 CALENDAR 44 7 14 LOCKING YOUR TELEPHONE 47 7 15 CONFIGURING BLUETOOTH 47 7 16 CONFIGURE DOCK SETTINGS 48 8 REGISTERING THE TELEPHONE 50 8 1 REGISTERING THE TELEPHONE ON A SYSTEM FOR THE FIRST TIME 50 8 2 REGISTERING THE TELEPHONE ON OTHER SYSTEMS 51 9 LIVE SIGNAL AND NOTIFICATION MANAGEMENT 53 9 1 INTRODUCTION 53 9 2 EMERGENC...

Страница 4: ...332AA Dongguan Deereng New Energy Co Ltd RTR001FXX Li ion 3 7V 1100mAh 4 1Wh The mains power socket used must be close to the charger holder and easily accessible so that it can be used as an on off facility Battery charge Charge the battery for about 6 hours before initial use The 8262 DECT Handset desktop Dual charger 3BN67346AA is dedicated for 8262 Dect handsets 3BN67345AA and needs the follow...

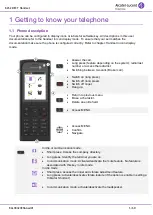
Страница 5: ... redial list Switching between two calls Broker call Switch on long press Switch off long press Switch off ringer Hang up Return to previous menu Erase a character Delete an entire field Access MENU Access MENU Confirm Navigate In idle or communication mode Short press Access the company directory Long press Identify the terminal you are on In communication mode Activate deactivate the mute featur...

Страница 6: ... jack plug for headset and maintenance Short press decrease the volume of the ring tone during an incoming call 8 steps or decrease the volume of the earpiece or loudspeaker during a conversation 8 steps Long press activate deactivate the mute feature Short press increase the volume of the ring tone during an incoming call 8 steps or increase the volume of the earpiece or loudspeaker during a conv...

Страница 7: ...rammed Call diversion activated Vibrate mode active Ringer active Ringer disabled Radio reception quality Normal Mode Radio reception quality 50 mW power Loudspeaker on in conversation Mute on in conversation Economy mode activated and used green Economy mode activated gray Alarm active icon Bluetooth enabled Bluetooth connected to a device Bluetooth audio active with a connected device You can ob...

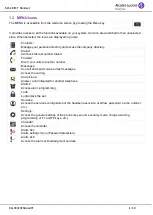
Страница 8: ...ber dialed Forward Divert your calls to another number Messages Consult and send voice and text messages Access the call log Call pick up Answer a call intended for another telephone Alarms Access alarm programming Lock Lock unlock the set Services Access the services configuration of the handset associate overflow password name number etc Settings Access the general settings of the phone key soun...

Страница 9: ... to DTMF signals Setting up a conference Forwarding your calls to your voice message service Parking an external communication Record the conversation Manual hold Cancel your enquiry call In the event of a multiple call the icons have symbols such as numbers to distinguish between the different callers Example first call is on hold second call is ongoing ...

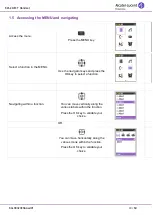
Страница 10: ...n in the MENU Use the navigator keys and press the OK key to select a function Navigating within a function You can move vertically along the various labels within the function Press the OK key to validate your choice OR You can move horizontally along the various icons within the function Press the OK key to validate your choice ...

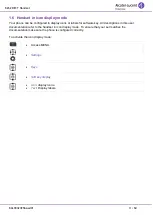
Страница 11: ...or labels for software key All descriptions in this user documentation refer to the handset in icon display mode To ensure that your set matches the documentation make sure the phone is configured correctly To activate the icon display mode Access MENU Settings Keys Soft key display Icon display icons Text Display labels ...

Страница 12: ...er is in place on the phone Unlock the cover Lift up the cover Position the battery connectors side as shown in the drawing A Terminate the installation of the battery in its compartment by pressing as shown in the drawing B If necessary lift up the belt clip to easily insert the battery Replace the cover Make sure that the lock is correctly positioned 2 1 2 Removing the battery from the telephone...

Страница 13: ...e in possession of the memory card for your phone The supported SD memory cards are Kingston 2 4 8 16 GB Class 4 10 Transcend 2 4 8 16 GB Class 4 10 Switch off the handset long press Unlock the cover Lift up the cover Remove the battery from its compartment You can turn your set over on your hand to extract the battery from its compartment Be careful not to drop the battery Slide in the memory car...

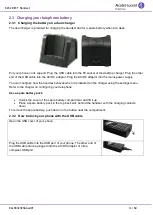
Страница 14: ...gure how the handset behaves when it is installed on the charger using the settings menu Refer to the chapter on configuring your telephone Use a spare battery pack Unlock the cover of the spare battery compartment and lift it up Place a spare battery pack in the top back slot behind the handset with the charging contacts down To remove the spare battery push down on the button near the compartmen...

Страница 15: ...our telephone On standby in the radio coverage zone Up to 160 hours In continuous conversation without Bluetooth or noise reduction activated Up to 20 hours if economy mode is activated 17 hours if economy mode is not activated Switch off the telephone before changing the battery 2 4 Switching on your telephone Press the switch on off key long press Your telephone is switched on If the display fai...

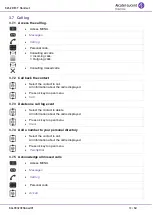
Страница 16: ...mmunication Hang up To make an external call dial the outside line access code before dialing your contact number 3 2 Calling from your personal directory Access MENU Contacts PersSpDial Validate access to the personal directory Select the name of the person you wish to call or Send the call Quick access long press ...

Страница 17: ...the first name If necessary refine the search by entering the beginning of the number Select the desired name or Send the call You enter your contact s name in predictive text mode In this mode enter each letter of the name by pressing only once on the key with this letter If several names come up you can refine the search by entering the successive letters second third etc of the name you are loo...

Страница 18: ...brate mode is active the vibrate mode active icon is displayed in the phone notification area The ringer is disabled the ringer disabled icon is displayed in the phone notification area 3 5 Redialing 3 5 1 Call back one of the last numbers dialed Long press OR Access MENU Dialed Select the number in the list Send the call 3 6 Requesting automatic callback if internal number is busy Call back To ca...

Страница 19: ...l All information about the call is displayed Press ok key to open menu Call 3 7 3 Delete one call log event Select the contact to delete All information about the call is displayed Press ok key to open menu Clear 3 7 4 Add a number to your personal directory Select the contact to call All information about the call is displayed Press ok key to open menu PersSpDial 3 7 5 Acknowledge all missed cal...

Страница 20: ...ays to access the options offered by your system using The list of icons at the top of the screen The list of items at the bottom of the screen 1 2 3 4 5 6 7 8 9 10 11 12 1 Call in progress 2 Slot for second call Call in progress Call waiting 3 Contacts 4 Transfer 5 Put through a second call 6 Voice frequency 7 Conference 8 Manual hold 9 Transfer to voicemail 10 Record the conversation 11 Park the...

Страница 21: ...ll Dial the number or Send the call The first call is on hold Select your contact in your personal or company directory Directory Select your contact in your personal or company directory or Send the call The first call is on hold You can also initiate another call by using the Enquiry call feature Secondcall Use one of the following o Dial a Number o Dialing the number Send the call The first cal...

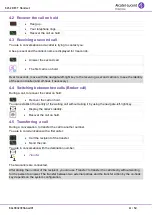
Страница 22: ... to recover the caller on hold Recover the call on hold You can establish the identity of the waiting call without taking it by using the navigate left right key Display the caller s identity Recover the call on hold 4 5 Transferring a call During a conversation to transfer the call to another number You are in communication with a first caller Call the recipient of the transfer Send the call You ...

Страница 23: ...rking You can park an outside caller in order to take the call on another set You are holding an external conversation Park Number to be called Your caller is parked and hears the hold melody If you on hook without entering the number of a call park destination set the call will be parked on your set To recover your parked call Access MENU Pickup Parking Dial the number of the handset that origina...

Страница 24: ...nfiguration If necessary contact your administrator During a call you sometimes have to send DTMF signals for example for a voice message service an automatic switchboard or when remotely consulting an answering machine You are in conversation with one caller MFcode To activate Sending DTMF signals MFcode To deactivate ...

Страница 25: ...s Access MENU Pickup AnsGenBell Confirm 5 2 Call pick up You hear a telephone ringing in an office where no one can answer If authorised you can answer the call on your own telephone Access MENU Pickup Pick upInd Enter number of ringing telephone Apply If the telephone ringing is in your own pick up group Pick upGrp The system can be configured to prevent call pick up on certain telephones ...

Страница 26: ...e called by using its own number 5 3 2 Temporary exit from your hunting group Code of the Group exit function Enter your group number Confirm 5 3 3 Return into your group Code of the Return to group function Enter your group number Confirm Display of exit acceptance 5 4 Diverting hunting group calls You can divert your own group calls Code of the Group call diversion function Number of diversion t...

Страница 27: ...2 Forwarding calls to another number immediate forward The number can be your home mobile voice mailbox or an internal extension operator etc Access MENU Forward Confirm access to immediate diversion FwdImm Dial the destination number Confirm You can continue to make calls while your telephone is diverted General remark concerning diversions you can only activate a single diversion on your telepho...

Страница 28: ...ur calls are diverted to the number you choose FwdDND Your telephone is momentarily inaccessible to all incoming calls FwdFollow Your calls follow you when you are at another set FwdtoPag Your calls are diverted to your portable radio paging receiver FwdTextAns When a contact tries to call you the text message you will have selected will be displayed on his or her phone screen 6 3 2 Example of div...

Страница 29: ...welcome screen The orange LED on your telephone flashes to indicate that you have a new request Display of callback requests The message icon disappears once all new events have been consulted 6 7 Consulting your voice mailbox When you have received a message the Message icon is displayed on the welcome screen The orange LED on your telephone flashes to indicate there is a message The number of ne...

Страница 30: ...laynew To access voice mail functions You can move horizontally along the various icons 1 2 3 4 5 6 7 1 Listen to the messages 2 Delete the current message 3 Call back the person who left the message 4 Send a copy of a message 5 Pause while listening to message 6 Go back 10 seconds 7 Go forward 10 seconds The message icon disappears once all new events have been consulted ...

Страница 31: ...assist ForwardON to activate personal assistant ForwardOFF to deactivate personal assistant Confirm 6 9 Personal assistant reaching you with one number only Access MENU Services Persoassist Menu To select the type of forwarding Menu InternalNb Enter the name of a colleague or your assistant or any other name ExternalNb Key in an outside number MobileNb Key in the number of your mobile ChoiceON Cho...

Страница 32: ... X Textmails Confirm Read the messages Select a message to read Confirm Readamsg Confirm access to the read messages option From the options menu you can delete the message callback the message sender reply to the message or save the message sender s number in your list of personal contacts The message icon disappears once all new events have been consulted 6 11 Sending a written message to an int...

Страница 33: ... _ 21 ON VACATION BACK ON ___ 8 USE PAGING 22 EXTERNAL MEETING 9 PLEASE FETCH YOUR FAX 23 EXTERNAL MEETING BACK ON ___ 10 PLEASE FETCH YOUR MAIL 24 I AM IN ROOM NR __ 11 PLEASE CANCEL YOUR FORWARDING 25 IN A MEETING DO NOT DISTURB 12 VISITORS ARE WAITING 26 AT LUNCH 13 YOU ARE EXPECTED AT RECEPTION 27 INDISPOSED 14 MEETING AT _ _ Messages to be completed using numeric keypad If selected message ha...

Страница 34: ... password Confirm Select the message to copy Sendcopy Number or name of the recipient or list Confirm Confirm Confirm To record a comment Sendcopy Number or name of the recipient or list Confirm Reccomment Confirm Confirm Start recording Recording in progress Stop Confirm While the message is being recorded you can select other functions with the navigate up down key ...

Страница 35: ... of the recipient or the list 000 050 Apply Select the message to be sent Confirm Distribution lists 000 the message is sent to all voice mailboxes 001 to 050 the message is sent to a group of voice mailboxes To record the message Reccomment Confirm Confirm Start recording Recording in progress Stop Confirm Send message While the message is being recorded you can select other functions with the na...

Страница 36: ...structions Your personal code is used to access your voice mailbox and to lock your telephone Until your voice mailbox is activated the default password is defined by the administrator Please contact your administrator A weak personal code with 6 identical digits 000000 111111 etc or a simple sequence of 6 digits 012345 123456 etc will be rejected by the system 7 2 Customizing your voice greeting ...

Страница 37: ...ervices Useroptions Password Enter the old password Enter the new password Apply Until your voice mailbox is activated the default password is defined by the administrator Please contact your administrator Each digit of the code is symbolized with an asterisk A weak personal code with 6 identical digits 000000 111111 etc or a simple sequence of 6 digits 012345 123456 etc will be rejected by the sy...

Страница 38: ...me Ring level Select the volume of your choice Apply 7 4 3 You can adjust the buzzer ringer mode according to your needs Press on the ringer vibrate key Off Ringer and buzzer are deactivated Ring only Rings only Vibrate then ring The handset vibrates and then rings Vibrate only The handset vibrates and doesn t ring Vibrate and ring The handset vibrates and rings simultaneously This key can be used...

Страница 39: ...rate only Vibrate and ring Ring only Vibrate and ring 7 5 Activating automatic answer on the headset This mode allows you to answer calls automatically without doing anything and to direct the call to the external headset Access MENU Services Phoneset automatic answer Select active inactive as you wish Apply 7 6 Adjusting your telephone functions Access MENU Settings Select the function you want a...

Страница 40: ...s activated the set adjusts its radio emission power according to the distance between the set and the radio base The closer the set is to the radio base the lower is the radio emission from the phone This means that the phone is not always emitting at full power and thus saves the battery Vibrate Ring You can adjust the buzzer ringer mode according to your needs Vibrator Shortcut Activate or deac...

Страница 41: ...rs Access MENU Contacts PersSpDial Select the chosen card Confirm long press Enter the name Apply Enter the number Apply Return to idle To key in the name the keys in the keypad include letters that you can display by pressing them successively Example press 8 twice to display the letter U Press and hold the key to switch from lowercase to uppercase mode and from uppercase mode to numbering mode T...

Страница 42: ...ase letters mode to uppercase letters mode and from uppercase letters mode to numbering mode Use the browser to position on the character or digit to modify To delete a character briefly press the delete key To erase a field full of characters hold down the erase key long press 7 10 Erase a record from the personal directory Access MENU Contacts PersSpDial Select the record to erase Confirm long p...

Страница 43: ...intment call back request Access MENU Alarms Select the appointment to cancel Delete time of appointment Apply Return to idle 7 12 Configure the F1 and F2 keys A lock speed dial alarm acknowledgment or notification event if authorized feature can be associated with the F1 and F2 keys Once configured these features can be accessed by a short or a long press 7 12 1 Define the feature to associate wi...

Страница 44: ...nage an agenda on your phone 7 13 1 Modify the agenda format Access MENU Access the agenda menu More View week View of the week View month View of the month 7 13 2 Programming an appointment reminder Access MENU Access the agenda menu Add Enter date Save Enter the beginning time Save Choose the duration of the appointment Select Enter the subject of the appointment This field can be left empty Sav...

Страница 45: ...tment Access MENU Access the agenda menu Select a date Month view only View Month view only View the agenda for the selected date Month view only Select the appointment of the day in month view or the appointment of the week in week view View A scheduled date is framed and has a checkmark 7 13 4 Modify an appointment reminder Access MENU Access the agenda menu Select a date Month view only View Mo...

Страница 46: ...y in month view or the appointment of the week in week view View More Copy Change the appointment by filling in the fields as described in the creation of appointments 7 13 6 Delete an appointment reminder Access MENU Access the agenda menu Select a date Month view only View Month view only View the agenda for the selected date Month view only Select the appointment of the day in month view or the...

Страница 47: ...our password Apply Unlocking features on your terminal Access MENU Lock Apply Personal code Please refer to the administrator for your password Apply 7 14 2 Locking your terminal key lock This service enables you to prevent unrequested key pressing Press the lock key of your phone long press Lock your phone 7 14 3 Unlock your terminal Press the lock key of your phone long press Unlock your phone 7...

Страница 48: ... displayed on the screen and the Bluetooth connected icon is displayed To manage the pairing the Bluetooth device must be in detectable mode Refer to your Bluetooth device documentation to find out how to activate detectable mode 7 15 3 Managing paired devices This option allows you to list and to manage devices paired to the phone up to 4 compatible devices Access MENU Settings Bluetooth Paired d...

Страница 49: ...installed on the charger if phone is switched off o Display lighting if set to Off screen remains off whatever the event incoming call message voice mail reboot o Silent charging if activated the handset does not ring beep or vibrate under any circumstances On Pick up o Backlight on pickup if set to yes backlight of the display will switch on when handset picked up from the charger o Off hook on p...

Страница 50: ...r PARK identifier optional Press the OK key to confirm If the system uses an AC authentication code enter the code Press the OK key to confirm Select Power mode You are advised not to select the 50 mW power mode unless required The 50mW power mode is intended for hazardous sites such as nuclear plants where it is requested that emissions do not exceed the maximum value Legacy Mode Yes No Call from...

Страница 51: ...system installation manual or consult your installation manager 2 When the system is ready Access MENU Settings System settings Enter the PIN Code Apply Register Select a system Enter PARK code Apply Enter access code Apply Select Power mode Legacy Mode Yes No Call from encrypted system to un encrypted system is accepted yes or rejected no Launch subscription If the registration operation runs cor...

Страница 52: ...tton with a central dot Return to idle The selection is retained even after switching the telephone on off The selection of a specific system SYSTEM forces operation on a specific system This selection must be changed if one wishes to change system Selecting Auto select enables the telephone to connect automatically when it enters a system coverage zone If the systems programmed in the telephone h...

Страница 53: ... server allows the server to confirm that the handset is under coverage and is working Emergency calls or notification calls Emergency calls are initiated by the user of the handset They are used to notify the server of emergencies such as injuries or material damage when specific keys are pressed Man down shock no movement pull cord alarms Abnormal situations are automatically detected by the han...

Страница 54: ...such as live key event or status calls During the notification process all user actions are ignored until communication is established with the alarm server Then either the user or the alarm server can terminate the call and the handset will return to idle state and will be available to process any subsequent user calls 9 3 Key event calls This feature allows you to send an information message to ...

Страница 55: ... alarm server While the handset is ringing a message maximum of 14 characters may also appear on the phone display 9 6 Calls While the phone is making such a call the standard call processing message appears on the display and you are unable to receive or set up any other calls Notification calls have the highest priority over any other calls In the event of a notification call any other call will...

Страница 56: ...e power supply and the USB cable Your phone is equipped with a belt clip on the back 10 2 Dual chargers and power supply Your phone charger is supplied with the following equipment An AC DC adapter made of a body and a separate plug head that clips onto the AC DC adapator body The charger is provided separately A USB cable provided with the charger A desk support for docking your phone and a spare...

Страница 57: ...e how the handset behaves when it is installed on the charger using the settings menu Refer to the chapter on configuring your telephone 10 2 2 Use a spare battery pack Unlock the cover of the spare battery compartment and lift it up Place a spare battery pack in the top back slot behind the handset with the charging contacts down To remove the spare battery push down on the button near the compar...

Страница 58: ...f the handset that will disengage the cord from the handset thanks to a sensor 10 5 Presentation of the battery pack 10 5 1 Autonomy of your phone without Bluetooth and noise reduction activated On standby in the radio coverage zone Up to 160 hours In continuous conversation Up to 20 hours if economy mode is activated 17 hours if economy mode is not activated 10 5 2 Initial charge Place the teleph...

Страница 59: ...oap or detergent to clean the surface of the telephone 10 8 Transporting and protecting your telephone To avoid losing your telephone get into the habit of clipping it onto your belt Your telephone can also be carried in a protective case Various models of carrying case are available Ask your installation technician for information It is vital to use the special protective carrying case if your te...

Страница 60: ...osure to Radio Frequency Signals This device has been designed and manufactured not to exceed the SAR Specific Absorption Rate radio frequency power transmission limits established by the different countries concerned The SAR value measured is equal to 0 089 W kg the globally accepted maximum limit being 1 6 W kg User Instructions Only use the handset in temperatures between 10 C to 55 C 14 F to 1...

Страница 61: ...or loudspeaker during a conversation 8 steps Long press activate deactivate the mute feature Short press increase the volume of the ring tone during an incoming call 8 steps or increase the volume of the earpiece or loudspeaker during a conversation 8 steps Long press activate deactivate the loudspeaker Lock unlock the phone Pull cord USB socket for charging the battery and upgrading the phone Eme...

Страница 62: ... text messages Access the call log Answer a call intended for another telephone Program a call back time Lock unlock the set Access the services configuration of the handset associate overflow password name number etc Access the general settings of the phone key sound economy mode charger warning programming of F1 and F2 keys etc Access the calendar Alarm settings menu Access the alarm acknowledgm...

Отзывы: