background image

Español 

41 

4.9.1 

Establecer el tono de llamada. 

El Tectalk Easy 2 tiene 10 tonos de llamada diferentes. 


Pulse  dos  veces  el  botón 

Menu

,  y  en  la  pantalla 

aparecerá “CA” y el número del tono de llamada actual 
parpadeando. 


Pulse  ▲  o  ▼  para  seleccionar  el  tono  de  llamada 
deseado  o  seleccione  “OF”  para  desactivar  el  tono  de 
llamada. 


Pulse  el  botón 

PTT/Call

  para  confirmar  y  tono  y 

regresar al modo en espera 

4.9.2 

Enviar un tono de llamada 

Pulse  brevemente  el  botón 

PTT/Call

.  Transmitirá  el  tono  de 

llamada en el canal seleccionado. 
Nota:  Si  tiene  desactivado  el  tono  de  llamada  en  el  menú,  no 
transmitirá ningún tono de llamada.


4.10 

Activar/Desactivar tono de tecla 

Con  esta  función  activada,  oirá  un  pitido  (bip)  pada  vez  que 
pulse una tecla. 


Pulse  el  botón 

Menu


tres veces y aparecerá “to” en la 

pantalla. 


Pulse la tecla ▲ o ▼para activarlo (oN) y desactivarlo 
(oF). 


Pulse  el  botón 

PTT/Call

  para  confirmar  la  selección  y 

regresar al modo en espera. 

4.11 

Activar/Desactivar el pitido de recibido 

Al dejar de pulsar el botón 

PTT/Call

 la unidad enviará un pitido 

(bip)  de  recibido  para  confirmar  que  usted  ha  terminado  de 
hablar. 
Para configurar el pitido de recibido. 


Pulse  el  botón 

Menu


4  veces.  Aparecerá  “rO”  en  la 

pantalla. 


Pulse la tecla ▲ o ▼ para activar (oN) y desactivar (oF) 
el tono de recibido. 


Pulse  el  botón 

PTT/Call

  para  confirmar  la  selección  y 

regresar al modo en espera. 

Содержание Tectalk Easy 2

Страница 1: ...Deutsch 1 Tectalk Easy 2 Bedienungsanleitung Deutsch English Français Español Italiano ...

Страница 2: ... der Nähe von Ölpumpen auf dem Unterdeck eines Schiffes oder in der Nähe eines Kraftstofflagers oder chemischer Produkte Schalten Sie das Gerät im Flugzeug oder im Krankenhaus aus Verwenden Sie das Gerät nicht in der Nähe eines Radios um Störungen zu vermeiden Entfernen Sie die Batterien wenn das Gerät längere Zeit nicht benutzt wird Verwenden Sie gebrauchte und neue Batterien nicht zusammen Halte...

Страница 3: ... Aufwärts Taste 6 Lautsprecher 7 PTT Call Taste 8 Lautstärke Anzeige 9 RX TX Symbol 10 Taschenlampe 11 Anzeige für Kanal Menüeintrag 12 Mikrofon 13 Taschenlampentaste 14 Abwärts Taste 15 Gürtelclipverriegelung 16 Gürtelclip 17 Batteriefach 18 Batterien nicht im Lieferumfang 1 2 3 4 5 6 7 8 9 10 11 12 13 14 ...

Страница 4: ... Sie das Batteriefach 17 und legen Sie 3 AAA Batterien 18 nicht im Lieferumfang ein Achten Sie auf die korrekte Ausrichtung der Batteriepole Setzen Sie den Deckel wieder ein Die Pfeile geben an in welche Richtung die Teile bewegt werden müssen 4 Verwendung des Tectalk Easy 2 4 1 Ein Ausschalten Zum Einschalten des Gerätes die Ein Aus Taste 3 Sekunden lang drücken bis ein Signalton zur Bestätigung ...

Страница 5: ...angen wird das RX Symbol auf dem Display angezeigt 4 5 Senden Senden Sie nicht wenn bereits jemand auf dem Kanal spricht Halten Sie zum Senden die PTT Call Taste gedrückt Auf dem Display wird das TX Symbol angezeigt Halten Sie das Gerät vertikal und so dass das Mikrofon etwa 5 7 cm vom Mund entfernt ist Sprechen Sie mit normaler Lautstärke Wichtig ist dass Sie und alle Partnerstationen denselben F...

Страница 6: ...rmalbetrieb zurückzukehren 4 8 Kanal Scan Der Kanal Scan führt in einer Endlosschleife über alle Kanäle eine automatische Signalsuche durch Drücken Sie 3 Sekunden lang die Taste um eine kontinuierliche Aufwärtssuche zu starten Während die Suche läuft können Sie die Suchrichtung durch Drücken der oder der Taste ändern Wird ein aktives Signal auf einem der 8 Kanäle erkannt setzt der Suchmodus aus so...

Страница 7: ...d kein Rufton gesendet wenn der Rufton im Menü deaktiviert ist 4 10 Tastenton ein aus Wenn diese Funktion aktiviert ist gibt das Gerät bei jedem Tastendruck einen kurzen Signalton aus Drücken Sie dreimal die Menu Taste daraufhin wird to angezeigt Drücken Sie die oder Taste um den Tastenton ein oN oder auszuschalten oF Drücken Sie die PTT Call Taste um die Auswahl zu bestätigen und wieder in den Be...

Страница 8: ...kt sich nicht auf den Signalempfang aus und der Standardmodus wird automatisch wieder aktiviert sobald ein Signal erkannt wird 4 14 Taschenlampe Als zusätzliches Ausstattungsmerkmal verfügt Ihr Funkgerät über eine eingebaute Taschenlampe Sie können die Taschenlampe aktivieren indem Sie die Taschenlampe Taste drücken 5 Technische Daten Kanalnummern und Frequenzen Kanal Frequenz MHz Kanal Frequenz M...

Страница 9: ... oder seinem autorisierten Service Center eingereicht werden Die Firma übernimmt keine Haftung für die Kommunikationsreichweite dieses Produktes Die Garantie gilt nicht für Produkte oder Teile davon die nach Ermessen der Firma durch Veränderungen am Gerät falsche Installation falsche Handhabung Missbrauch Fahrlässigkeit Unfall oder durch Entfernen oder Unkenntlichmachung der Fabrik Seriennummer de...

Страница 10: ...icht der europäischen FuTKEE EMV und NSR Richtlinie sowie den harmonisierten Standards EN 300 296 2 V1 4 1 EN 301 489 1 V1 9 2 EN 301 489 05 V1 3 1 und EN 60 950 1 2006 2 Ausg Das Gerät darf in den folgenden Ländern verwendet werden A B BG CH CY CZ D DK E EST F FIN FL GB GR H I IS IRL L LV LT M N NL P PL RO RSM S SK SLO Lütjensee 21 04 2016 Alan Electronics GmbH 6 1 Service Hinweise und Dokumentat...

Страница 11: ... Bitte nutzen Sie diese Möglichkeit es ist Ihr Beitrag für eine ordnungsgemäße Verwertung von elektronischem Material und es kostet Sie nichts Service Partner in Deutschland nur für in Deutschland verkaufte Funkgeräte Alan Service c o Transerv2000 Repair Service GmbH Co KG Servicecenter Frankfurt Robert Bosch Str 35 D 64625 Bensheim Reparaturen und technische Fragen Tel 49 0 6251 9856 0 55 E Mail ...

Страница 12: ...Deutsch 12 ...

Страница 13: ...English 13 Tectalk Easy 2 User Manual English ...

Страница 14: ... the device in a potentially explosive setting e g around petrol pumps on the lower deck of a boat or around a fuel storage installation or chemical products Switch off the device if on an aeroplane or in a hospital Never use the device in close proximity to a radio to avoid interference Remove the batteries if the device is not in use for an extended period of time Never mix used and new batterie...

Страница 15: ... button 5 Up button 6 Loudspeaker 7 PTT Call button 8 Volume level indicator 9 RX TX icon 10 Lamp 11 Channel Menu item indication 12 Microphone 13 Lamp Button 14 Down button 15 Belt clip latch 16 Belt attachment 17 Battery compartment 18 Batteries not supplied 1 2 3 4 5 6 7 8 9 10 11 12 13 14 ...

Страница 16: ... the device Open the battery compartment 17 and insert 3 AAA batteries 18 not supplied ensuring that the poles are correctly aligned Then close the lid The arrows indicate in which direction the parts need to be moved 4 Using the Tectalk Easy 2 4 1 Turning the Device On Off To turn the devices on or off hold down the Power button for 3 seconds a BEEP sound will be played to confirm 15 18 16 17 ...

Страница 17: ... Don t transmit if someone is already talking on the channel Press and hold the PTT Call button to transmit The TX Indicator will be shown on the LCD Hold the unit in a vertical position with the microphone about 5 7 cm away from the mouth and speak in normal loudness It is important that you and all your partner stations have selected the same operating channel Note This device is equipped with a...

Страница 18: ...s to start scanning continuously upwards When the scan is running the direction can be changed by the and buttons When an active signal on one of the 8 channels is detected scan mode pauses so you can hear the radio traffic on this channel The scan will resume automatically when no signal is received for more than 5 seconds Press the Power button to abort scanning Note In the presence of a signal ...

Страница 19: ...mode 4 11 Roger Beep On Off After the PTT Call button is released the unit will send out a roger beep to confirm that you have stopped talking To set the Roger Beep Press the Menu button four times rO will be displayed Press the or key to toggle the roger beep on oN and of oF Press the PTT Call button to confirm your selection and return to the standby mode 4 12 Display Backlight To activate the b...

Страница 20: ...oven defective in material or workmanship within 2 years from the date of original purchase such defect s will be repaired or replaced with new or reconditioned product at the company s option without charge for parts and repair labor To obtain repair or replacement within the terms of this warranty the product is to be delivered with proof of warranty coverage e g dated bill of sale specification...

Страница 21: ... used only in EU and other states applying the R TTE directive of the European Community However there is still a restriction for users in Italy as of date of this user manual a one time payment is requested before using the radio the first time but this payment is not requested from tourists who use the radio only during holidays This unit complies to the European R TTE EMC and LVD Directives and...

Страница 22: ...local communities will provide containers for disposal of electronic waste Please use these facilities it will be your contribution to proper recycling of electronic material and it is free of charge for you Service partner in Germany only for radios sold in Germany Alan Service c o Transerv2000 Repair Service GmbH Co KG Servicecenter Frankfurt Robert Bosch Str 35 D 64625 Bensheim Repairs and tech...

Страница 23: ...Français 23 Tectalk Easy 2 Guide d utilisateur Français ...

Страница 24: ...dans un environnement potentiellement explosif ex près de pompes à essence sur le pont inférieur d un bateau ou près d une installation de stockage de combustible ou de produits chimiques Éteignez l appareil dans un avion ou dans un hôpital N utilisez jamais l appareil à proximité d une radio pour éviter les interférences Retirez les piles si l appareil ne va pas être utilisé pendant une longue pé...

Страница 25: ...n Menu 5 Touche haut 6 Haut parleur 7 Touche PTT Appeler 8 Indicateur du niveau de volume 9 Icône RX TX 10 Lampe 11 Indication canal élément de menu 12 Microphone 13 Touche Lampe 14 Touche bas 15 Loquet d agrafe de ceinture 16 Attache de ceinture 17 Compartiment à piles 18 Piles non fournies 1 2 3 4 5 6 7 8 9 10 11 12 13 14 ...

Страница 26: ...de l appareil Ouvrez le compartiment à piles 17 et insérez 3 piles AAA 18 non fournies veillez à respecter les polarités Refermez ensuite le couvercle Les flèches indiquent la direction dans laquelle les composants doivent être déplacés 4 Utilisation de Tectalk Easy 2 4 1 Allumer Éteindre l appareil Pour allumer éteindre les appareils maintenez appuyée la touche d alimentation pendant 3 secondes u...

Страница 27: ... écran LCD 4 5 Transmission d un signal Ne pas émettre si quelqu un est en train de parler sur le canal Maintenez appuyée la touche PTT Call pour émettre L indicateur TX s affiche sur l écran LCD Tenez l appareil dans une position verticale le micro doit être de 5 à 7 5 cm de la bouche puis parlez normalement Il faut obligatoirement que votre appareil et ceux de vos partenaires soient sur le même ...

Страница 28: ...de balayage des canaux Le balayage des canaux effectue une recherche automatique de signaux en boucle continue sur tous les canaux Maintenez appuyée la touche pendant trois secondes pour lancer la recherche continue vers le haut Pendant la recherche le sens peut être modifié par les touches et Dès qu un signal actif sur l un des 8 canaux est détecté le mode recherche s arrête pour permettre l écou...

Страница 29: ...la tonalité d appel est désactivée dans le menu 4 10 Activer désactiver la tonalité des touches Lorsque cette fonction est activée l appareil émet un bip court à chaque pression sur une touche Appuyez trois fois sur la touche Menu jusqu à ce que à s affiche Appuyez sur la touche ou pour activer ON désactiver OF la tonalité Appuyez sur la touche PTT Call pour confirmer la sélection et retourner au ...

Страница 30: ...e intégrée comme fonctionnalité supplémentaire Vous pouvez l allumer en appuyant sur la touche Lampe 5 Spécifications Numéros et fréquences des canaux Canal Fréquence MHz Canal Fréquence MHz 1 446 00625 5 446 05625 2 446 01875 6 446 06875 3 446 03125 7 446 08125 4 446 04375 8 446 09375 Puissance de transmission RF max 0 5W ERP Type de modulation FM F3E Portée Jusqu à 10 km espace dégagé Alimentati...

Страница 31: ...l altération de la des plaque s portant le numéro de série le code à barres La garantie ne s applique pas aux pièces accessoires ou aux problèmes causés par des accessoires non autorisés ou non recommandés tels que piles alimentations externes et surtension causée par des alimentations externes ampoules électriques antennes cassées attache de ceinture brisée verre acrylique brisé ou endommagé et p...

Страница 32: ...reil Notre documentation technique est mise à jour régulièrement Vous pouvez télécharger les dernières versions des Guides d utilisation documents techniques et également la Déclaration de conformité originale bilingue ainsi que des conseils de service ou FAQ à tout moment sur notre serveur http www service alan electronics de Si vous avez un problème consultez les conseils de service ou les quest...

Страница 33: ...eulement pour les radios vendues en Allemagne Alan Service c o Transerv2000 Repair Service GmbH Co KG Servicecenter Frankfurt Robert Bosch Str 35 D 64625 Bensheim Réparations et assistance technique Tél 49 0 6251 9856 0 55 Courriel service alan transerv2000 de Pour d autres pays consultez votre distributeur local en cas de problème technique Droits d impression réservés 2016 Alan Electronics GmbH ...

Страница 34: ...Français 34 ...

Страница 35: ...Español 35 Tectalk Easy 2 Manual de usuario Español ...

Страница 36: ...gares con riesgo de explosión p ej cerca de un surtidor de gasolina en la sala de máquinas de un barco o junto a depósitos de combustible o de productos químicos Apague el aparato cuando dentro de un avión o en un hospital Nunca use el aparato cerca de una radio para evitar interferencias Saque las pilas si no va a utilizar el aparato durante un largo periodo de tiempo Nunca mezcla pilas nuevas co...

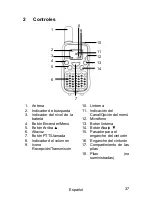
Страница 37: ...ltavoz 7 Botón PTT Llamada 8 Indicador del volumen 9 Icono Recepción Transmisión 10 Linterna 11 Indicación del Canal Opción del menú 12 Micrófono 13 Botón linterna 14 Botón Abajo 15 Pasador para el enganche del cinturón 16 Enganche del cinturón 17 Compartimiento de las pilas 18 Pilas no suministradas 1 2 3 4 5 6 7 8 9 10 11 12 13 14 ...

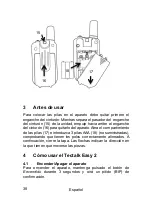
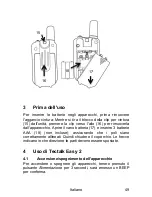
Страница 38: ... aparato Abra el compartimiento de las pilas 17 e introduzca 3 pilas AAA 18 no suministradas comprobando que tienen los polos correctamente alineados A continuación cierre la tapa Las flechas indican la dirección en la que tienen que moverse las piezas 4 Cómo usar el Tectalk Easy 2 4 1 Encender Apagar el aparato Para encender el aparato mantenga pulsado el botón de Encendido durante 3 segundos y o...

Страница 39: ...es No transmita si hay alguien hablando en el canal Mantenga pulsado el botón PTT Call para transmitir El indicador de transmisión aparecerá en la pantalla LCD Aguante la unidad en posición vertical con el micrófono unos 5 7 cm separado de la boca y hable con naturalidad Es importante que ambas unidades la suya y la de su pareja tengan seleccionado el mismo canal de funcionamiento Nota Este aparat...

Страница 40: ...a función de monitorización de señales débiles 4 8 Búsqueda de canales La búsqueda de canales efectúa una búsqueda automática de señales en un bucle sin fin en todos los canales Pulse el botón durante 3 segundos para iniciar la búsqueda continua en sentido ascendente Una vez iniciada la búsqueda puede cambiar la dirección usando los botones y Cuando el aparato detecta una señal activa en uno de lo...

Страница 41: ...enú no transmitirá ningún tono de llamada 4 10 Activar Desactivar tono de tecla Con esta función activada oirá un pitido bip pada vez que pulse una tecla Pulse el botón Menu tres veces y aparecerá to en la pantalla Pulse la tecla o para activarlo oN y desactivarlo oF Pulse el botón PTT Call para confirmar la selección y regresar al modo en espera 4 11 Activar Desactivar el pitido de recibido Al de...

Страница 42: ...ción añadida su radio lleva integrada una linterna Puede activarla pulsando el botón de la Linterna 5 Especificaciones Números de canal y Frecuencias Canal Frecuencia MHz Canal Frecuencia MHz 1 446 00625 5 446 05625 2 446 01875 6 446 06875 3 446 03125 7 446 08125 4 446 04375 8 446 09375 Potencia RF en transmisión 0 5 W ERP máx Tipo de modulación FM F3E Alcance Hasta 10 km en campo abierto Batería ...

Страница 43: ...ta con el código de barras La garantía no es de aplicación a los accesorios o a los problemas causados por el uso de accesorios no autorizados o recomendados para los aparatos como las pilas las fuentes de alimentación externa picos de tensión provocados por las fuentes de alimentación las bombillas las antenas rotas el enganche para el cinturón roto ventanas de cristal acrílico rotas o dañadas y ...

Страница 44: ...cargar las últimas versiones de los manuales de usuario documentos técnicos y también la declaración de conformidad original en dos idiomas como también sugerencias sobre el servicio técnico o las preguntas frecuentes desde nuestro servidor en http www service alan electronics de Si tuviera un problema por favor eche un vistazo a las sugerencias sobre el servicio técnico o a las preguntas más frec...

Страница 45: ...Repair Service GmbH Co KG Servicecenter Frankfurt Robert Bosch Str 35 D 64625 Bensheim Reparaciones y consultas técnicas Tel 49 0 6251 9856 0 55 Dirección de correo electrónico service alan transerv2000 de En otros países contacte con su distribuidor local en el caso de sufrir problemas técnicos Errores de imprenta reservados 2016 Alan Electronics GmbH Daimlerstr 1 k D 63303 Dreieich www alan elec...

Страница 46: ...Italiano 46 Tectalk Easy 2 Manuale dell utente Italiano ...

Страница 47: ...nte esplosivo ad es nei pressi di pompe di benzina sul ponte inferiore di una barca o in prossimità di impianti per il deposito di carburante o prodotti chimici Spegnere l apparecchio se si è su un aereo o in un ospedale Non utilizzare mai l apparecchio in prossimità di una radio per evitare interferenze Rimuovere le batterie se si prevede di non utilizzare l apparecchio per un periodo prolungato ...

Страница 48: ...nu 5 Pulsante Su 6 Altoparlante 7 Pulsante PTT Chiamata 8 Indicatore livello volume 9 Icona RX TX 10 Lampada 11 Indicazione Canale Voce menu 12 Microfono 13 Pulsante lampada 14 Pulsante Giù 15 Blocco clip per cintura 16 Aggancio cintura 17 Comparto batteria 18 Batterie non fornite 1 2 3 4 5 6 7 8 9 10 11 12 13 14 ...

Страница 49: ...hio Aprire il vano batteria 17 e inserire 3 batterie AAA 18 non incluse assicurando che i poli siano correttamente allineati Quindi chiudere il coperchio Le frecce indicano in che direzione le parti devono essere spostate 4 Uso di Tectalk Easy 2 4 1 Accensione spegnimento dell apparecchio Per accendere o spegnere gli apparecchi tenere premuto il pulsante Alimentazione per 3 secondi sarà emesso un ...

Страница 50: ...icona RX è visualizzata sull LCD 4 5 Trasmissione di un segnale Non trasmettere se qualcuno sta già parlando su un canale Premere e tenere premuto il pulsante PTT Call per trasmettere L indicatore TX appare sull LCD Mantenere l unità in posizione verticale con il microfono a circa 5 7 cm dalla bocca e parlare a voce normale È importante che tu e tutte le tue stazioni partner abbiate selezionato lo...

Страница 51: ...aggio 4 8 Scansione canale Scansione Canale esegue una ricerca automatica dei segnali in un ciclo continuo su tutti i canali Premere il pulsante per tre secondi per avviare la scansione continua verso l alto Durante la scansione la direzione può essere modificata con i pulsanti e Quando è rilevato un segnale attivo su uno degli 8 canali la modalità scansione va in pausa in modo da poter ascoltare ...

Страница 52: ...nzione è attivata l unità emette brevemente un bip a ogni pressione del tasto Premere tre volte il pulsante Menu appare to Premere il tasto o per attivare oN e disattivare oF il tono del tasto Premere il pulsante PTT Call per confermare la propria scelta e tornare alla modalità di standby 4 11 Attivare disattivare il Roger Bip Dopo aver rilasciato il pulsante PTT Call l unità emetterà un roger bip...

Страница 53: ...446 09375 Potenza di trasmissione RF max 0 5 W ERP Tipo di modulazione FM F3E Intervallo Fino a 10 km campo aperto Batteria 3 AAA 6 Garanzia europea di 2 anni Il negozio distributore fornitore o rivenditore garantisce all acquirente originale del prodotto che qualora esso dovesse in tutto o in parte risultare difettoso in normali condizioni di utilizzo nei materiali o nella manodopera entro 2 anni...

Страница 54: ... radio In alternativa se la radio è stata acquistata in Germania è possibile inviarla direttamente al nostro partner di assistenza indirizzo riportato sull ultima pagina Questioni legali Dichiarazione di Conformità CE La presente unità è conforme a tutti i principali Standard e Regolamenti europei per servizio radio PMR 446 Questa radio può essere usata solo nell UE o altri stati che applicano la ...

Страница 55: ...omento dal nostro server all indirizzo http www service alan electronics de In caso di problemi consultare i suggerimenti per l assistenza o le domande frequenti FAQ prima di inviare la propria Tectalk Easy 2 al centro assistenza Smaltimento di dispositivi elettronici difettosi La Direttiva Europea WEEE non consente di smaltire i dispositivi elettronici usati nei rifiuti domestici I comuni locali ...

Страница 56: ...icecenter Frankfurt Robert Bosch Str 35 D 64625 Bensheim Riparazioni e richieste tecniche Tel 49 0 6251 9856 0 55 e mail service alan transerv2000 de In altri paesi contattare i propri distributori locali in caso di problemi tecnici Errori di stampa riservati 2016 Alan Electronics GmbH Daimlerstr 1 k D 63303 Dreieich www alan electronics de ...

Отзывы: