6
5
SWITCHING YOUR RADIO ON FOR THE FIRST TIME
DAB auto scan
The auto scan will search for the entire DAB Band III channels. After the scan has finished, the
first alphanumerically found station will be automatically selected.
1. To activate auto scan, first press the
MENU
button to enter into the Tune Select Menu and
then press the
▲
or
▼
button to select “Autoscan”, finally press the
SELECT
button to
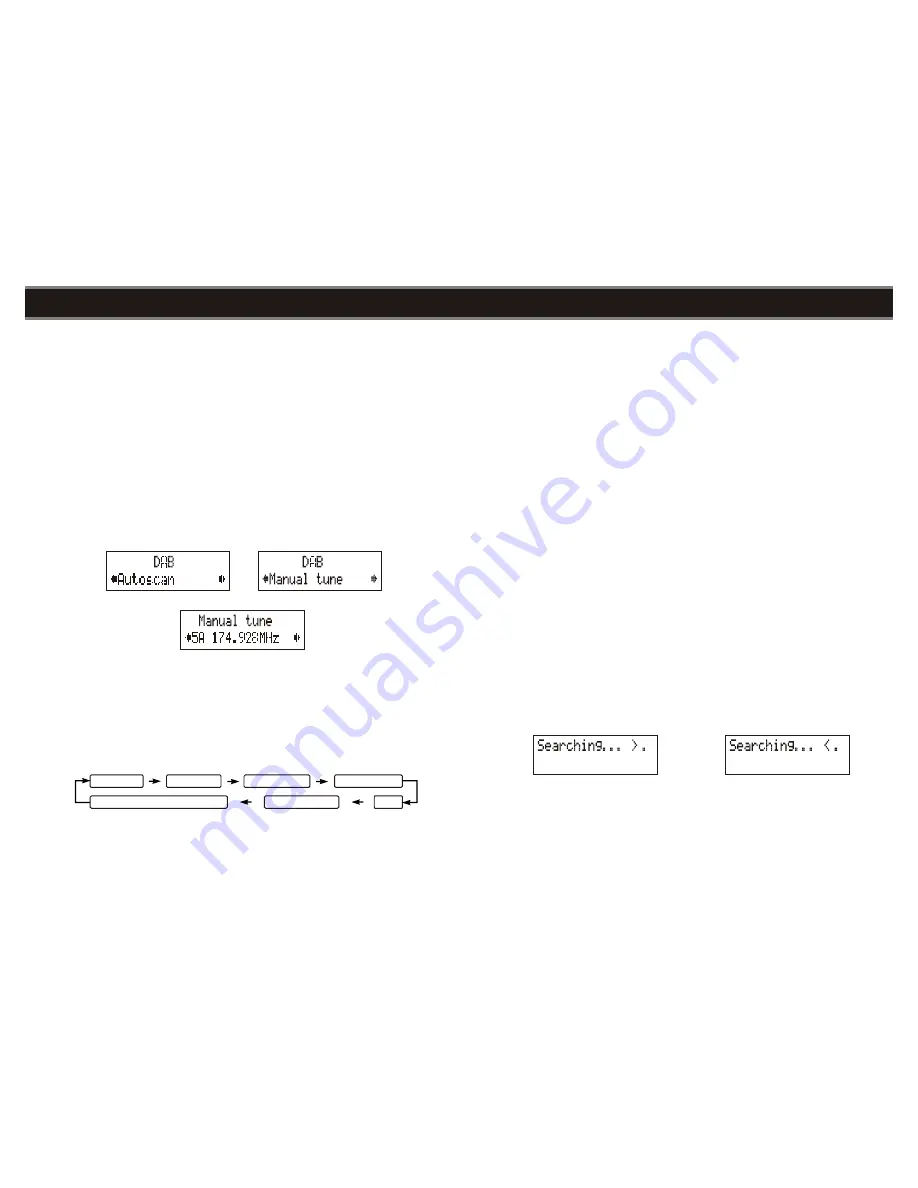
confirm, the display will show “Scanning …” and a progressing slide bar. (F. 3)
2.
All the stations that have been found will be stored automatically, to explore the stations
that have been found, press the
▲
or
▼
buttons and when you find a station that you
would like to listen to, press the
SELECT
button.
DAB manual tune
1. To select manual tune, first press the
MENU
button to enter into the Tune Select Menu,
then press the
SELECT
button to select “Manual tune”. (F. 4) (F. 5)
2.
Press the
▲
or
▼
button to move through the DAB channels, the display will show “5A to
13F” and their associated frequencies.
3.
When your desired frequency appears in the display, press the
SELECT
button to
confirm. The name of the station group (ensemble/multiplex) will be displayed.
4.
To listen to the station selected, press the
SELECT
button again.
DAB secondary services
On some occasions you will see a “>” symbol directly after the name of the station, this
indicates that there are secondary services available to that station. These secondary services
contain extra services that relate to the primary station. E.g. a sports station may want to add
extra commentaries. The secondary services are inserted directly after the primary station. To
select the secondary station, press on the
SELECT
control once.
DAB display modes
Every time you press the
INFO
button, the display will cycle through the following display
modes:
Time and date
The time and date will be automatically updated by the broadcasted information; it is no need to
set the clock manually. In the unlikely event that no clock information is received, the display
will show “<TIME/DATE>”
.
F.3
F.4
F.5
Ensemble/Multiplex(Group name)
Time/Date
Signal strength
DLS
Audio Bit Rate
Programme Type
Frequency
Frequency
The frequency of the present station will be displayed.
Audio bit rate
The display will show the digital audio bit rate being received.
Signal strength
The display will show a slide bar to indicate the signal strength, the stronger the signal, the longer
the bar will be from left to right.
DLS
DLS stands for Dynamic Label Segment which is a scrolling message that the broadcaster may
include in their transmissions. The message usually includes information such as programme
details …etc.
Programme type
This describes the style of the programme that is being broadcast. If the information is not
available, the display will show “<Programme Type>”.
Ensemble/Multiplex (Group name)
The Ensemble/Multiplex is a collection of radio stations that are bundled and transmitted together
in a single frequency. There are national and local multiplexes, local ones contain stations that are
specific to that area.
Note:
Press and hold the INFO button for longer than 2 seconds, the software version number will
be displayed.
FM radio
1. To select FM, press the
MODE
button, the display will show FM and the frequency.
2.
To activate auto search, press and hold the
▲
or
▼
button until it starts to scan up or down
the frequency band, the display will show “Searching … > .” or “Searching … < .”, and it will
stop automatically once a station has been found. (F. 6)(F. 7)
3.
To activate manual search, repeatedly press the
▲
or
▼
button.
4.
To select audio mode, press the
SELECT
button to toggle between the “Auto” or “Mono”
selection.
Note:
The radio will automatically switch between stereo and mono mode, but you can override
this and switch this function manually which is helpful for poor signal reception.
SWITCHING YOUR RADIO ON FOR THE FIRST TIME
F.6
F.7
Содержание NE-6207
Страница 1: ...5 08 DAB FM DIGITAL RADIO NE 6207...


