background image


English - 4


Français

Español

Deutsch

Italiano

English

Portuguese


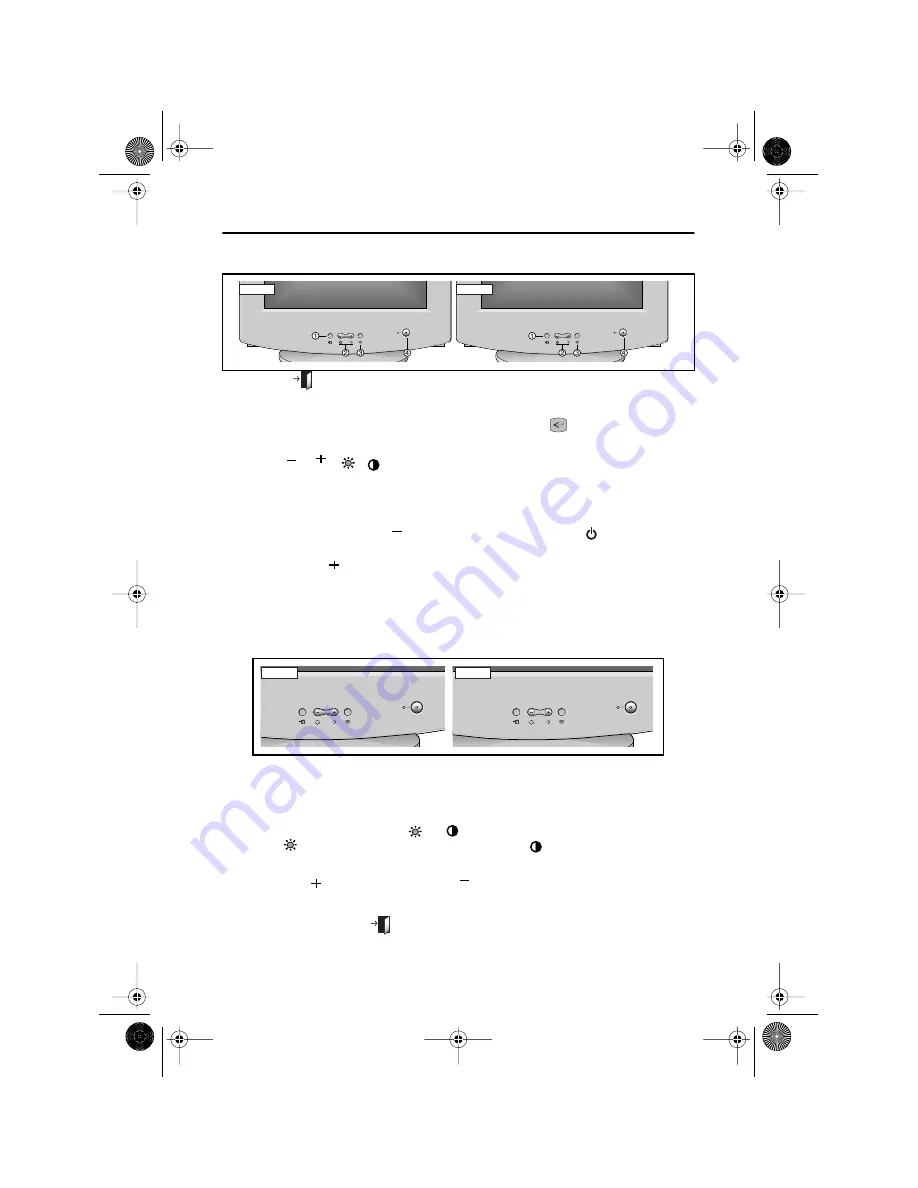
Front Panel


1


EXIT (

)  button


Closes the On Screen Display. It is 
also used to return to the previous 
menu when using the on-screen 
menu system. 


2


The

/

(

/

) buttons


These buttons allow you to select and 
adjust items using the on-screen 
menu. When adjusting an item using 
the on-screen menu, the 

button 

lowers the value of the selected 
function. The

button raises the 

value of the selected function. These 
buttons are also direct access buttons 
for the Contrast and Brightness 

feature controls. (See the section 
below on Direct Access Buttons.) 


3


MENU (

) button


Opens the on-screen menu. It is also 
used to select a highlighted function, 
open a sub-menu, or move between 
menus when using the on-screen 
menu system. 


4


 Power button


The power button turns the monitor 
on and off. The power indicator light 
glows green during normal operation, 
see page 11.


Direct Access Buttons


Most of the adjustments you make to your monitor will be accessed  through the on-screen 
menu described in the next section. The Contrast and Brightness features can also be 
accessed directly from the front of your monitor.


1


With the menu off, press the

or

button on the front of your monitor. 

The

button accesses the Brightness feature. The

button accesses the 

Contrast feature. 


2


Push the 

button to increase or the

button to decrease the value of the 

selection. 


3


Press the EXIT button

twice to exit the on-screen menu.

EXIT

EXIT

MENU

MENU

MENU

EXIT

EXIT

MENU

MENU

MENU

AK57V

AK77E

MENU

EXIT

EXIT

MENU

MENU

MENU

AK57V

EXIT

EXIT

MENU

MENU

MENU

MENU

AK77E


Your New Monitor


4_3p-4p.fm  Page 4  Wednesday, April 2, 2003  10:17 AM

Содержание SyncMaster AK57V

Страница 1: ...AK57V AK77E 1_AK57V77E Cover fm Page 1 Wednesday April 2 2003 10 19 AM...

Страница 2: ...n 6 Vertical Position 6 Horizontal Size 6 Vertical Size 6 Pincushion 7 Geometry 7 Trapezoid 7 Parallelogram 7 Rotation 7 Pinbalance 7 V Linearity 7 Language 8 Advanced 8 H Moir 8 V Moir 8 Video Input...

Страница 3: ...in a location with low humidity and a minimum of dust 8 Do not expose the monitor to rain or use it near water in kitchens near swimming pools etc If the monitor accidentally gets wet unplug it and c...

Страница 4: ...ded A PC compatible computer does not need an adapter 3 Power port Connect the power cord for your monitor to the power port on the back of the monitor 4 Power cords Plug the power cord for the monito...

Страница 5: ...s when using the on screen menu system 4 Power button The power button turns the monitor on and off The power indicator light glows green during normal operation see page 11 Direct Access Buttons Most...

Страница 6: ...on icons 3 To select a function or open a sub menu push the button The screen will display the options for adjustment If there is a sub menu use the or button to highlight the feature you want to adju...

Страница 7: ...on Horizontal screen position Moves screen left Moves screen right Vertical Position Vertical screen position Moves screen down Moves screen up Horizontal Size Horizontal screen size Decreases size In...

Страница 8: ...gram Skews screen image left Skews screen image right Rotation Rotates entire screen left Rotates entire screen right AK77E model only Pinbalance Curves vertical lines to left Curves vertical lines to...

Страница 9: ...s chosen affects only the language of the OSD It has no effect on any software running on the computer Advanced H Moir Corrects for on screen moir pattern and clear Vertical Moir V Moir Corrects for o...

Страница 10: ...itor display settings Factory timing User timing OSD Lock Unlock Allows you to secure the current control settings so that they cannot be inadvertently changed You can unlock the OSD controls at any t...

Страница 11: ...ction between the computer and the monitor Sync Out of Range appears The input signal frequency is over or under the synchronization range of the monitor see Specifications on page 12 The screen image...

Страница 12: ...ility installed on your computer to set up this feature NOTE This monitor is EPA Energy Star compliant and ENERGY 2000 compliant when used with a computer equipped with VESA DPMS functionality Display...

Страница 13: ...16 inch 267 0 4 mm 77E 12 5 0 16 inch 312 0 4 mm Vertical 57V 8 0 0 16 inch 200 0 4 mm 77E 9 4 0 16 inch 234 4 mm Input Signal Terminated Analog 0 7 Vpp positive at 75 ohms Separate Sync TTL level pos...

Отзывы: