ALASKA CM2209DS Скачать руководство пользователя страница 22

10

CLEANING AND CARE

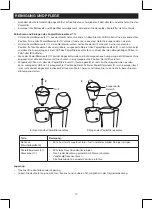
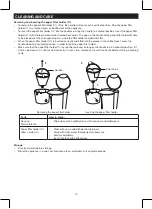
Removing and inserting the paper filter holder (11)

•  To remove the paper filter holder (11), lift up the handle until you reach a vertical position. Now the paper filter 

holder (11) is unlocked and can be lifted out of the appliance.

•  To insert the paper filter holder (11) into the appliance, bring the handle to a vertical position. Insert the paper filter 

holder (11) with the large cutout area showing backwards. The gaps in the handle of the paper filter holder (A) have 
to be placed over the corresponding pins inside the filter holder compartment (8).

•  When the paper filter holder (11) is inserted correctly and fitted into the groove in the coffee maker, press the 

handle down to a horizontal position, in order to lock the paper filter holder.

•  Make sure that the paper filter holder (11) cannot be removed, as long as the handle is in a horizontal position. If it 

still can be moved, it is not inserted correctly. In such case, remove and insert it correctly before starting a brewing 
cycle.

max

10

9

8

7

5

4

3

6

3

4

6

8

max

12

max

10

6

4

3

8

10

3

4

6

8

6

4

3

8

10

max

10

9

8

7

5

4

3

6

1

2

1

2

11

10

1

2

3

4

5

6

7

8

9

max

12

max

10

Handle

Cutout area

A


Removing the paper filter holder   

    Inserting the paper filter holder
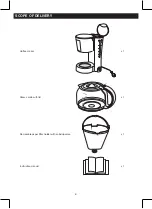
Parts

How to clean...

Housing
Warm plate (5)

•  Wipe clean with a slightly damp cloth and some mild detergent.

Paper filter holder (11)
Glass carafe (10)

•  Clean with some mild dishwasher detergent.
•  Rinse with clean water thoroughly after every use.
•  Let dry completely.
•  Insert into their original locations.

Storage

•  Dry all parts well before storage.
•  Store the appliance in a cool, dry and clean place, preferably in its original package.

Содержание CM2209DS

Страница 1: ...Gebrauchsanweisung Kaffeemaschine CM2209DS...

Страница 2: ...Lieferumfang 6 Teileliste 7 Vor der ersten Inbetriebnahme 8 Bedienung 8 9 Reinigung und Pflege 9 10 Entkalken 11 Probleml sung 11 Technische Daten 12 Gew hrleistung 12 WICHTIGE SICHERHEITSHINWEISE Be...

Страница 3: ...atgebrauch bestimmt und ist nicht f r den professionellen Betrieb ausgelegt 8 berpr fen Sie regelm ig den Netzstecker und das Netzkabel auf Besch digungen Wenn die Netzanschlussleitung dieses Ger tes...

Страница 4: ...nur Originalzubeh r 20 Sch tzen Sie das Ger t vor extremer Hitze Staub direkter Sonneneinstrahlung Feuchtigkeit Tropf und Spritzwasser 21 Stellen Sie keine schweren Gegenst nde auf das Ger t Stellen S...

Страница 5: ...n 32 Achten Sie darauf dass beim Gebrauch des Ger tes der Deckel immer geschlossen bleibt 33 Bef llen Sie den Wassertank ausschlie lich mit kaltem klaren Wasser 34 Dieses Ger t ist nur zum Erhitzen vo...

Страница 6: ...6 8 max 12 max 10 6 4 3 8 10 1 11 10 x 1 Glaskanne mit Deckel max 10 9 8 7 5 4 3 6 3 4 6 8 max 12 max 10 6 4 3 8 10 x 1 Herausnehmbarer Filtereinsatz mit Tropfstopp Funktion max 10 9 8 7 5 4 3 6 3 4 6...

Страница 7: ...4 3 8 10 max 10 9 8 7 5 4 3 6 2 1 2 1 2 3 4 5 6 7 8 9 max 12 max 10 1 Wasserbeh lter Deckel 7 Ein Ausschalter mit Betriebskontrollleuchte 2 Wassereinlass 8 Schwenkbarer Filterhalter 3 Wasserbeh lter 9...

Страница 8: ...neuen Br hvorgang starten Nehmen Sie die Glaskanne 10 von der Warmhalteplatte 5 Halten Sie die Glaskanne nur am Griff Verbrennungsgefahr F hren Sie 3 Br hvorg nge durch und sch tten Sie nach jedem Du...

Страница 9: ...egonnen hat Lassen Sie nach dem Br hvorgang die Glaskanne 10 auf der Warmhalteplatte 5 stehen um den Kaffee warmzuhalten Lassen Sie zu diesem Zweck die Kaffeemaschine eingeschaltet Nehmen Sie die Glas...

Страница 10: ...rgesehene Aussparung der Kaffeemaschine eingesenkt ist dr cken Sie den Griff nach unten in eine waagerechte Position Der Griff rastet ein Vergewissern Sie sich dass der Papierfiltereinsatz 11 fest ein...

Страница 11: ...Ger t Reinigung und Pflege PROBLEML SUNG Problem M gliche Ursache Probleml sung Der Br hvorgang startet nicht Der Netzstecker 6 ist nicht korrekt angeschlossen Pr fen Sie ob der Netzstecker 6 korrekt...

Страница 12: ...unsachgem en Anschluss oder Installation sowie durch h here Gewalt oder sonstige u ere Einfl sse entstehen fallen nicht unter die Gew hrleistung Falls produktspezifische Hinweise beiliegen empfehlen...

Страница 13: ...Instruction manual Coffee Maker CM2209DS...

Страница 14: ...ing the appliance It contains important information for your safety as well as operating and maintenance advice 1 Observe all safety instructions to avoid damage through improper use Follow all warnin...

Страница 15: ...ning Do not immerse the electrical parts of the appliance in water or other liquids Never hold the appliance under running water 11 Danger of burns The warm plate and the casing become very hot during...

Страница 16: ...upplying power to your appliance The installation should be done by an experienced electrician 23 Do not pull the power plug out of the electrical outlet by the power cord and do not wrap the power co...

Страница 17: ...it contains hot liquid or while it is hot IMPORTANT SAFETY INSTRUCTIONS 36 Never operate the appliance without water in the water tank 37 Only use the appliance with the glass carafe provided 38 This...

Страница 18: ...4 6 8 max 12 max 10 6 4 3 8 10 1 11 10 x 1 Glass carafe with lid max 10 9 8 7 5 4 3 6 3 4 6 8 max 12 max 10 6 4 3 8 10 x 1 Removable paper filter holder with anti drip valve max 10 9 8 7 5 4 3 6 3 4...

Страница 19: ...8 6 4 3 8 10 max 10 9 8 7 5 4 3 6 2 1 2 1 2 3 4 5 6 7 8 9 max 12 max 10 1 Water tank lid 7 On off switch with operating light 2 Water inlet 8 Swing out filter holder compartment 3 Water tank 9 Filter...

Страница 20: ...an the appliance afterwards Cleaning and care Note Due to the manufacturing process the appliance may emit some odor when switched on for the first time This is normal and does not indicate any defect...

Страница 21: ...the coffee carefully to ensure that hot coffee is not spilled Hold the glass carafe by its handle only Danger of burns Switching the coffee maker off Let the appliance operate until the water tank 3 i...

Страница 22: ...ndle down to a horizontal position in order to lock the paper filter holder Make sure that the paper filter holder 11 cannot be removed as long as the handle is in a horizontal position If it still ca...

Страница 23: ...Cleaning and care TROUBLESHOOTING Problem Possible cause Solution The brewing cycle does not start Power plug 6 not connected properly Check if the power plug 6 is properly connected to an electrical...

Страница 24: ...placement or storage improper connection or installation as well as force or other external influences are not covered by this warranty We recommend careful reading of the operating instructions as it...

Страница 25: ...209DS 220 240 V 50 60 Hz 730 870 W Fulltrade International GmbH Schl terstra e 5 40235 D sseldorf QA15 0000004292 Lot Nr YM 49 x 27 mm 160204 IM 37 001583_WK2209N_DE GB_V14_150519 indb 11 19 5 15 5 22...

Отзывы: