


English
13
Basic operations
ground noise when no signal is being picked up. You can regulate the
threshold of device activation.
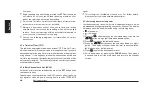
1) Press the
button to access the command menu, then use the
buttons to highlight the
Radio Param
option.
2) Press the
button once more to view the available sub-menus,
then
until the sub-menu
Squelch
(adjustment of squelch
levels) is highlighted.
3) Press
to access the sub-menu.
SQUELCH
will appear on the
display, and a horizontal bar will show the level of squelch inter-
vention currently being used.
4) Hold down the
button until the background noise is continuous.
5) Now press the
button to gradually increase the level of squel-
ch intervention, stopping as soon as the noise disappears.
6) Wait for a few seconds to ensure the noise has disappeared stably.
7) Exit the sub-menu by pressing the
F4/ESC
button, then press it
a second time to exit the main menu and return to the standby
screen.
Be careful not to set the squelch level too high: you may not be
able to receive weak signals.
6.6 Monitor
The monitor function is mainly used for two purposes:
• To allow for reception of extremely weak signals.
• To temporarily disable the CTCSS/DCS and/or selective calling to
allow you to listen to all communications on the tuned channel,
including those outside your network.
Each time the monitor function is activated, will appear on the
display.
6.6.a Monitor from the menu
1) Press the
button to access the command menu, then use the
buttons to highlight
Radio Param
(radio parameters)
from the menu.
2) Press
to view the sub-menus available and
until the
Monitor
sub-menu is high lighted.
3) Press
to insert beside
Monitor
. This indicates that the moni-
tor function is active.
4) Exit the sub-menu by pressing the
F4/ESC
button, then press it
a second time to exit the main menu and return to the standby
screen.
6.6.b Monitor using the microphone
If the monitor function has been activated (hang-up), you will activate
it each time you remove the microphone from its mount.
6.7 Transmission
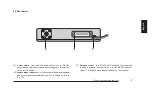
1) Remove the microphone from its mount.
2) Ensure the channel is unoccupied (otherwise you will create inter-
ference), and verify the status LED is off or flashing orange.
3) Hold down the push to talk (
PTT
) button on the hand-held mi-
crophone. The status
LED
[8] to the right of the display will light
up in red to confirm that you are transmitting.
4) Speak in a normal voice approximately 5 – 10 cm from the mi-
crophone.
5) Release the
PTT
at the end of the call, ensuring the status LED is
no longer lit.
6) At the end of the conversation, hang the microphone back up on
Содержание HM135S
Страница 1: ...English...


