background image

G B

P etrol la w n m o w e r

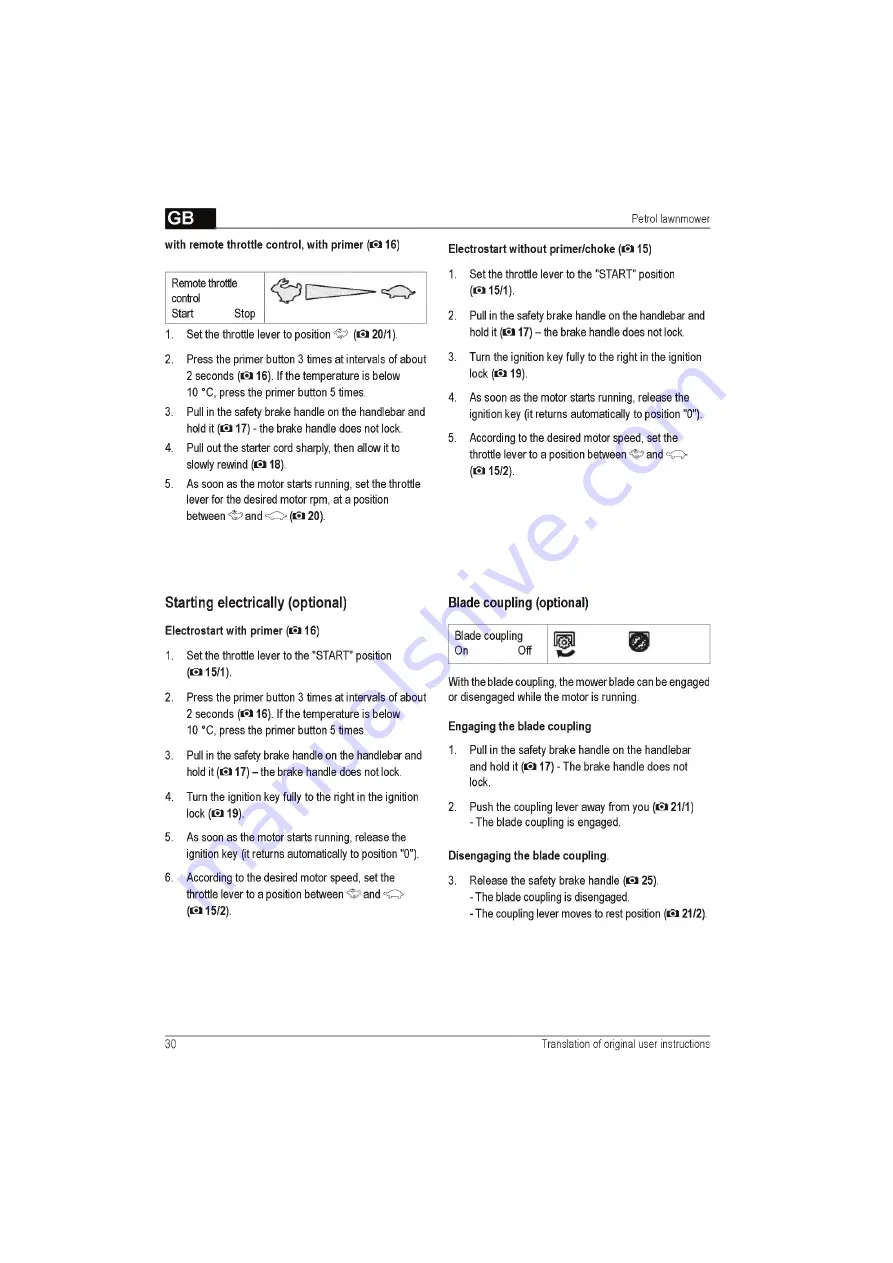
w ith  rem ote throttle control, w ith  prim er 

(Cl 

16)

E lectrostart w ith o u t prim er/choke ( O  15)

Remote throttle


control

Start 

Stop

1.  Set the throttle lever to position <5? 

(Cl 

20/1).

2.  Press the primer button 3 times at intervals  of about


2 seconds 

(Cl 

16).  If the temperature is below

10  °C,  press the primer button 5 times.

3.  Pull in the safety brake handle on the handlebar and


hold it 

(Cl 

17) - the brake handle does not lock.

4.  Pull out the starter cord sharply, then allow it to


slowly rewind 

(Cl 

18).

5.  As soon as the motor starts running,  set the throttle


lever for the desired motor rpm,  at a position


between <5? and 

O


(Cl 

20).

1.  Set the throttle lever to the "START" position


( t i  15/1).

2.  Pull in the safety brake handle on the handlebar and


hold it 

(Cl 

17) -  the brake handle does not lock.

3.  Turn the ignition key fully to the right in the ignition


lock 

(Cl 

19).

4.  As soon as the motor starts running,  release the


ignition key (it returns automatically to position "0").

5.  According to the desired motor speed,  set the


throttle lever to a position between 

and = 0 -


(Cl 

15/2).

S t a r tin g   e le c t r ic a lly   (o p tio n a l)

Electrostart w ith  prim er 

(Cl 

16)

1.  Set the throttle lever to the "START" position


(Cl 

15/1).

2.  Press the primer button 3 times at intervals of about


2 seconds 

(Cl 

16).  If the temperature is below

10  °C,  press the primer button 5 times.

3.  Pull in the safety brake handle on the handlebar and


hold it (C l 17) -  the brake handle does not lock.

4.  Turn the ignition key fully to the right in the ignition


lock ( a  19).

5.  As soon as the motor starts running,  release the


ignition key  (it returns automatically to position "0").

6.  According to the desired motor speed,  set the


throttle lever to a position between 

and 

O


(Cl 

15/2).

B la d e  c o u p lin g   (o p tio n a l)

Blade coupling


On 

Off

With the blade coupling, the m ower blade can be engaged


or disengaged while the motor is running.

Engaging th e blade coupling

1.  Pull in the safety brake handle on the handlebar


and  hold it 

(Cl 

17) - The brake handle does not


lock.

2.  Push the coupling lever away from you 

(Cl 

21/1)

- The blade coupling  is engaged.

D isengaging th e blade coupling.

3.  Release the safety brake handle  ( a  25).

- The blade coupling is disengaged.
- The coupling lever moves to rest position 

(Cl 

21/2).

30

T ranslation  o f orig in al  u ser  instru ctio ns

Содержание Classic 4.26 P-A

Страница 1: ...Garden Hobby QUALITY FOR LIFE ALKD iNFORMATiON i MANUALS i SERViCE BENZINRASENMAHER Betriebsanleilung m o c 470 591 _C I 12 2010...

Страница 2: ...ning 218 N Bruksanvisning 232 FIN Kayttoohjeet 246 EST Kasutusjuhend 260 LV Instrukcijas 274 LT Instrukciju vadovas 288 RUS PyK0B0gcTB0 no KC yaTa l l 302 UA noci6HUK 3 eKcnnyaTa i 316 BG PbKOBOflCTBo...

Страница 3: ...Notice 470 591_c 3...

Страница 4: ...Benzin Rasenmaher 4 Original Betriebsanleitung...

Страница 5: ...ESsM...

Страница 6: ...Benzin Rasenmaher S I o 6 O riginal Betriebsanleitung...

Страница 7: ...s l 470 591_c 7...

Страница 8: ...denen Optionen B e s tim m u n g s g e m a fte V e rw e n d u n g Dieses Gerat ist zum Mahen eines Rasenbodens im pri vaten Bereich bestimmt und darf nur auf abgetrocknetem Rasen eingesetzt werden Ein...

Страница 9: ...llstandsanzeige 14 VerschluRklappe 7 Prallklappe 15 Mulchkit 8 Grasfangbox je nach Ausfuhrung Sym bole am Gerat A Achtung Besondere Vorsicht bei der Handhabung 15 e a Vor Arbeiten am Schneidwerk Zundk...

Страница 10: ...t einer Steigung von mehr als 20 mahen Besondere Vorsicht beim Wenden Nur bei ausreichendem Tageslicht oder kunstlicher Beleuchtung arbeiten Korper GliedmaSen und Kleidung vom Schneid werk fernhalten...

Страница 11: ...hluss austau schen Tankdeckel immer fest schlieSen Wenn Benzin ausgelaufen ist Motor nicht starten Zundversuche vermeiden Gerat reinigen Wenn Motorol ausgelaufen ist Motor nicht starten Ausgelaufenes...

Страница 12: ...en Schnitthohe loslassen Achsverstellung oder Zentralverstellung a 2 3 1 Hebel zum Entriegeln zur Seite drucken und halten 2 Hebel nach links oder rechts in die gewunschte Schnitthohe schieben 3 Hebel...

Страница 13: ...mit Nahr stoffen Die besten Ergebnisse werden durch regelmaSigen Ruckschnitt um ca 2 cm erreicht Nur junges Gras mit weichem Blattgewebe verrottet schnell Grashohe vor dem Mulchen Maximal 8 cm Grasho...

Страница 14: ...en Messer dient als Schwungmasse Beim Starten des betriebswarmem Motors Choke oder Primerknopf NICHT benutzen Reglereinstellungen am Motor nicht verandern Gerat nicht starten wenn der Auswurfkanal nic...

Страница 15: ...M stellen O 14 1 2 Sicherheitsbugel zum Oberholm herziehen und fest halten O 17 Sicherheitsbugel rastet nicht ein 3 Starterseil zugig herausziehen und danach langsam wieder aufrollen lassen O 18 4 Na...

Страница 16: ...chen 5 und O stellen Cl 15 2 E le k tris c h e s S ta rte n O p tio n Elektro Start m it Prim er Cl 16 1 Gashebel auf Position START stellen Cl 15 1 2 Primerknopf 3x drucken im Zeitabstand von ca 2 Se...

Страница 17: ...eitsbugel loslassen O 25 2 Gashebel auf Position O stellen Cl 20 2 Motor schaltet aus Achtung schw ere Schnittverletzung Motor kann nachlaufen Nach Ausschalten verge wissern dass Motor steht 1 Getrieb...

Страница 18: ...efekte Schalldampfer immer ersetzen Ladevorgang 1 Ladegerat aus dem Batteriekasten nehmen 2 Batteriekabel vom Motorkabel trennen a 28 3 Batteriekabel mit Ladegeratekabel verbinden O 29 4 Ladegerat an...

Страница 19: ...ppen n 31 32 Gerat trocken und unzuganglich fur Kinder und un befugte Personen lagern Starterbatterie frostfrei lagern Starterbatterie von Zeit zu Zeit nachladen Benzintank entleeren Zundkerzenstecker...

Страница 20: ...chnitthohe korrigieren Grasfangbox fullt nicht aus reichend Schnitthohe korrigieren Rasen abtrocknen lassen Mahmesser nachschleifen erneuern Gitter der Grasfangbox saubern Auswurfkanal Gehause reinige...

Страница 21: ...erlischt bei SachgemalSer Behandlung des Gerates Reparaturversuchen am Gerat Beachtung der Bedienungsanleitung Technischen Veranderungen am Gerat Verwendung von Original Ersatzteilen nicht bestimmung...

Страница 22: ...ular model in the product illustrations and descriptions of the various options P ro p e r use This equipment is intended for moving lawns on private property and should be used on dry grass only Use...

Страница 23: ...evel indicator 14 Cover flap 7 Deflector plate 15 Mulch kit 8 Grass catcher depending on version Sym bols on the device A Caution Be particularly careful when handling 15 GB Remove the spark plug conn...

Страница 24: ...slopes where the gradient is greater than 20 Take particular care when turning Only use the lawnmower if there is sufficient daylight or artificial lighting Keep the body limbs and clothing away from...

Страница 25: ...tup W arning risk of fire Petrol and oil are highly inflammable I I Always observe the operating instructions sup plied by the motor manufacturer O p e ra tin g flu id s Petrol M otor oil G rade Regul...

Страница 26: ...of individual wheels or axle adjustm ent CJ 4 1 To release the lever press to the side and hold 2 Push the lever to the left or right to select the desired cutting height 3 Let the lever click into p...

Страница 27: ...rass height before mulching 8 cm maximum Grass height after mulching 4 cm minimum Adapt your walking pace to the mulching process do not walk too fast Inserting the mulch kit Caution Risk of injury In...

Страница 28: ...ld the bar and loosen both clamps C l 12 2 2 Move the bar to the desired position 3 Lock the clamps S ta rtin g th e m o to r Caution risk of poisoning Never leave a motor running in an enclosed space...

Страница 29: ...prim er choke Remote throttle control Start Stop o w ithout rem ote throttle control with prim er O 16 1 Press the primer button 3 times at intervals of about 2 seconds O 16 If the temperature is bel...

Страница 30: ...ition between and 0 Cl 15 2 S ta rtin g e le c tr ic a lly o p tio n a l Electrostart with prim er Cl 16 1 Set the throttle lever to the START position Cl 15 1 2 Press the primer button 3 times at int...

Страница 31: ...1 Release the transmission contro handle 24 The wheel drive is switched off Blade coupling U P On Off 1 Release the safety brake handle O 25 2 Set the throttle lever to position O Cl 20 2 The motor is...

Страница 32: ...The starter battery is maintenance free and is normally charged by the lawnmower In certain cases however the battery will need to be charged by the user Before the initial start up of the lawnmower I...

Страница 33: ...t dry and which cannot be accessed by children or unauthorised persons Store the starter battery where it will be protected from frost Recharge the starter battery from time to time Drain the fuel tan...

Страница 34: ...Adjust the cutting height Grass catcher does not fill sufficiently Adjust the cutting height Allow the lawn to dry Resharpen replace the mower blade Clear the grille on the grass catcher Clean the ou...

Страница 35: ...warranty is valid only if The warranty is no longer valid if The equipment has been used properly The equipment has been tampered with The operating instructions have been followed Technical modificat...

Отзывы: