background image

20

Fig 32

13. Media

Time Shifting and Play Pause.

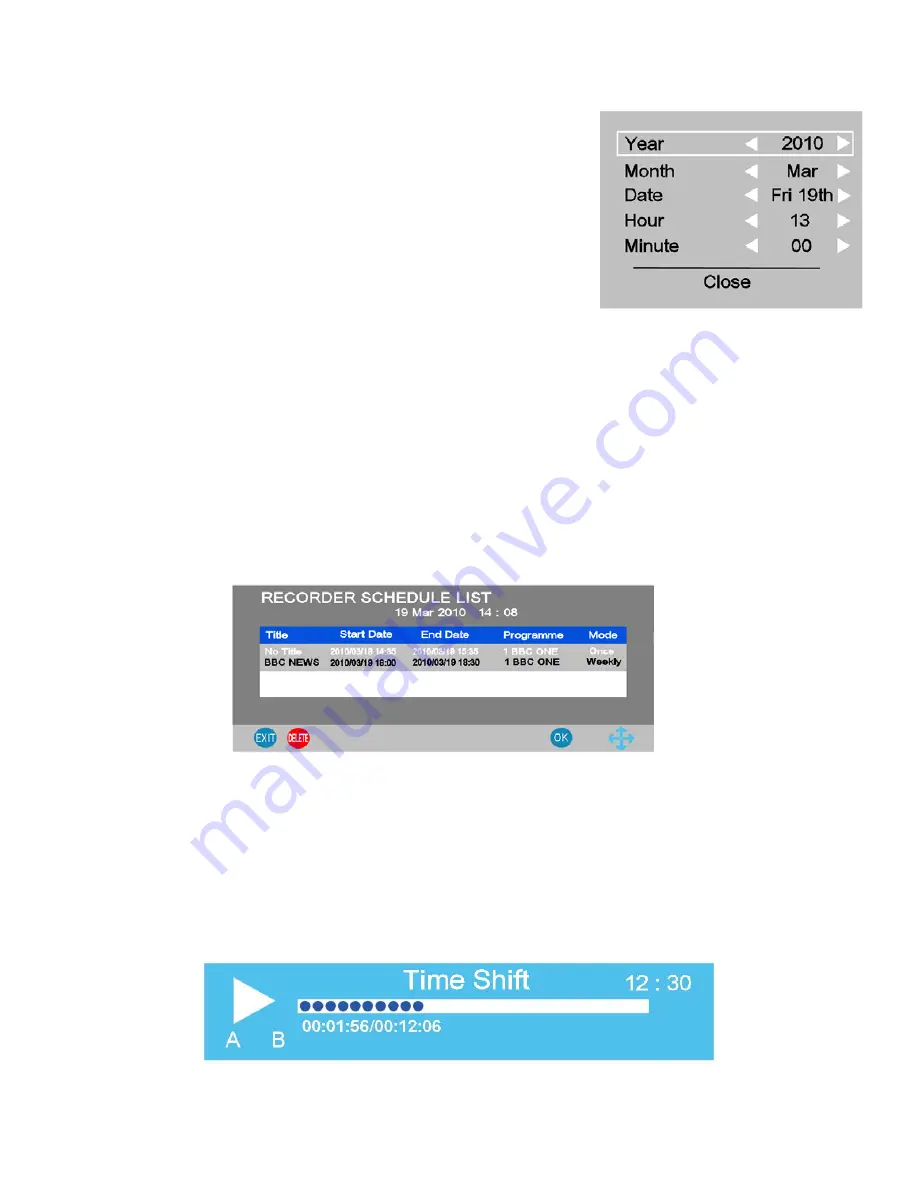
If you need to pause a “Live” tv programme while you “make a cup of tea”, press the “T-Shift” button and the 
picture will “Freeze” and the “Time Shift” menu will be shown “ Fig 34”.
When you wish to resume press “Play”, the programme will resume from the paused section. To end the “Time 
shift” mode press “Stop”, the TV will revert to normal operation.  Stopping “Time Shift” will clear the memory 
used.
The amount of time you “Pause” is shown in the display below the “progress bar”. To pause the Playback press 
the “T-Shift” button, to resume play, press the “Play” button again.

19

Programme. 

Displays the name of the programme selected.

Mode

. Sets the number of times the recording will be made. 

Select from Auto, Once, Everyday, and Weekly.

AUTO

. This selection automatically sets the recording timer 

from the EPG and cannot be changed.

Once, Everyday and Weekly

, opens the menu as in Fig 32 and 

allows changes to be made.

Start Date / Time.  End date / End Time

. To change details, 

press the 

button and Fig 32 will be shown. Using the 

/

/

/

buttons, you may change the details.

On completion, select “CLOSE” and Fig 31 will be re displayed, 
showing the changes, if any have been made.  Press “OK” to 
confirm.  

Fig 33

Timer Recording

.

To select the “Recording Timer” feature, press the “Menu” button and see “Fig 4” on page 11  Use the 

button to select “Recorder Mode” and press “OK”.  The menu “Fig 30” will be shown.  All the settings are then 
as the EPG Recording as shown above.  To “EXIT” the Timer menu, press ”OK” to confirm the settings and 
then press “EXIT”. 

Schedule List.

To see what has been set in the “Schedule list” press the “Green” button.  To “Delete” a setting use the 

/

buttons and press the “Red” button. To confirm the Schedule press “OK”. To exit the menu press “EXIT”.

Fig 34

19

Содержание ALED3211E 3U

Страница 1: ...ALED3211E 3U Super Slim Digital LED TV Incorporating Led Backlight Technology with DVBt Freeview HDMI PVR Customer Help Line 0845 293 7698 Website www ekey co uk...

Страница 2: ...Basic Tuning 11 OSD Menu 12 TV setting 14 DTV Manual Tuning 14 ATV Manual Tuning 14 Programme edit 15 Cam Module 16 9 Teletext Analog 17 10 Teletext Digital 17 11 Digital Radio 17 12 EPG Electronic Pr...

Страница 3: ...in is intended to show that this appliance must not be placed with ordinary household waste at the end of its useful life To prevent possible harm to the environment or human health from uncontrolled...

Страница 4: ...dilute mild detergent Do NOT use petrol based fluids or abrasive materials LCD Screen Do not hit or cause impact to the LCD screen The screen consists of many individual pixels and is easily damaged B...

Страница 5: ...check the contents of the TV before you continue If any item is missing please contact your point of purchase User Manual Remote Control 2x Female Scart to Mini Scart 4 Jack to RCA x 3 lead CVBS Jack...

Страница 6: ...will shift the selection upwards 4 CH Reduces channel selection by 1 with each press In menu mode will shift the selection downwards 5 Menu Selects the MENU function If in a sub menu will revert to pr...

Страница 7: ...gain to restore sound 4 INFO Displays TV settings and channel being viewed 6 ASPECT Selects different picture size modes 8 NICAM In Analog TV mode switches between Mono and Nicam In DVBt mode selects...

Страница 8: ...ean the compartment with soapy water and scrape any residue from the contacts To NOT touch or ingest battery residue Should you swallow chemicals leaked from a battery please URGENTLY consult a medica...

Страница 9: ...er View card to be used USB PVR connection to Hard drive or Memory stick HDMI 1 2 3 Input from HDMI sources High Definition VGA PC input RGB CVBS Input IMPORTANT When making connections ensure the TV...

Страница 10: ...VGA Under Side Connectors HDMI Y Pb Pr and Audio Connect Y Pb Pr inputs and Audio if required Use SOURCE button to select Y Pb Pr Connect HDMI inputs Use SOURCE button to select HDMI 1 2 or 3 Hard Dr...

Страница 11: ...he SOURCE button on the Remote Control or the INPUT button on the TV Using the buttons select the Source Input required and press OK to select Y Pb Pr Lead supplied CVBS R L audio Lead supplied Green...

Страница 12: ...nnect the TV to the Mains supply and suitable aerial It is advisable not to connect other apparatus until you have established that the TV is working correctly If using the TV for DVBt Freeview viewin...

Страница 13: ...on colour depth Sharpness Adjusts the clarity of the picture If the signal is noisy analog then this setting should be reduced to mask the noise Tint Only available when using NTSC sourced material fr...

Страница 14: ...rox 5 minutes if the Signal is removed Time Zone The clock is able to be set to different world time zones select the time zone to suit OPTION Fig 9 Language English only available in the UK Audio Lan...

Страница 15: ...al Tuning Fig 12 It may be necessary to add more digital channels as they are provided by the programme providers or manually tune stations for reasons above Select DTV Manual Tuning and press Ok Usin...

Страница 16: ...t the channel you wish to Skip Press Blue and a Blue dot will be shown next to the channel selected To remove the skip function press the Blue button again When a channel has been selected to Skip you...

Страница 17: ...the TV Reconnect the TV and switch on Select DTV Insert your Pay per view card Do NOT touch the gold contacts Press the LCD Menu button and select TV Setting menu Select CI Information and press If e...

Страница 18: ...Press again to exit the feature COLOUR BUTTONS Red Green Yellow Blue are used as fast access buttons to pages of text which are highlighted at the bottom of each text page HOLD Press to hold any text...

Страница 19: ...G bytes Before you can record the Media Memory must be formatted This is done by the TV Plug the Media Memory into the USB connector both HDD and USB Memory stick must be formatted Note You MUST use a...

Страница 20: ...of the buttons will change the allowable time of Time shifting press OK to continue If you do not want to Time shift select Cancel The TV will now perform a system check and display Fig 28 Fig 25 Fig...

Страница 21: ...on automatically sets the recording timer from the EPG and cannot be changed Once Everyday and Weekly opens the menu as in Fig 32 and allows changes to be made Start Date Time End date End Time To cha...

Страница 22: ...To stop Repeat press the Stop button Pause To Pause play press the T Shift button To resume playing press Play Fig 38 Fig 37 20 13 Media Media Playback The TV is able to display Photographs in JPEG fo...

Страница 23: ...OK The file will start to play in the box on the right To see the full size picture press Play To pause the movie press the Play Pause button To resume press the Play button again To stop the playbac...

Страница 24: ...6W Tuning Analog Band 1 Band 3 UHF Digital UHF Inputs 2 x mini Scart 3 x HDMI VGA CVBS L R audio PC Audio Y Pb Pr USB Outputs Scart OSD Language English Audio Nicam stereo Mono Analog Wall Mounting Ad...

Страница 25: ...aerial signal checked If indoor aerial it may need an outdoor aerial Bright dots or Dark dots Pixel damage This is not uncommon It is not covered by warranty Lost password 7948 PC OPERATION No picture...

Отзывы: